
WARGAMES DESIGNS ECW BLOG
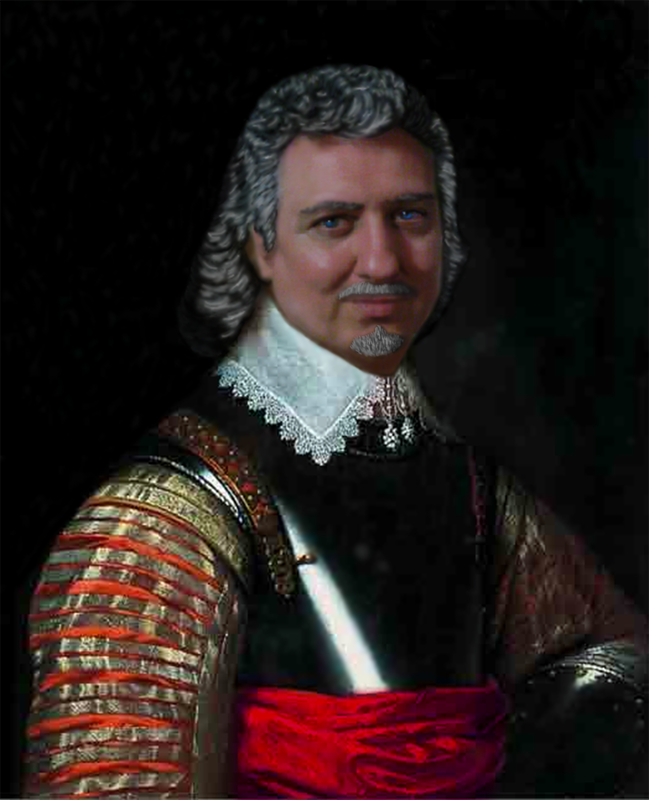
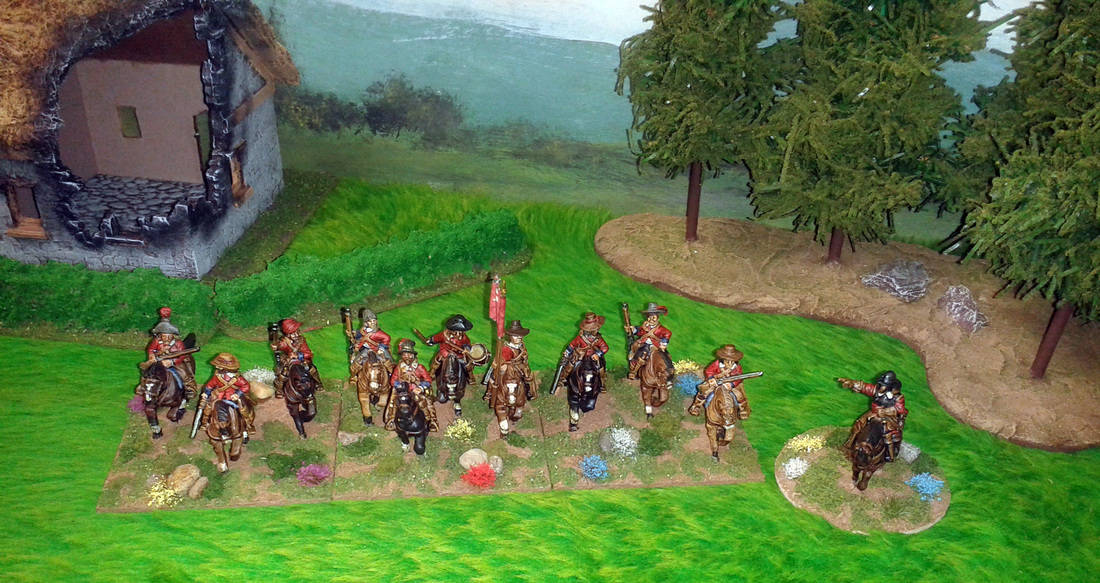
The Very Famous Royalist General Sir Stephen Wylde
|
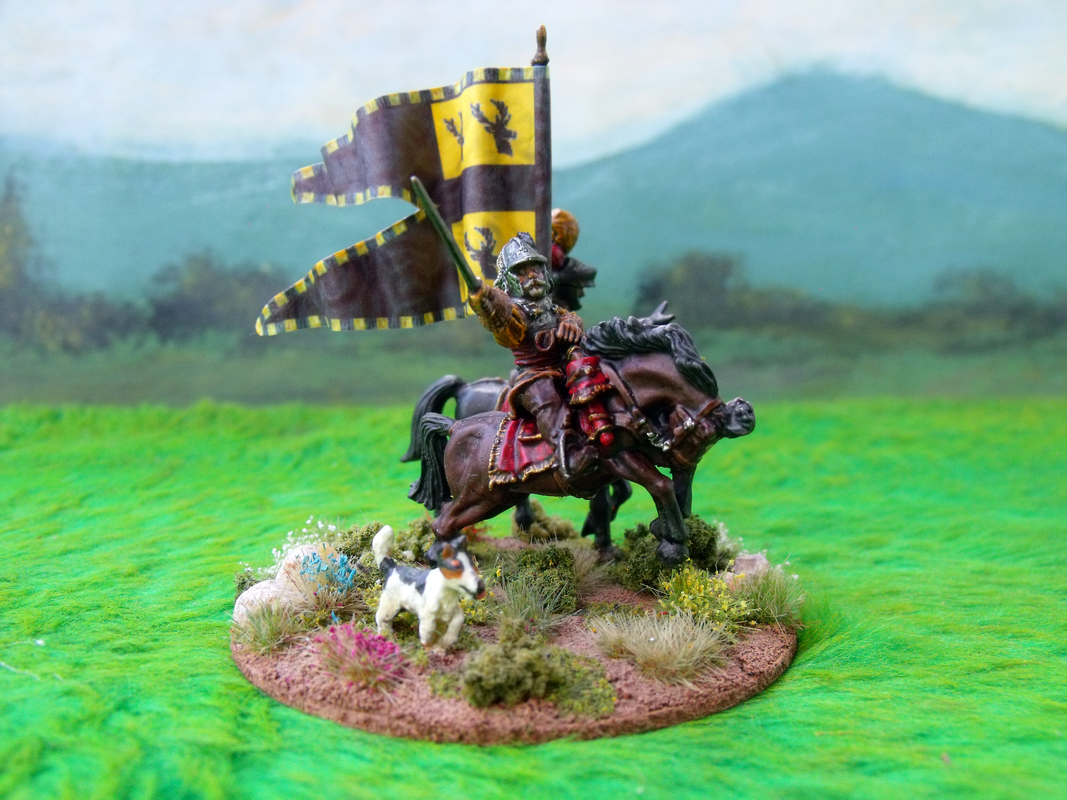
Sir Stephen with his Personal Standard Bearer and his Faithful Hound Daisy
|
|
The Very Famous Royalist General Sir Stephen Wylde
|
Sir Stephen with his Personal Standard Bearer and his Faithful Hound Daisy
|
|
This is parts 1 & 2 of the Pike & Shot combined unit rule amendments in a fancy dandy PDF format, I have also included the Characters PDF for anyone who hasn't downloaded it before.
3 Comments
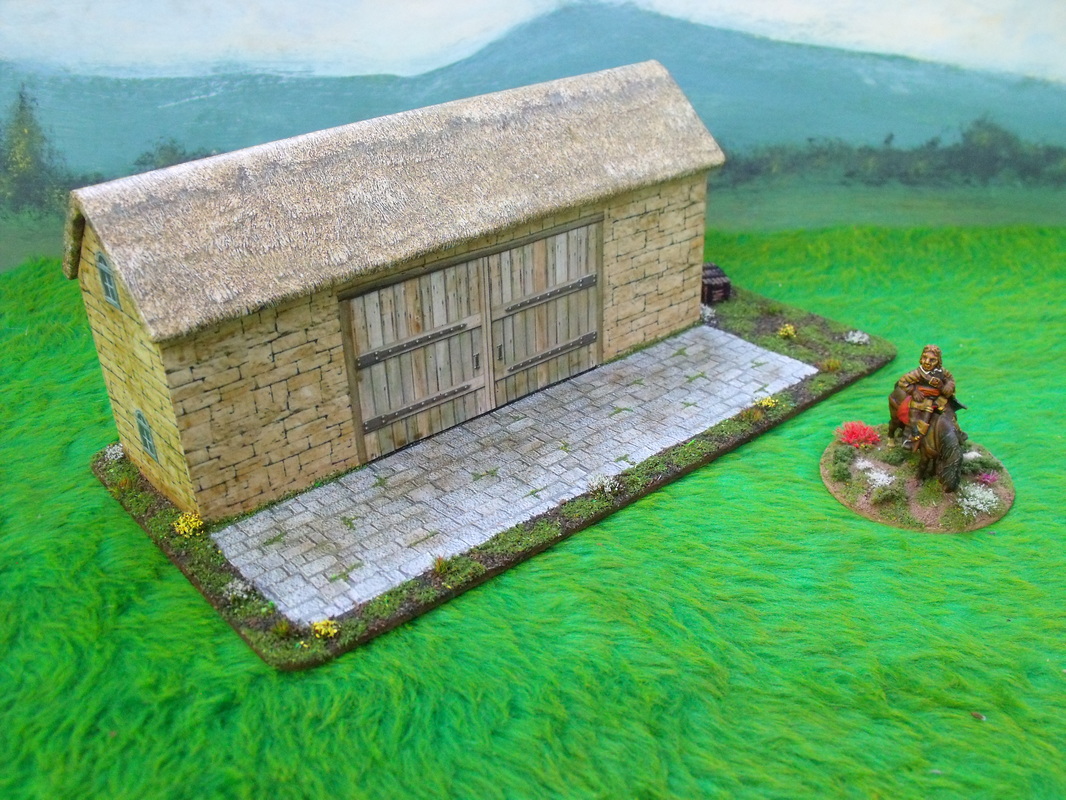
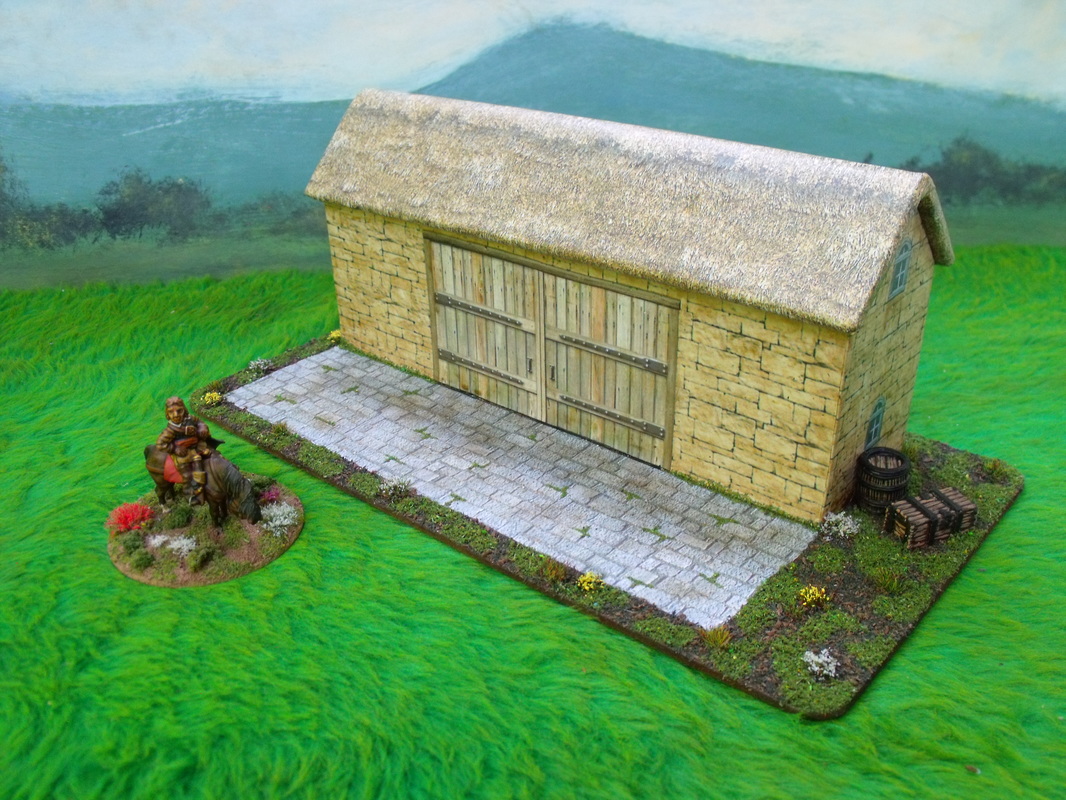
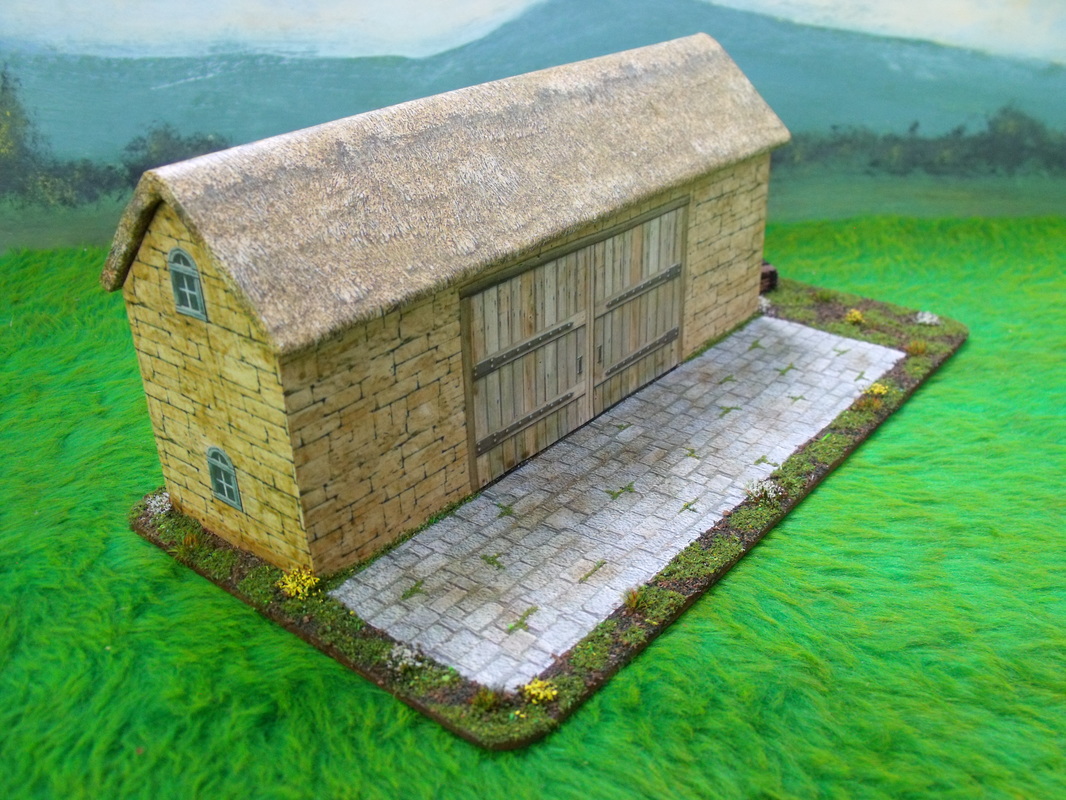
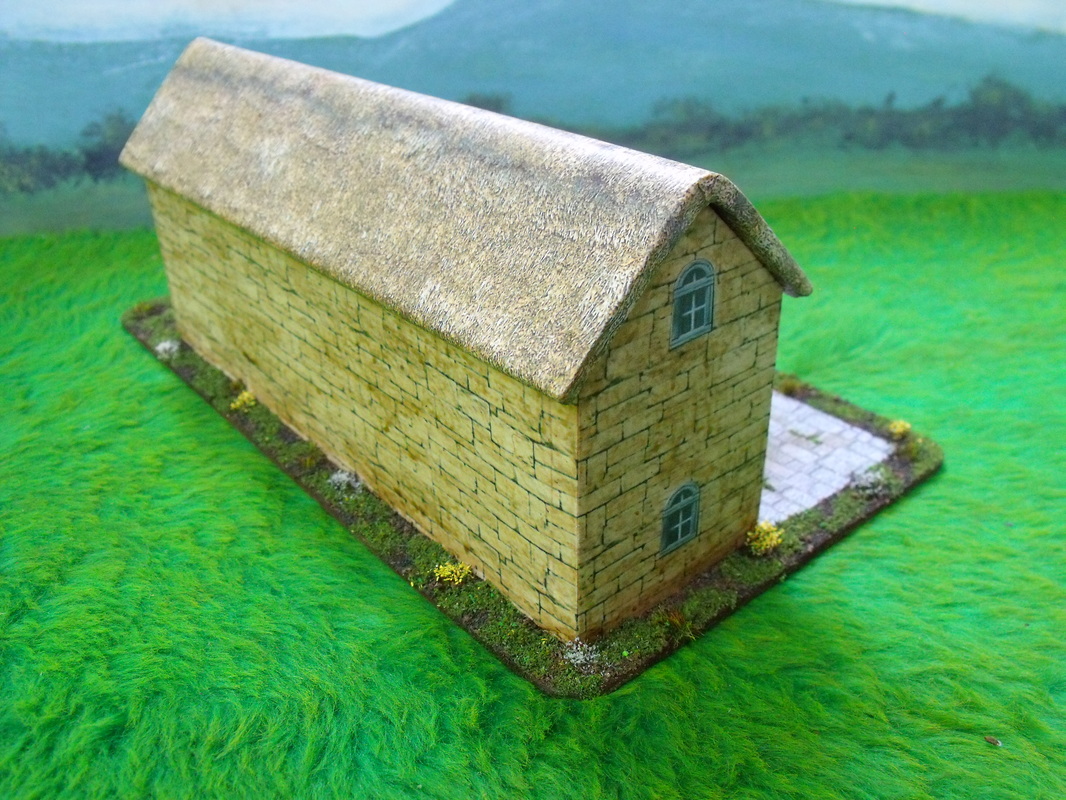
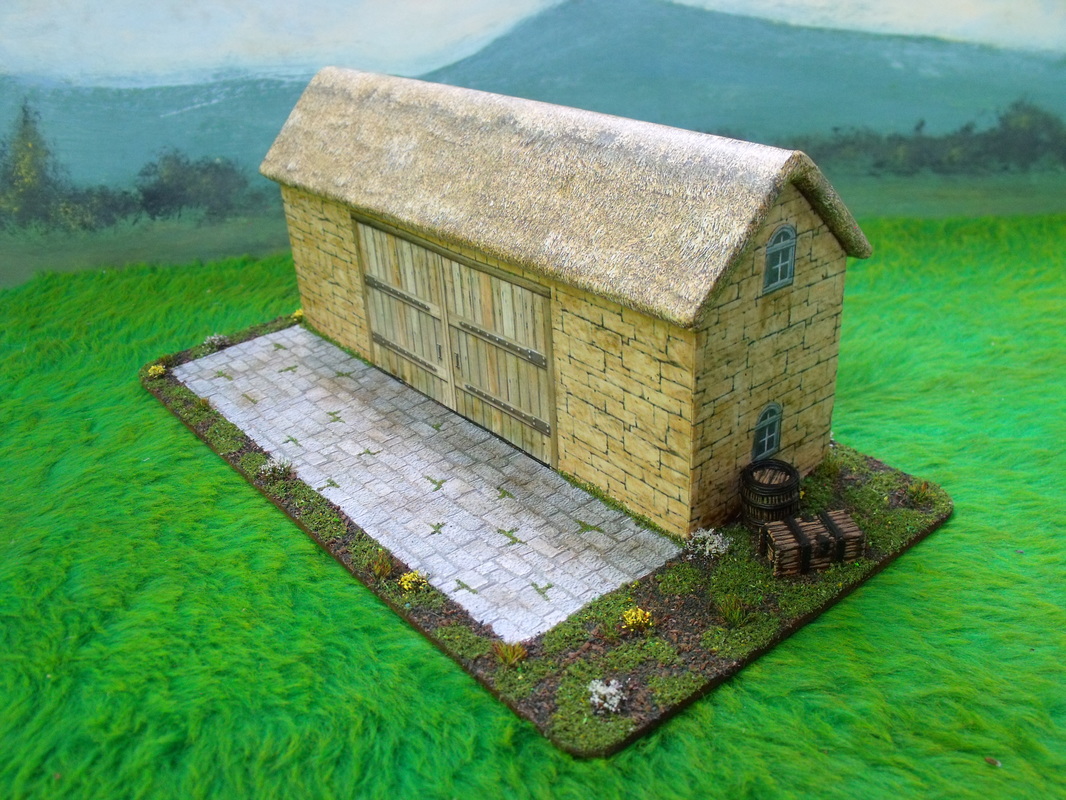
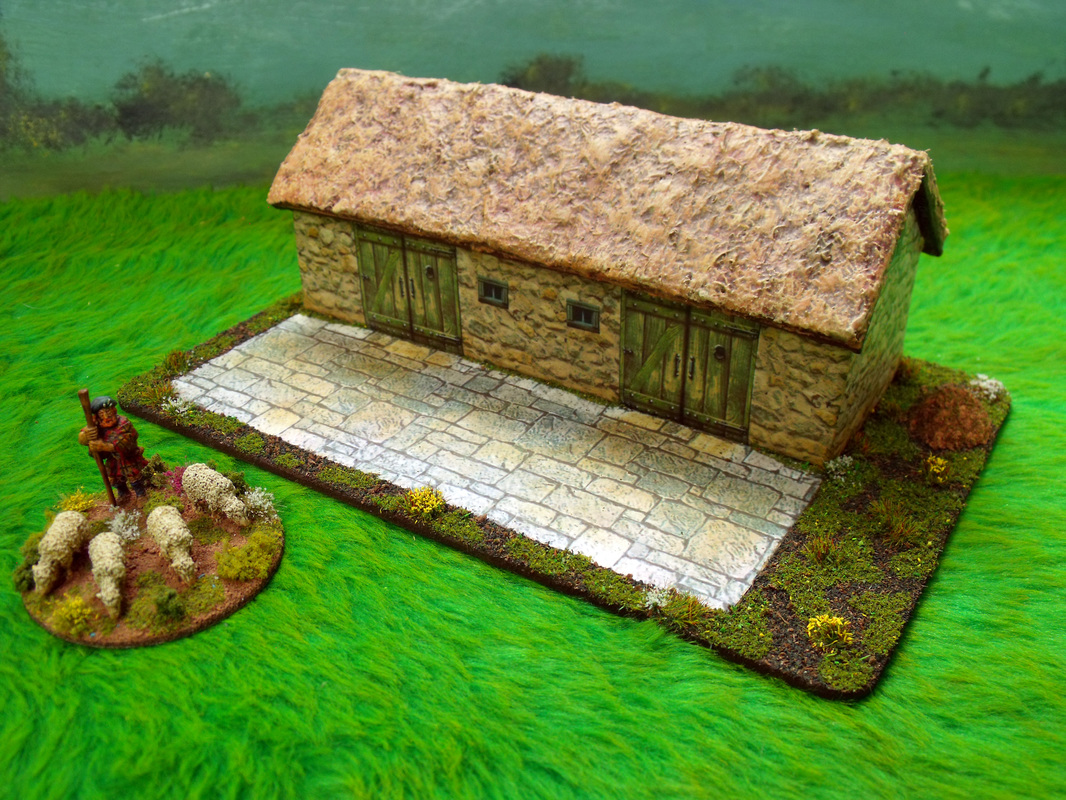
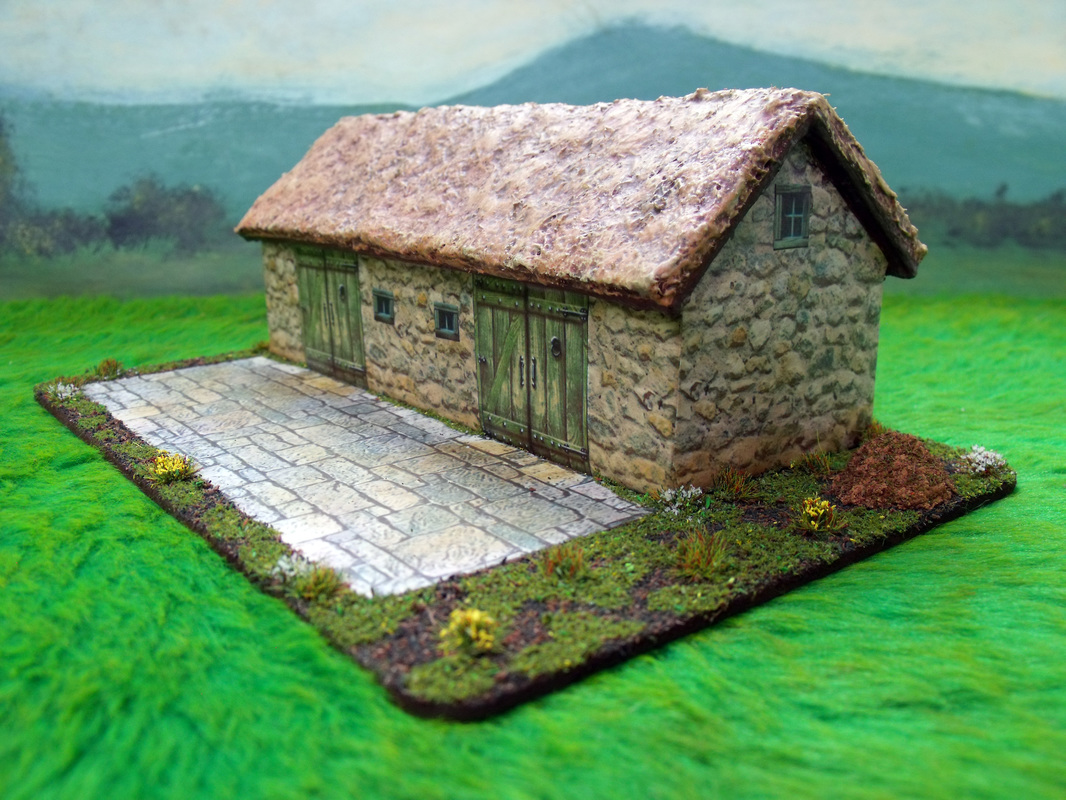
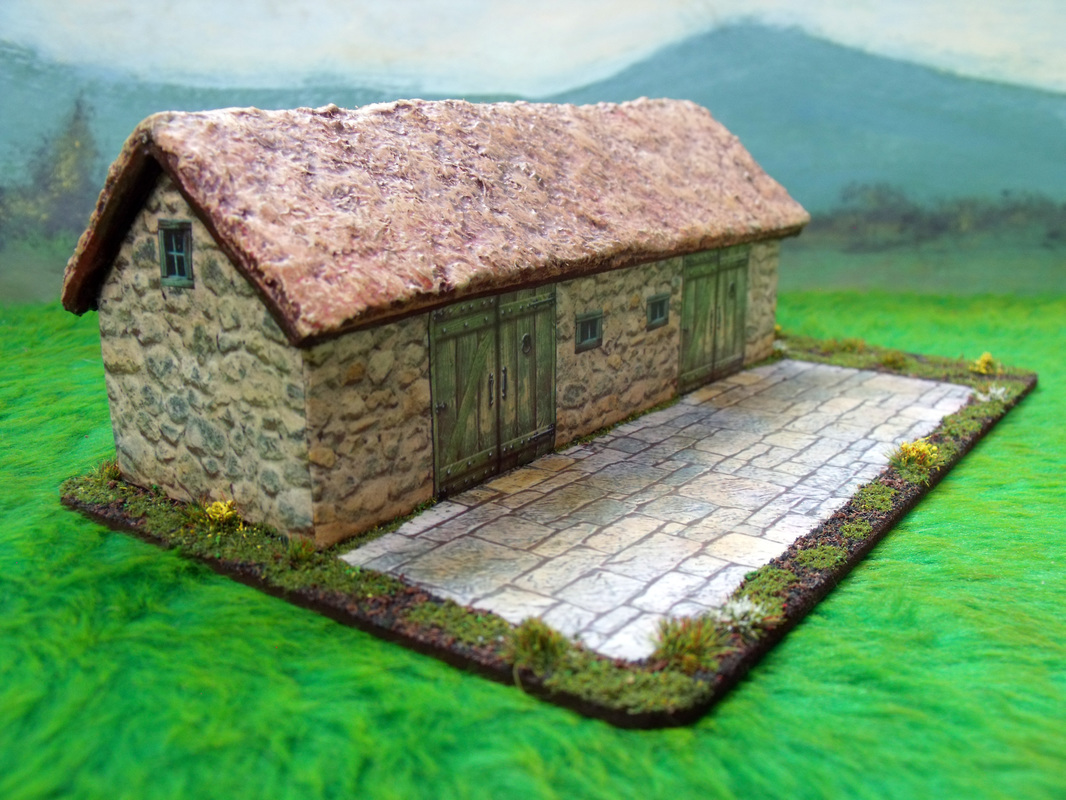
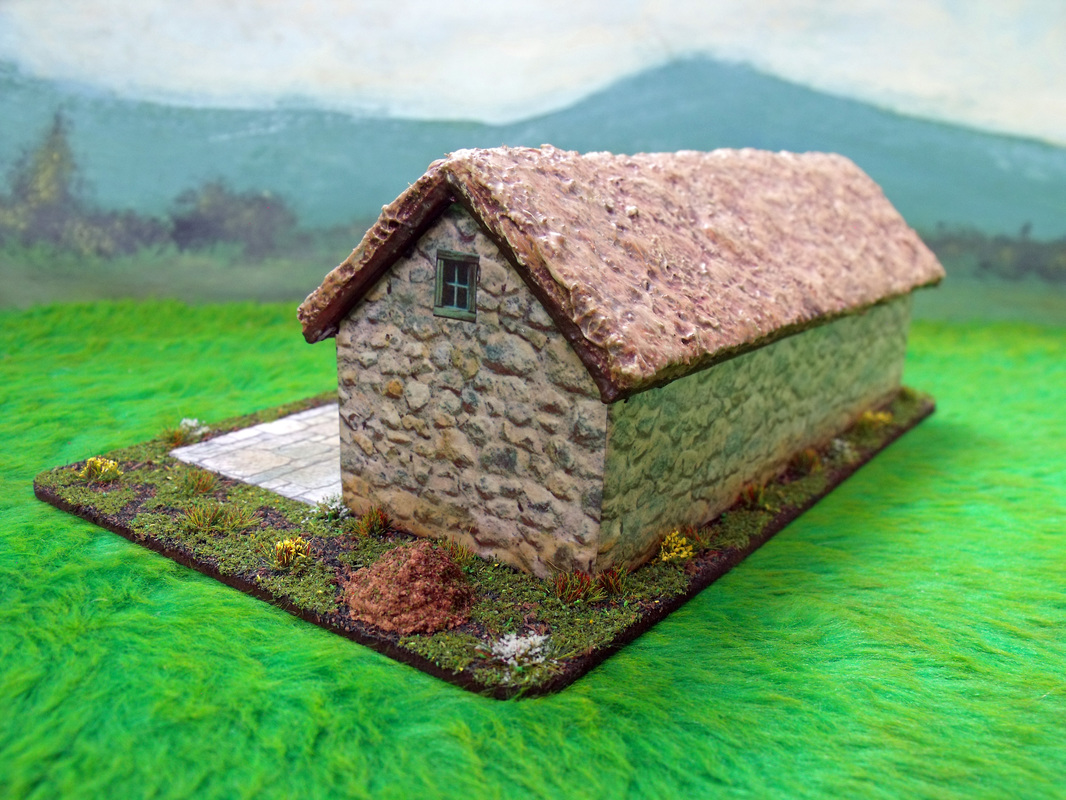
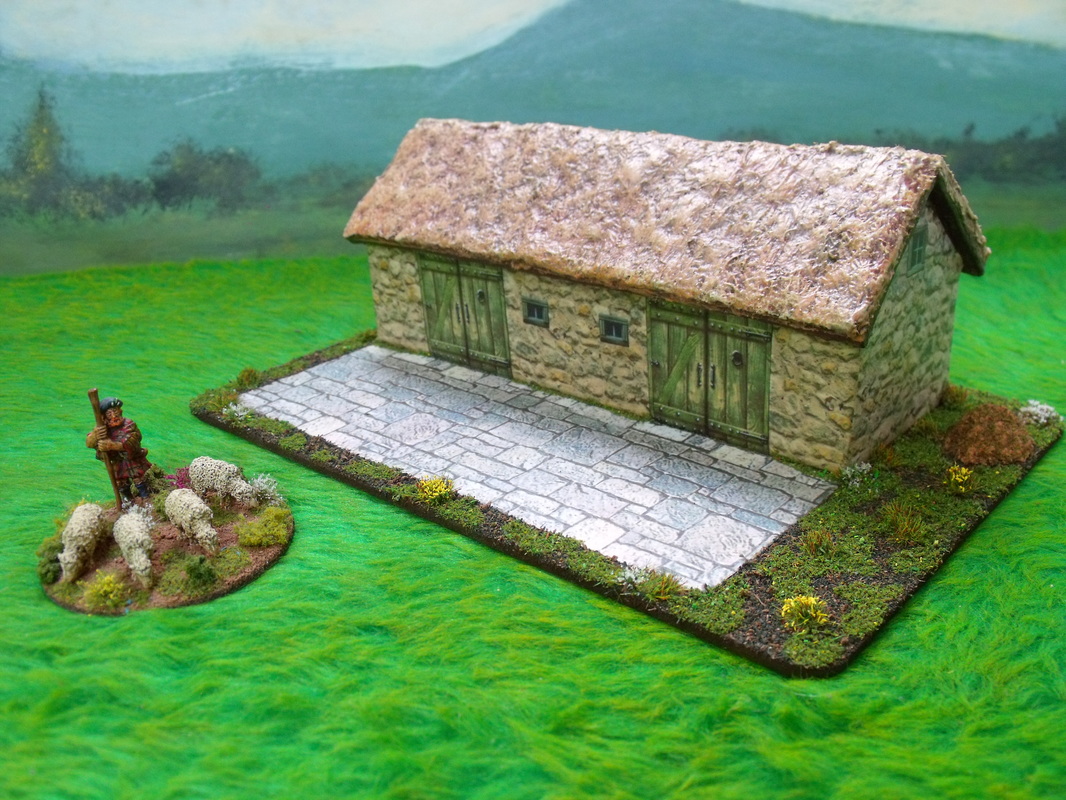
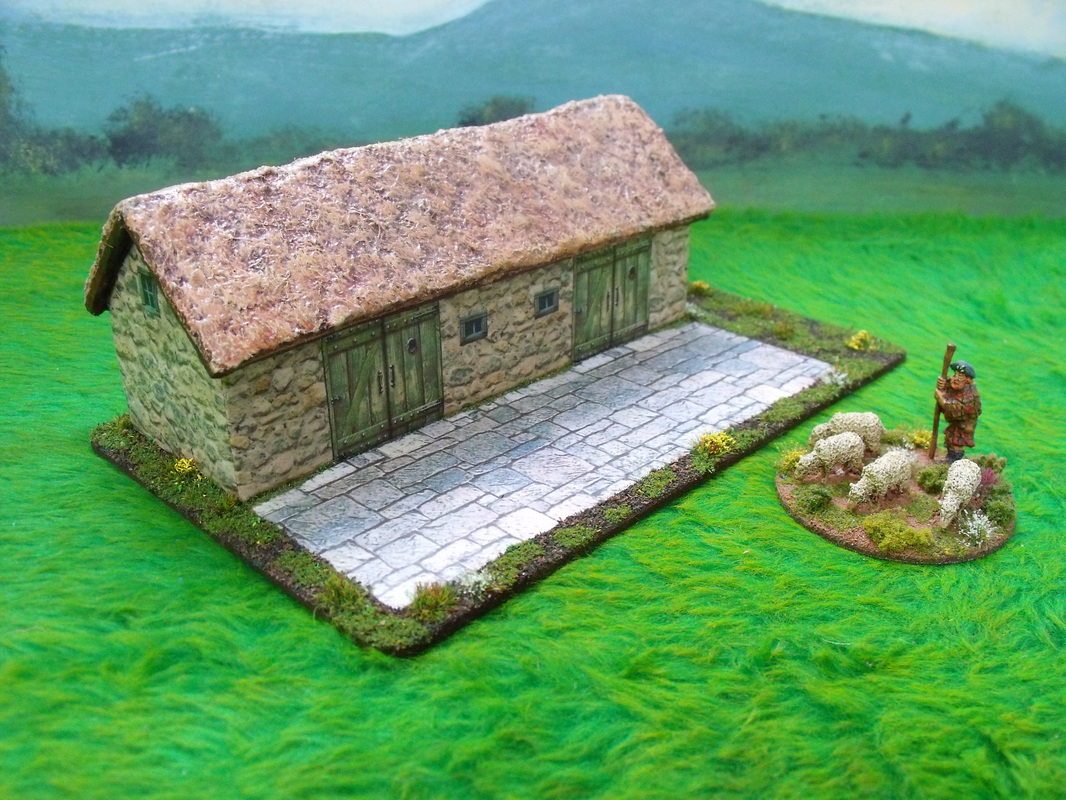
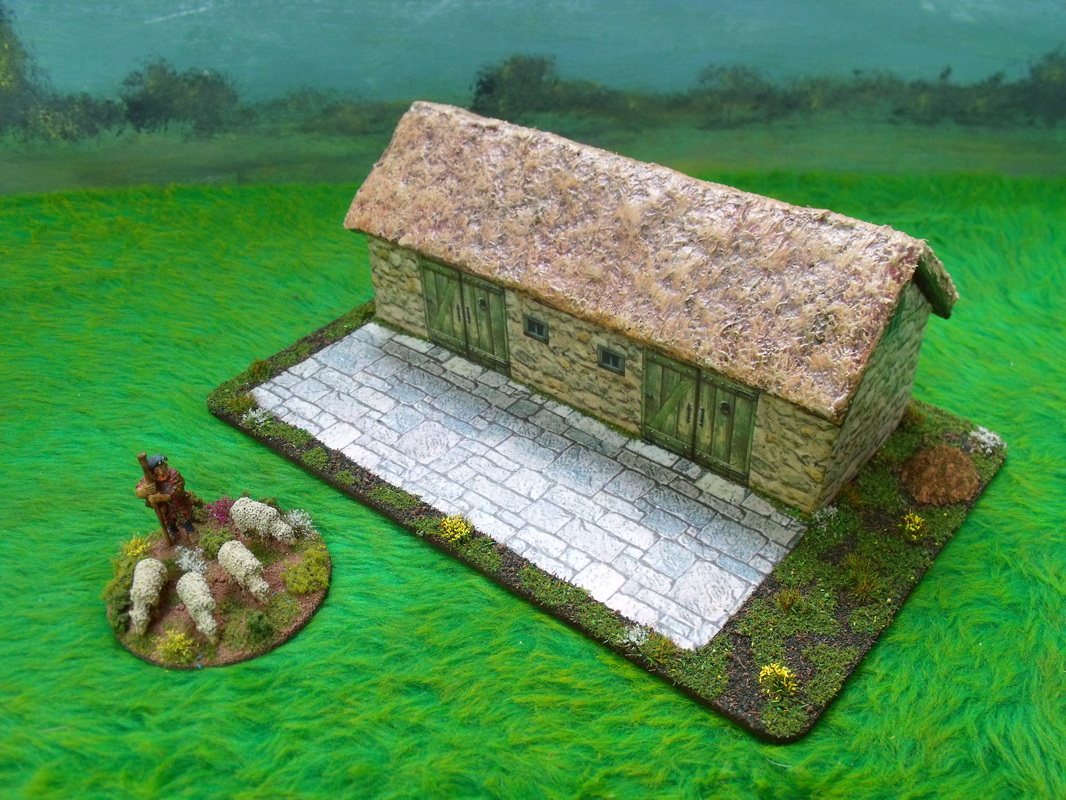
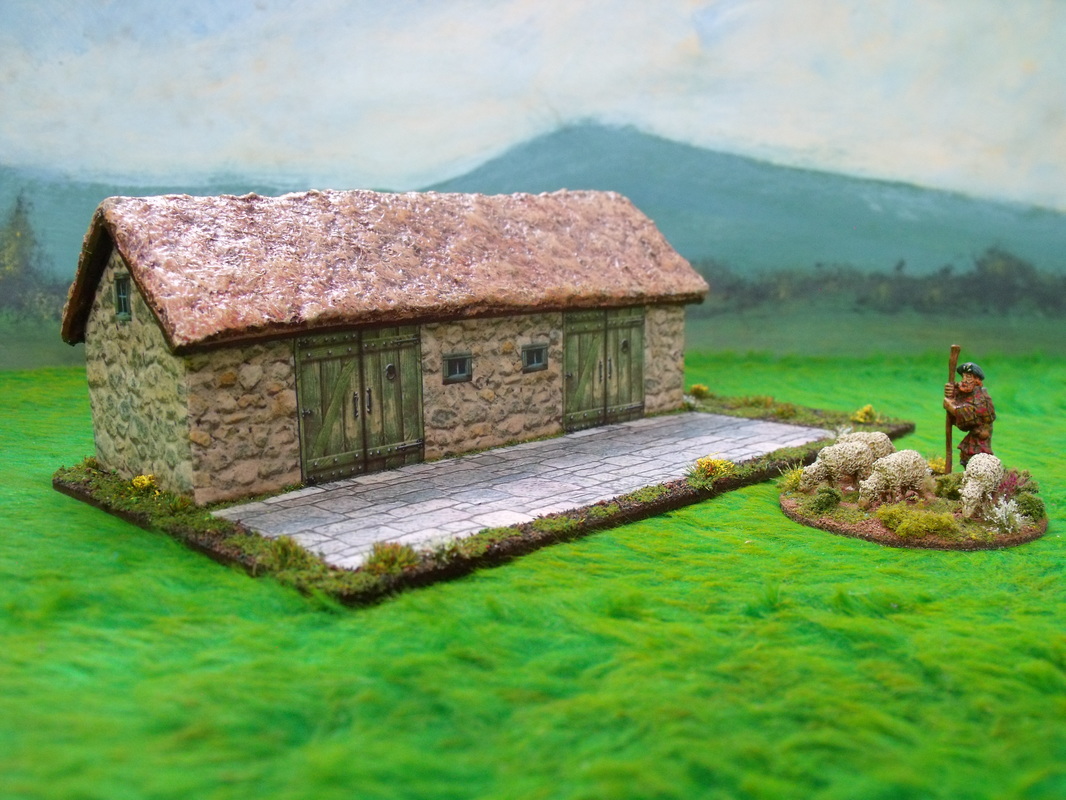
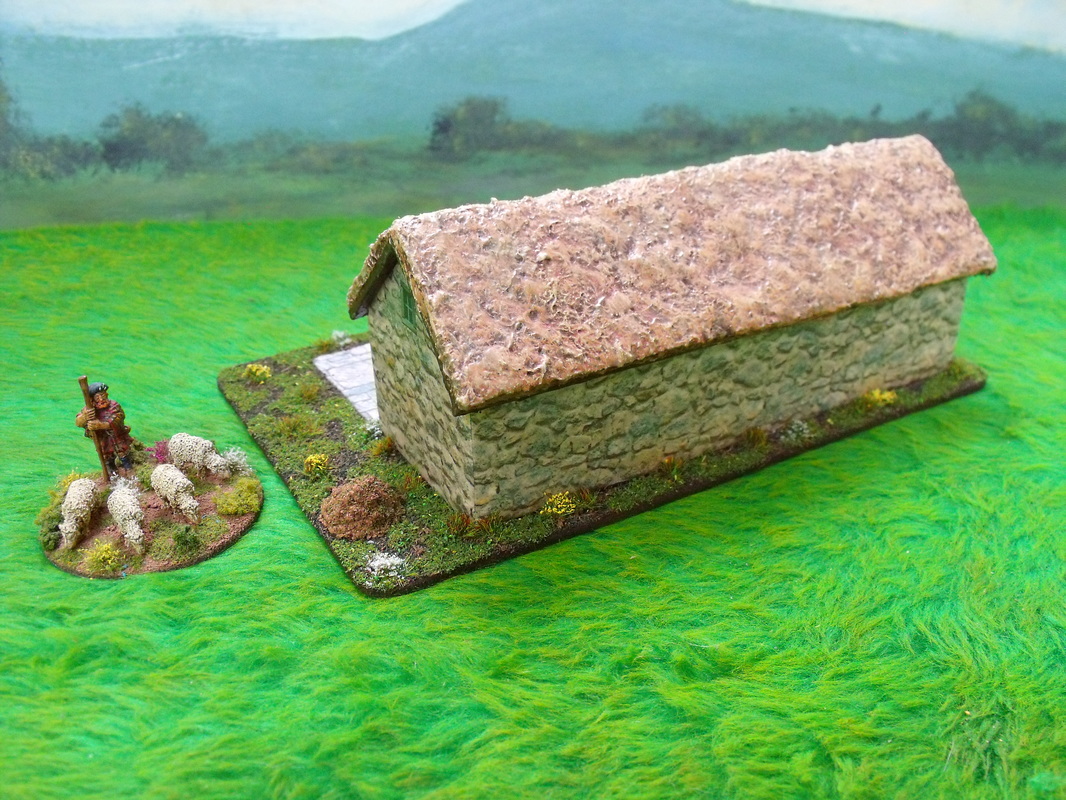
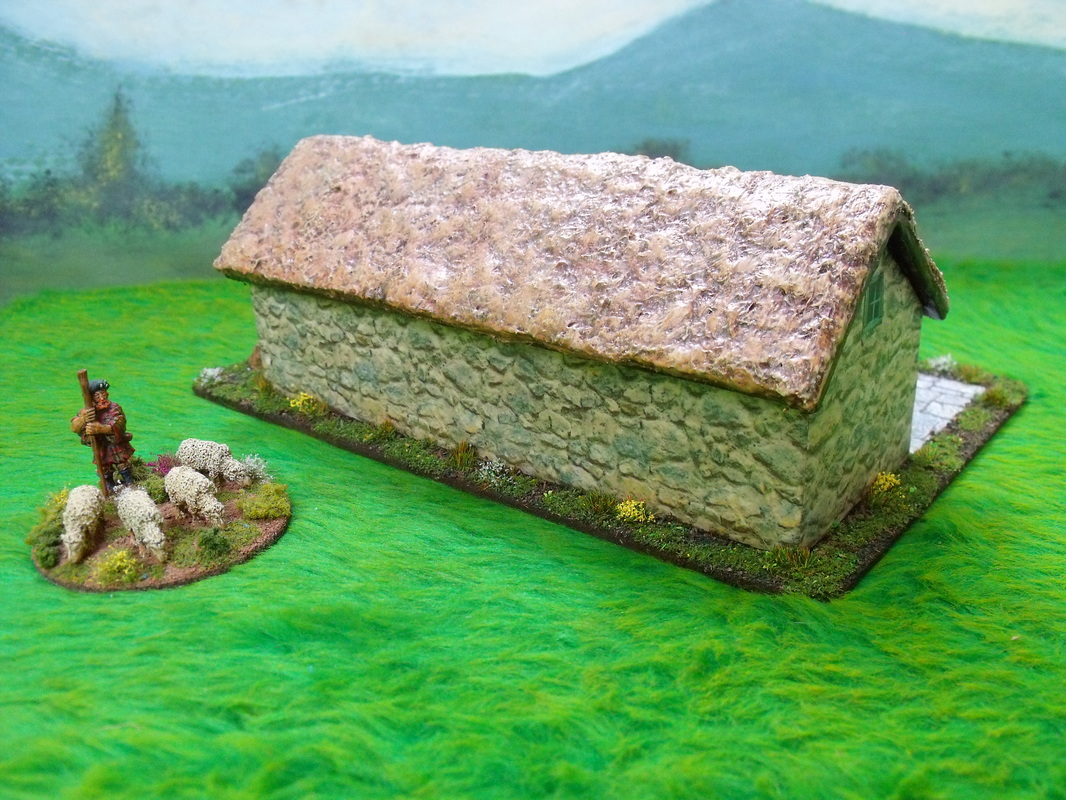
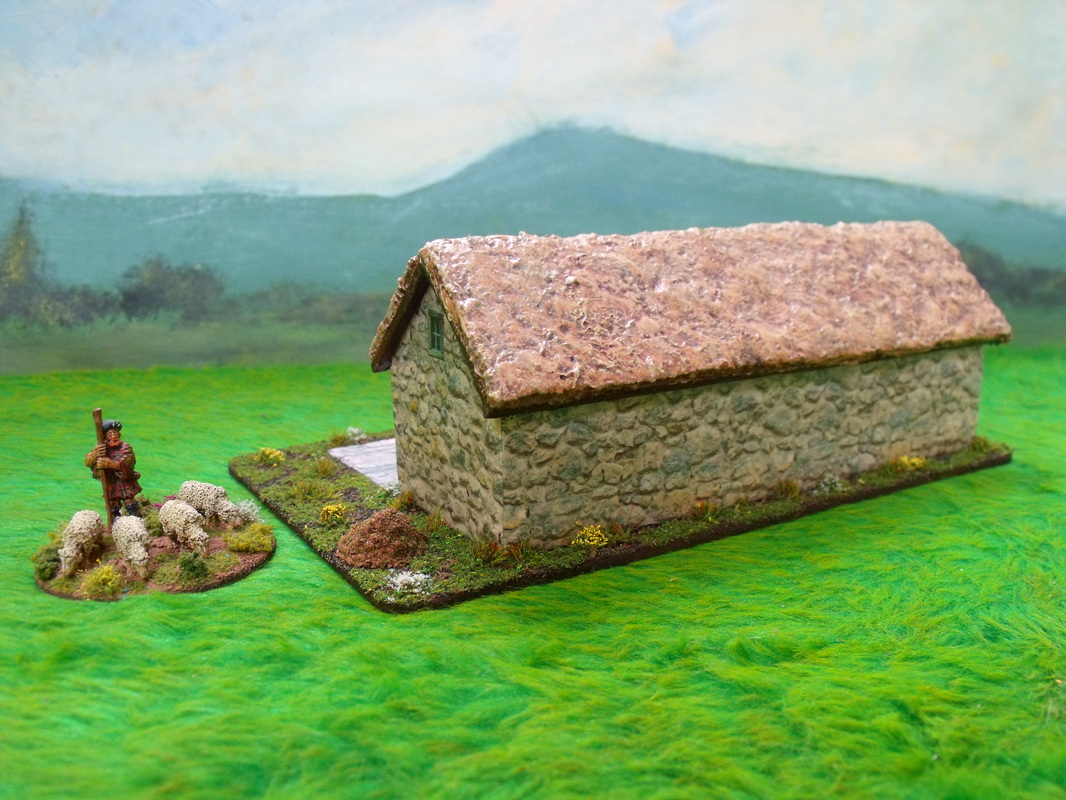
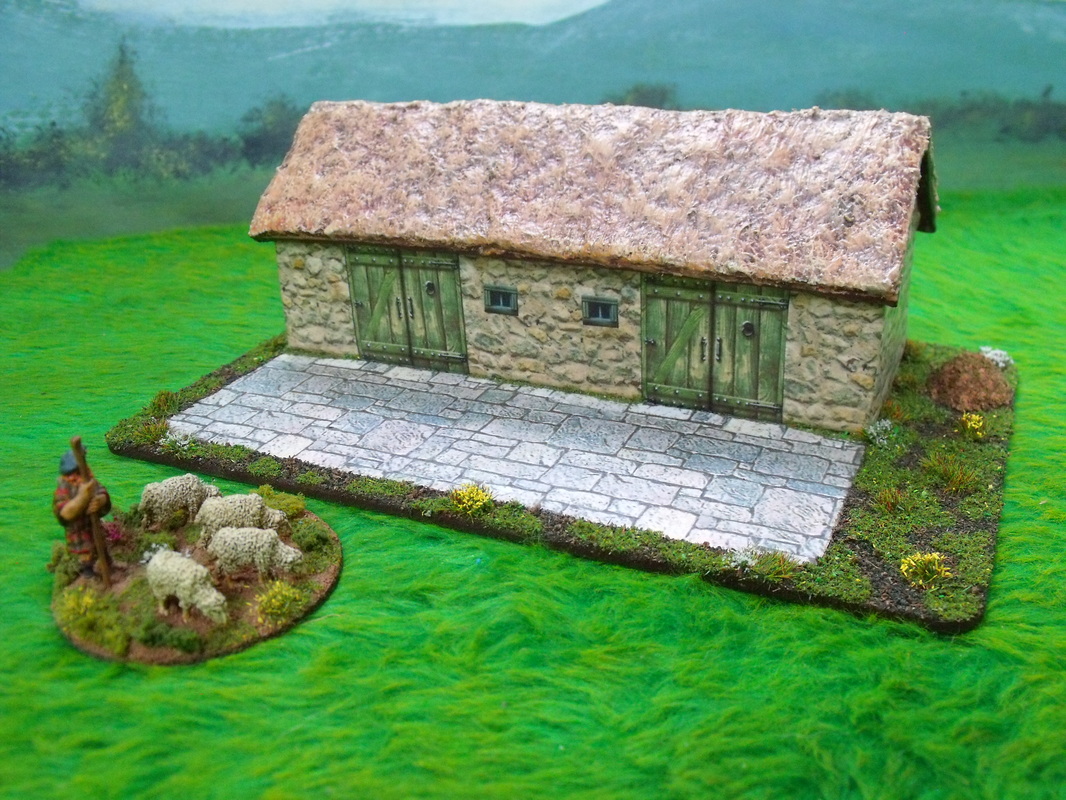
I built his building as a sort of experiment really just to try out some new wallpapers and see how they looked on a finished building. I wanted a new barn or warehouse for my ECW collection but also I wanted to try out a Cotswold stone wallpaper that I made a few months ago as I wasn't at all sure that I liked it, at the same time I had bought a thatch wallpaper and again I wasn't sure that it would look so good on a finished building. The structure itself was made in the usual way using a foamboard shell and this time I used a pre-formed roof made from a single piece of packaging that I got from a local supermarket. As the roof was pre-formed it dictated the size of the barn in both width and length but the height was determined by the barn doors, hence the long thin appearance of the building. With the bare bones of the building completed I decided to wallpaper the walls and then the roof, which was not attached at this time. Once dry the roof was glued to the walls and the windows and doors were cut out and glued on and the whole building was then glued down to the base board. The next job was to glue down the paved area and then I painted the bare areas to the colour of the dirt coloured scatter material that I would later use to cover the base. The walls looked too new and probably too light for my taste at this stage so I decided to apply a brown wash to tone it down and make it look a little more weathered. Back to the base I fixed down all the bushes and flowers and then added a crate and a barrel as in my mind at least I pictured this building as more of a warehouse than a barn. I then turned back to the building and coated it all over with acrylic varnish to protect the paper surfaces and also help to bring out the colours a little more. Finally the scatter material was added to the base, firstly the dirt and once dry I added the grass areas, this time though I decide to add some grass/weeds coming through the paved area to complete the look I was after and also again as an experiment to see how it looked. Once it was finished I set it aside and had a good look at it from the distance it would be viewed at from the tabletop and I was actually really impressed with how well the stone looked but especially impressive was the thatch effect. I have to say that wallpapers are so much easier to use than scratchbuilding in the normal way and in my opinion look just as good.
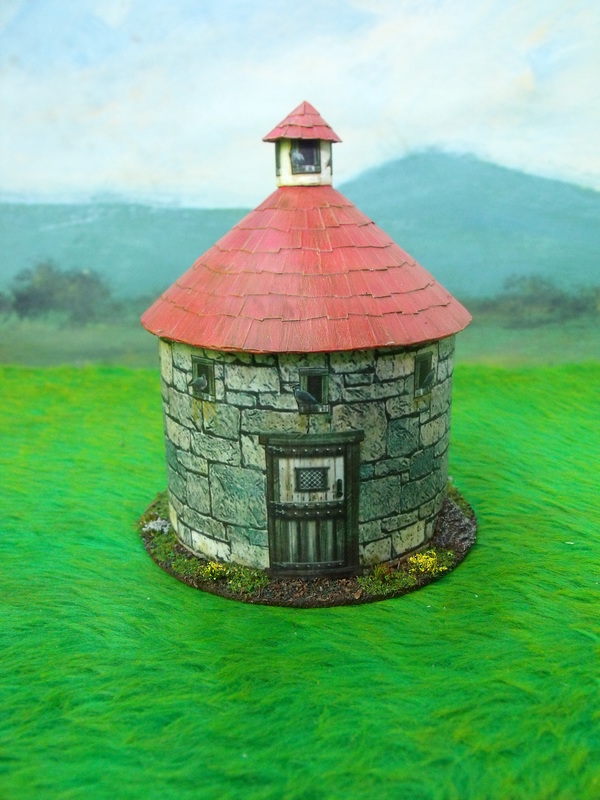
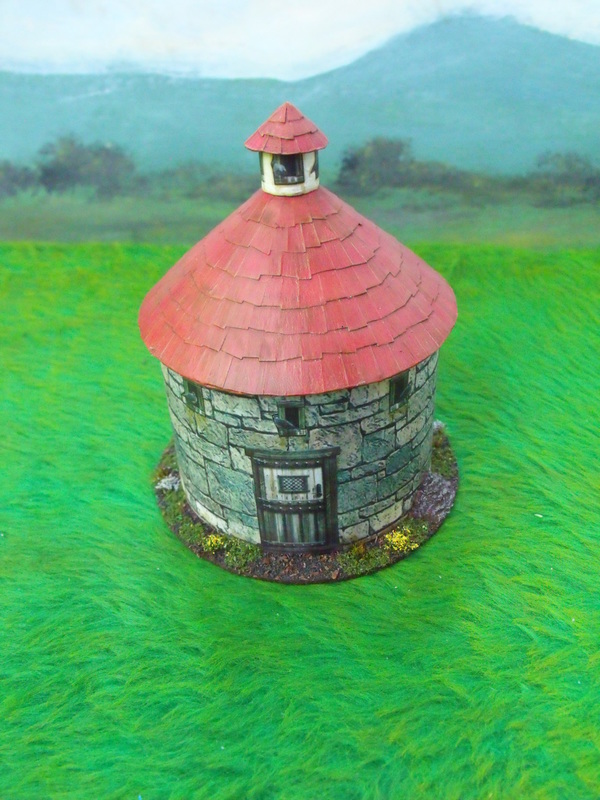
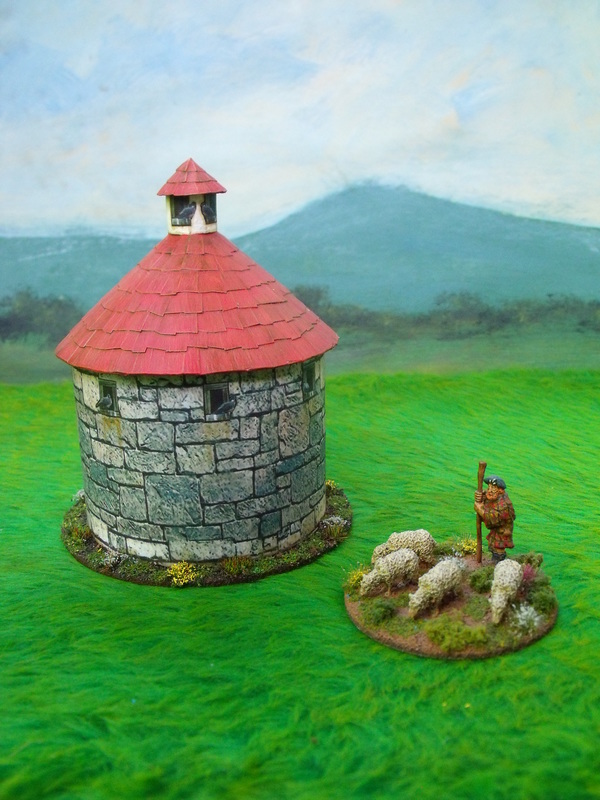
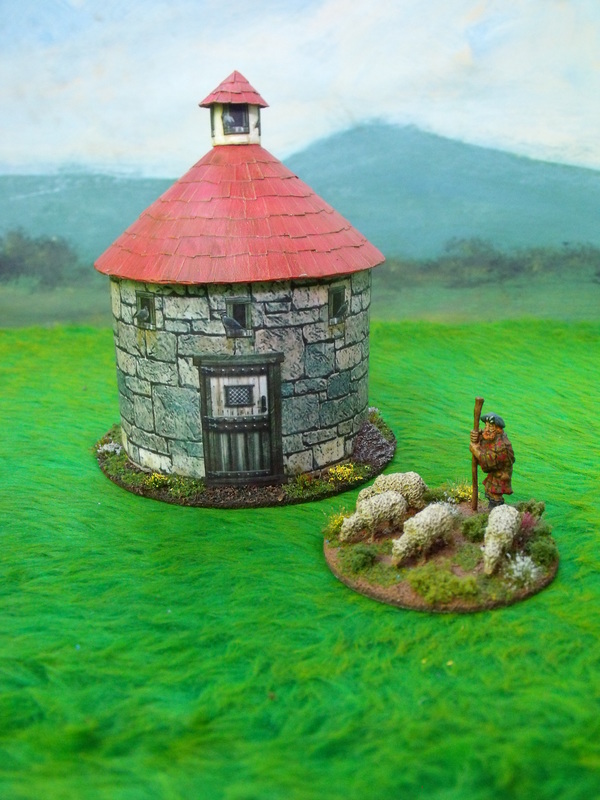
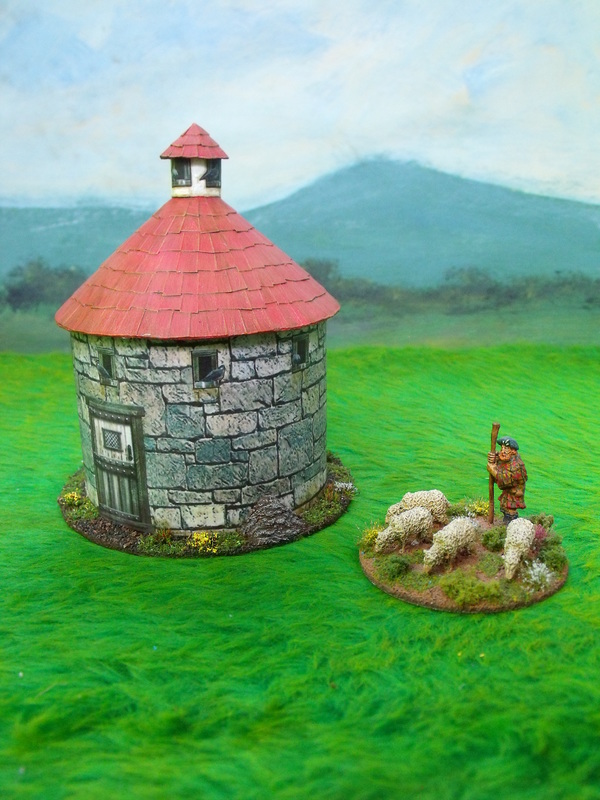
Continuing with my ECW Buildings Project I decided to build a Dovecote as I really wanted to add one to my new collection, probably because as a child my father kept pigeons and I used to help him with the keeping of them. Dovecotes themselves especially the type that I have modeled are actually really nice buildings to have on the table top and fairly unusual too. To make this I used two sellotape rolls glued together, one being 2" deep and the other being 1/2" deep, alternatively I could have used a cut down Pringles tube which is actually almost the same diameter. Next I made a cone from a 5" diameter circle cut from a cereal packet and glued in place as the roof which was then tiled using thin card tiles. The top part of the roof was made with a tube and cone made from thin card and the roof again tiled with thin card tiles. At this stage I decided to paint the roof and dry brush it to make the tiles stand out and after leaving it a good while I decided to give the tiles a brown wash to kick back the brightness and weather the tiles a little. The next thing was to cover the tower with stone effect paper and then glue in place a suitable door after which I glued the entrance holes for the pigeons with added pigeons to give a nice effect. I then gave a light wash of brown under the entrance holes to suggest staining and then glued the Dovecote to a 4 diameter tile base. As usual I painted the base dark brown and then used brown and green scatter material and long grass tufts to for flowers and weeds. I decided to add a pile of pigeon muck to the base as an added feature and this was painted and drybrushed to give the right effect. All in all I am very happy with the overall effect and cannot wait to put it on the tabletop.
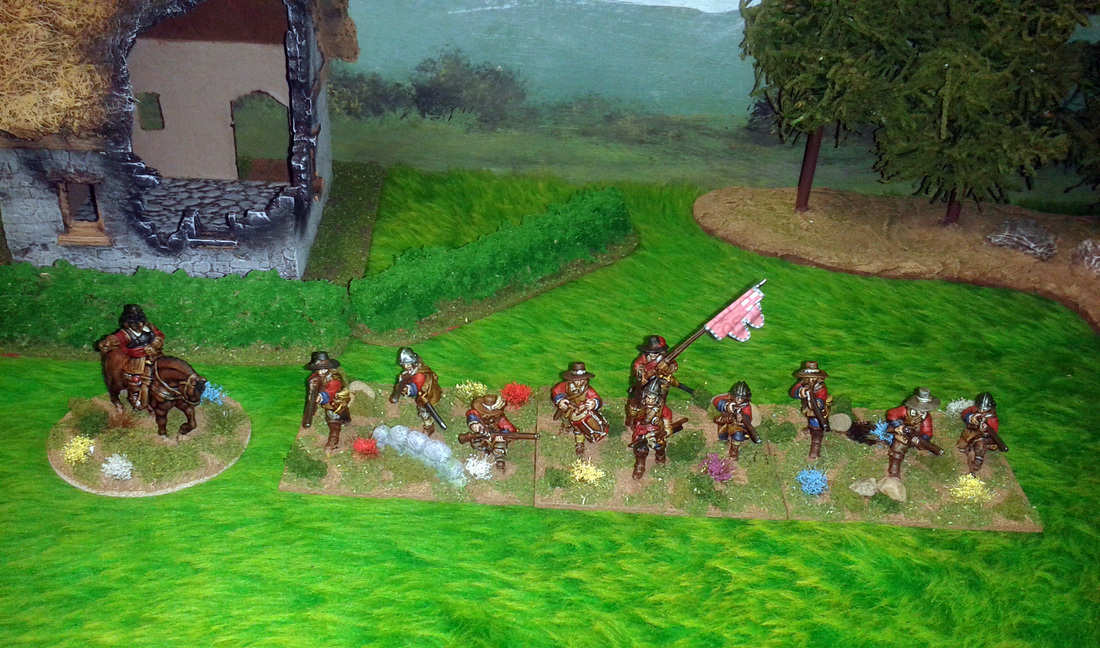
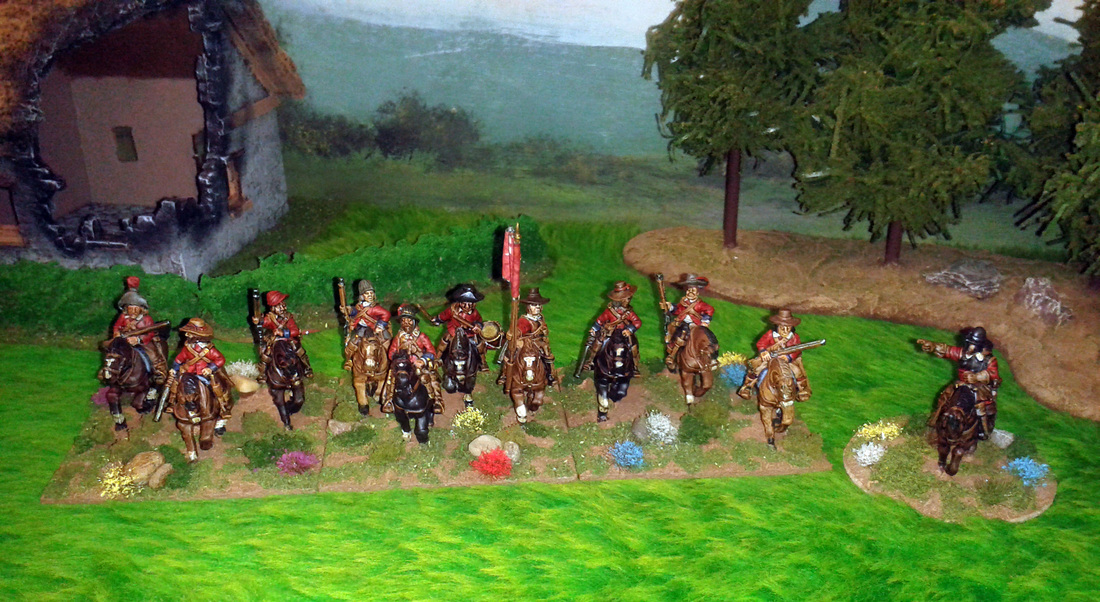
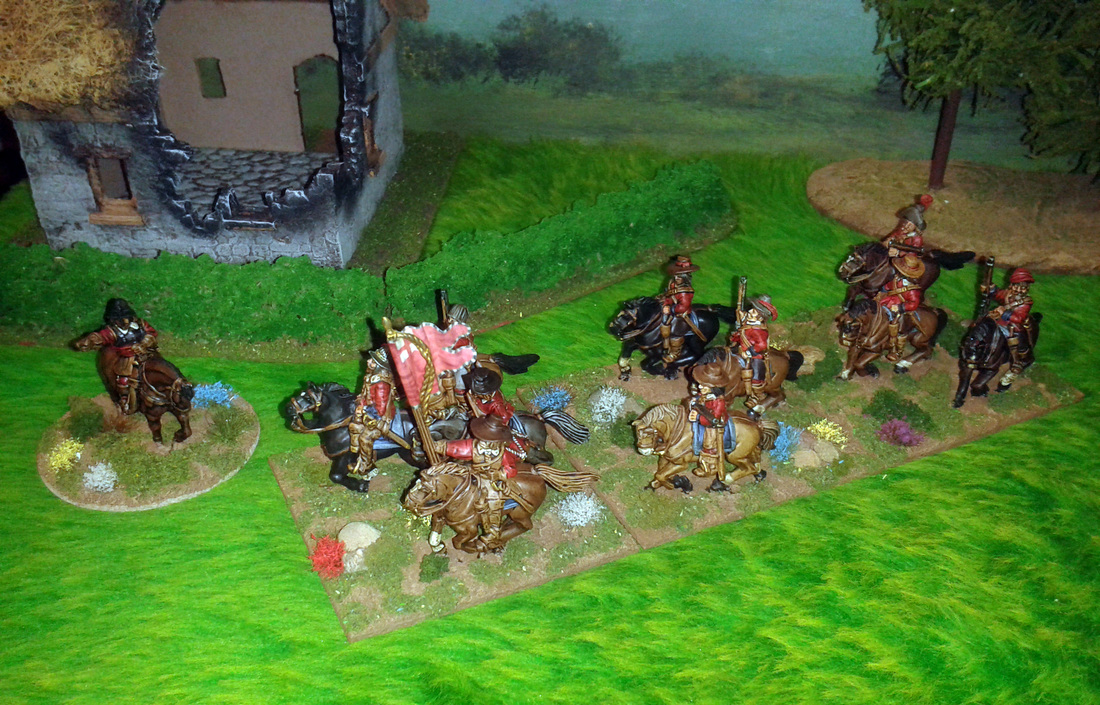
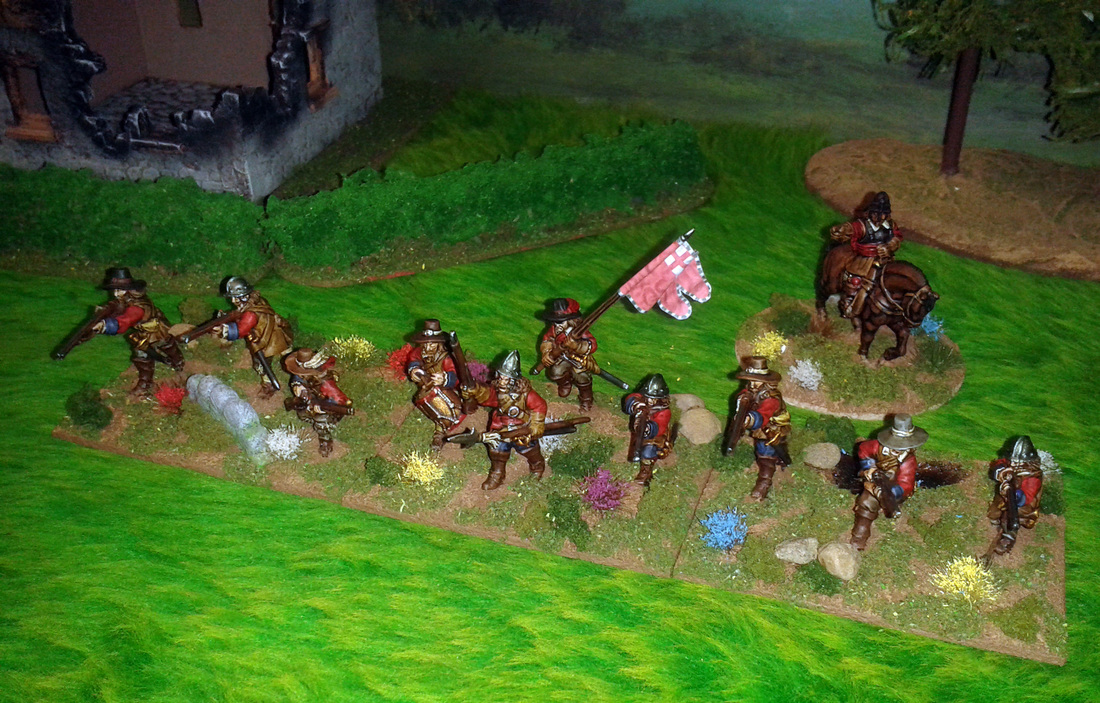
After a few weeks of being extremely busy with work, holidays, work and yet more work I am now in a position to put these rule amendments on the blog. So to recap.... My own 28mm ECW armies are arranged in smaller mixed units averaging about 20 figures in 2 ranks for foot or 10 figures in 1 rank for the horse both occupying the same frontage which is approximately 9 inches. Obviously I don't expect anyone else to follow my unit sizes but needless to say so long as the units are more or less the same frontage as each other it doesn't really matter what frontage you actually use. Large units are one third wider or 12 inches instead of 9 inches wide and smaller units ore one third narrower or 6 inches instead of 9 inches wide. Tiny units where used are reserved for small platoons of musketeers or small troops of lifeguard cavalry and are one third of the width of a normal unit or 3 inches wide. The rationale I use for the unit frontages is that pike and shot units were 6 ranks deep and an average 500-600 man regiment would have an approximate frontage of 150 yards and an average squadron of approximately 250-300 cavalry would be in 3 ranks and again have a frontage of around 150 yards. Obviously this is based on the normal unit size and large units would represent 700-800 infantry or 350-400 cavalry, small units would represent 300-400 infantry or 150-200 cavalry, and tiny units would represent 100-200 infantry or 50-100 cavalry. Okay so now for a few explanations as to my thoughts on the cavalry of the ECW period. There were 4 main types of cavalry tactic used in this period being: Charging at the Gallop - Synonymous with dashing Cavaliers. The cavalry basically charged home at full gallop armed with any hand weapon they preferred to use including swords, hammers and axes. The resulting charge had a lot of momentum but at the expense of control which meant if they were victorious and routed the enemy they would probably follow in pursuit and not return to the area of battle. Trotting and Firing - Synonymous with dour Roundheads. The cavalry trotted forward and discharged a pistol just prior to contact and then reached for their sword to engage in combat. This lacked any real momentum but the troops were kept in control and would normally be able to rally if they routed their enemy. Standing and Firing - Early suicidal Roundheads. Used and very quickly dropped by any sane cavalry commander this tactic relied upon standing and trying to 'shoot off' the enemy with pistol fire. The unit was usually drawn up in a deeper formation (5-6 ranks or more) and the if the enemy was routed it would be because of pistol fire rather than any hand to hand combat involved. This was as close as it got to a Caracole tactic and was favoured by the Scottish or Irish pistol armed cavalry throughout the period according to some historians due to their inferior mounts. Charging at the Trot - Cunning Ironsides. This tactic was favoured by Oliver Cromwell and his Ironside cavalry of the New model Army and it involved the cavalry charging forward at a good trot or canter into the enemy cavalry with swords in hand ready to fight. It was not as devastating as a full galloping charge but it did have the advantage of allowing the cavalry commander to keep better control of his squadrons and usually rally them if they won. Further to this the first two tactics were used by BOTH sides during the war and were dependent upon the general in charge of the cavalry and not the individual squadron commanders, so mixed commands of Trotting and Galloper cavalry are not only wrong but totally illogical. With regards to types of mounted troops there were basically four being: Cuirassiers, much loved by wargamers and model makers but very rarely seen as units of any size during the ECW period these consisted of three quarter armoured troops on large horses armed with swords and pistols. Some small troops of horse may have been raised and one very short lived regiment (Hasselrigge's) appeared during the ECW period. Horse, basically the normal cavalry for both sides with as much armour as they could get and usually armed with a sword (or any hand weapon) and pistols. Scottish Horse, although you can group Irish horse into this category too, basically cavalry with little armour on inferior (small) mounts and armed with lots of pistols and a sword they usually preferred not to use. Scottish Lancers, again cavalry with little armour on inferior mounts but this time with lances instead of lots of pistols. Mixed Scottish Horse, according to some historians some Scottish cavalry were mixed into units that contained both types of Scottish horse, so some with lance and some with sword and pistol. Dragoons, although certainly NOT cavalry they were mounted albeit on very inferior horses, ponies etc. and had no armour, no ability to fight mounted as they were armed with carbines or sometimes muskets and expected to skirmish on foot. I use the following system for the fighting qualities which I feel give a really good game and don't adversely affect the effectiveness of either arm as the frontages and combat qualities have been adjusted to take into account the original relationships within the rules. Cavalry Rules & Stats Cuirassier (Tiny) HTH = 3, Shooting = 1, Morale = 3+, Stamina = 1, Points 27 Cuirassier (Small) HTH = 6, Shooting = 2, Morale = 3+, Stamina = 2, Points 38 Cuirassier (Normal) HTH = 9, Shooting = 3, Morale = 3+, Stamina = 3, Points 49 Cuirassier (Large) HTH = 12, Shooting = 4, Morale = 3+, Stamina = 4, Points 60 Cavalry (Tiny) HTH = 3, Shooting = 1, Morale = 4+, Stamina = 1, Points 23 Cavalry (Small) HTH = 6, Shooting = 2, Morale = 4+, Stamina = 2, Points 34 Cavalry (Normal) HTH = 9, Shooting = 3, Morale = 4+, Stamina = 3, Points 45 Cavalry (Large) HTH = 12, Shooting = 4, Morale = 4+, Stamina = 4, Points 56 Pistoleers (Tiny) HTH = 2, Shooting = 2, Morale = 4+, Stamina = 1, Points 22 Pistoleers (Small) HTH = 4, Shooting = 4, Morale = 4+, Stamina = 2, Points 32 Pistoleers (Normal) HTH = 6, Shooting = 6, Morale = 4+, Stamina = 3, Points 42 Pistoleers (Large) HTH = 8, Shooting = 8, Morale = 4+, Stamina = 4, Points 52 Dragoons (Tiny) HTH = 1, Shooting = 1, Morale = 5+, Stamina = 1, Points 24 Dragoons (Small) HTH = 2, Shooting = 2, Morale = 5+, Stamina = 2, Points 32 Dragoons (Normal) HTH = 3, Shooting = 3, Morale = 5+, Stamina = 3, Points 40 Dragoons (Large) HTH = 4, Shooting = 4, Morale = 5+, Stamina = 4, Points 48 Cavalry using Trotting and Firing tactics which includes Cuirassiers and Mixed Scottish Cavalry, are allowed to move into contact as normal but then allowed to shoot by rolling 3 d6 before the hand to hand combat starts causing hits on the roll of 6. Casualties are worked out as normal but no reaction test is taken and the 6's scored do not count as disordering the enemy cavalry. Trotting and Firing cavalry are not allowed to claim any bonuses in melee for charging or following up, if they defeat their opponents they can choose whether or not to follow up. Cavalry using Charging at the Gallop tactics which includes Scottish Lancers Cavalry are not allowed to use their pistols prior to hand to hand combat but they do get a +2 bonus for charging or following up instead of the normal +1. If they defeat their opponents they must follow up and must countercharge where able to do so. Other than that ignore the Galloper and Lancers special rules in the book as they move the same as all other Cavalry and these rules supplant those. Cavalry using Charging at the Trot tactics Including New Model Cavalry and Ironsides are not allowed to use their pistols prior to hand to hand combat but they do get a +1 bonus for charging or following up. If they defeat their opponents they can choose whether or not to follow up. Pistoleer Cavalry using Standing and Firing tactics which includes Early Parliament Cavalry and Scottish Cavalry, are not allowed to charge or countercharge into contact instead they must remain stationary and receive any charge as normal but then allowed to shoot by rolling 6 d6 before the hand to hand combat starts causing hits on the roll of 6. Casualties are worked out as normal but no reaction test is taken and the 6's scored do not count as disordering the enemy cavalry. Standing and Firing cavalry are not allowed to claim any bonuses in melee for charging or following up, if they defeat their opponents they are not allowed to follow up. Dragoons follow all the rules in the book as normal and their points value includes the following special rules: Fire & Evade 2pts, Marauders 5pts, Firelocks 1pt. If you want to remove any of these rules to downgrade them then please do so and if you want them to have carbines instead of muskets then this costs -1pt per pip of firing. All cavalry are allowed to fire their pistols at times where appropriate such as: when facing Pike & Shot frontally or across a river or other such feature, again Cavalry only score hits on the score of a 6. Scottish and Irish Cavalry have less armour and inferior mounts regardless of the tactics used, when compared to other cavalry and this should be reflected by giving them a 5+ Morale value at a points reduction of -4pts. With regards to exactly what tactics your cavalry should be using I personally allow this to be determined by the cavalry general I am using, so for instance any cavalry commanded by Prince Rupert or Sir Thomas Fairfax would be Charging at the Gallop, Oliver Cromwell commanding New Model Cavalry would be Charging at the Trot, Morale can also be varied to reflect better or worse armour or status such as: 5+ for units with really poor armour (basically just normal clothing) - 4pts, or 3+ for unusually well armoured or elite status units (although this I would use very rarely) +4pts. Stamina can be adjusted to reflect the fighting experience of units by giving veteran units an extra Stamina point +4 pts, or raw or particularly fragile units subtracting a Stamina point - 4pts.
Dragoons mounted and dismounted
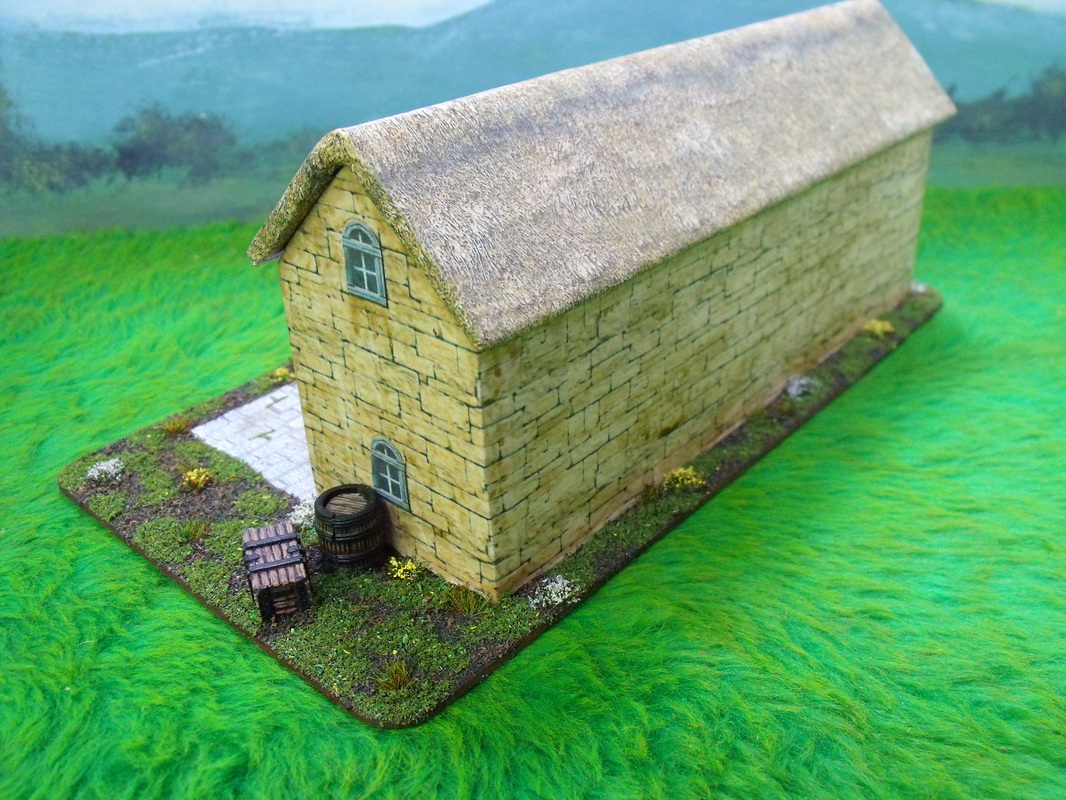
After some excellent feedback I decided to add some muck stains to the courtyard and a bit of weathering to the bottom of the walls to suggest damp. Also as noted in the last post I have re-varnished the thatch with solvent based matt varnish to take away the slightly glossy sheen. I think that the result was well worth the extra ten minutes of work.
I made this Pigsty for my ECW collection a good while ago and decided to finish it off the other day by putting the groundwork around the structure and courtyard. The building itself is made of a polystyrene block cut to the right shape and wrapped in stone effect wallpaper with the doors and windows added later. The roof is felt lagging over thick card with a polyfilla wash over it and several coats of paint to give a nice thatch effect. The base is an off-cut of hardboard and the courtyard is again a stone effect paper and the groundwork is several layers of various shades of scatter material with some long grass and flower tufts added to make it look extra pretty. The pile of pig muck is strategically placed for an assassin to hide in just in case an enemy general decides to go looking for some free bacon. With all of my buildings I give them a coat of matt acrylic varnish or protection but sometimes a coat of matt solvent based varnish is required over that to really matt down such things as the shiny a thatch that was caused by the acrylic varnish. All in I am really pleased with the result and especially now that the thatch has had an extra coat of matt varnish.
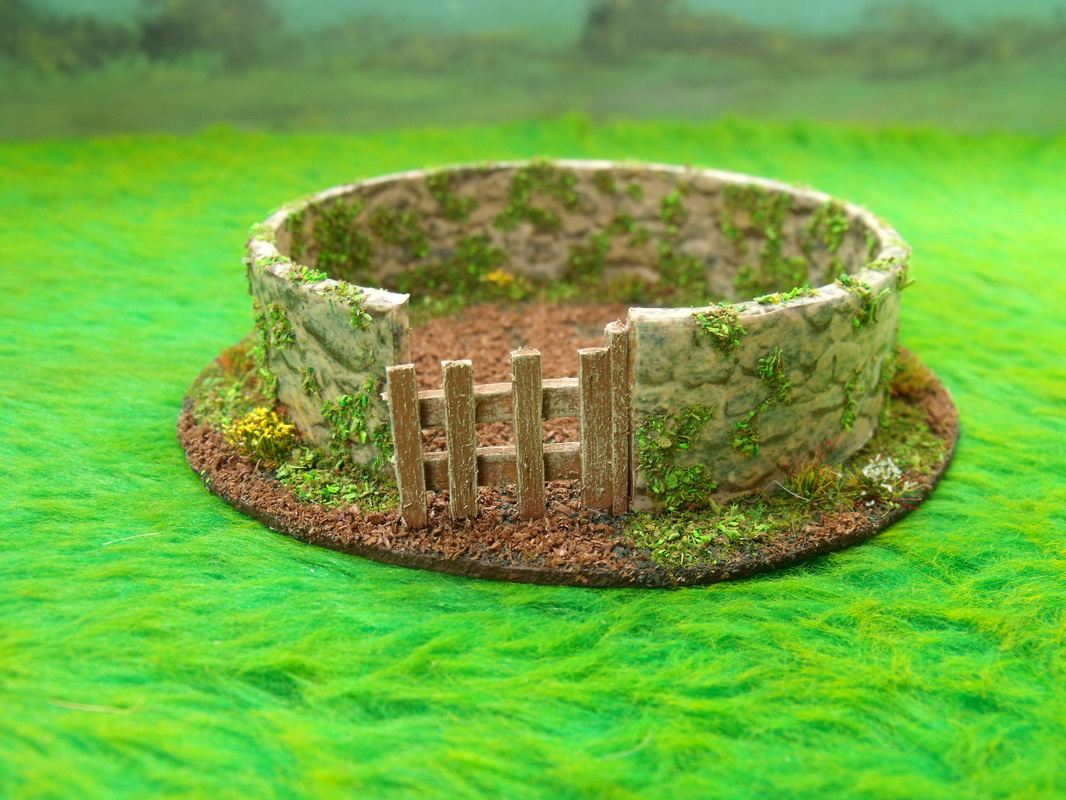
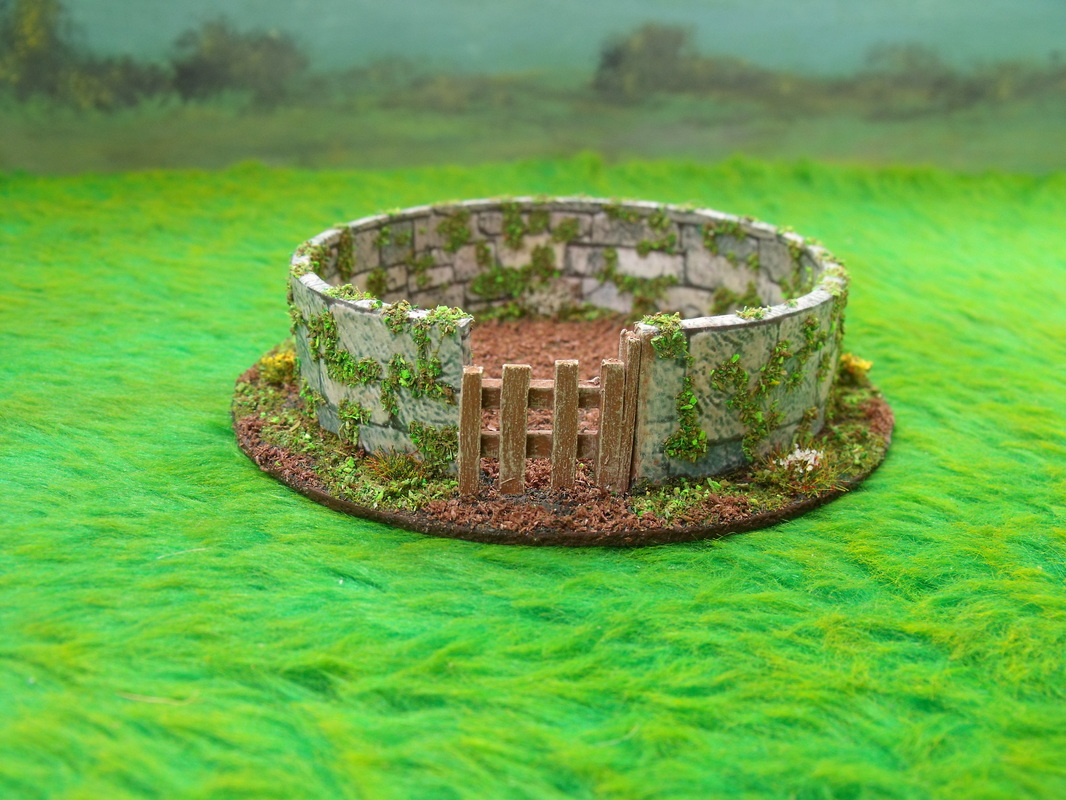
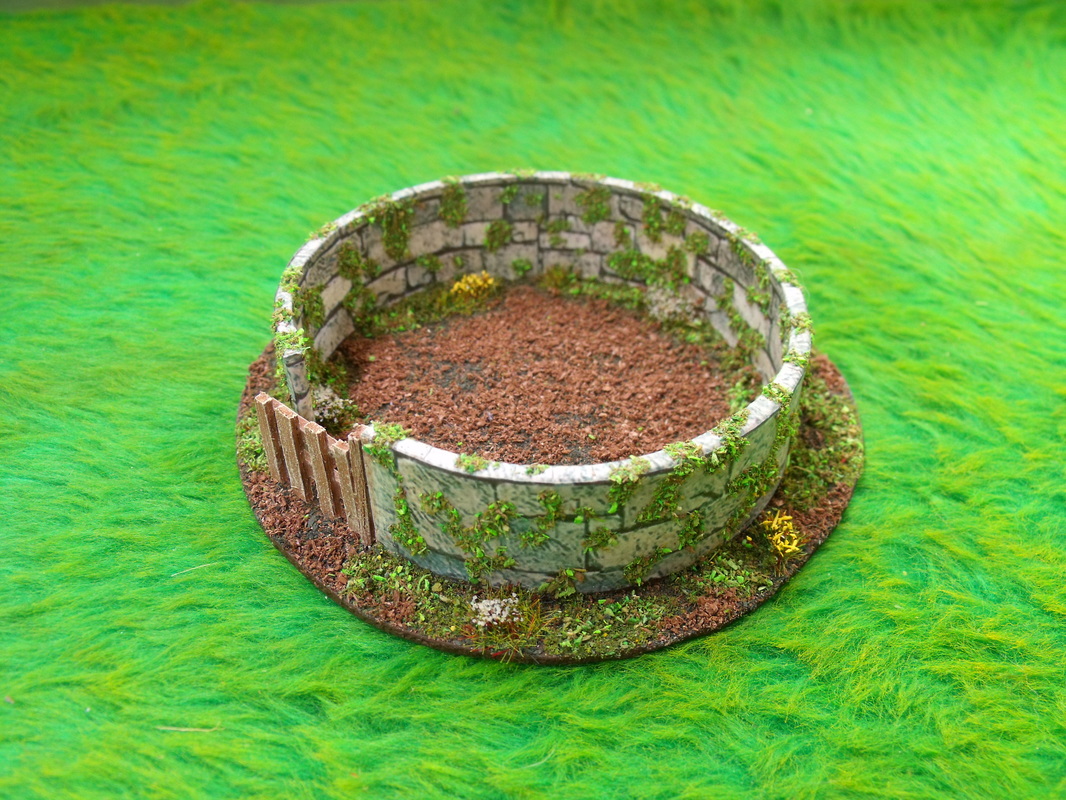
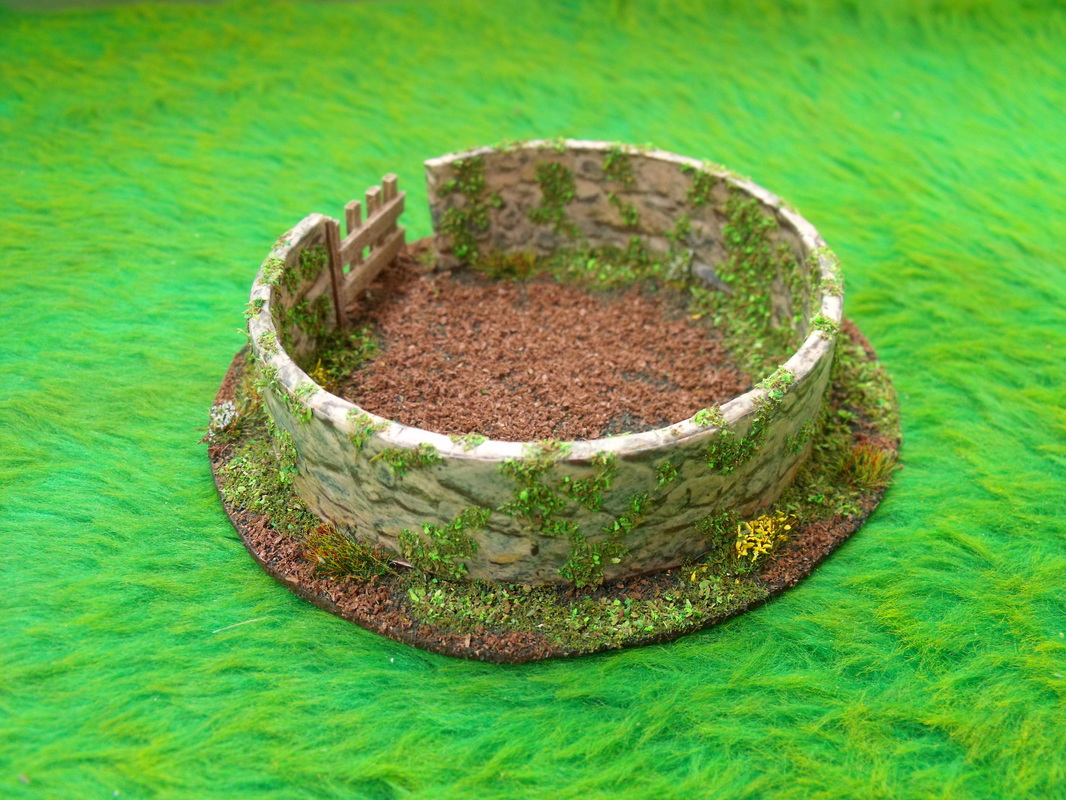
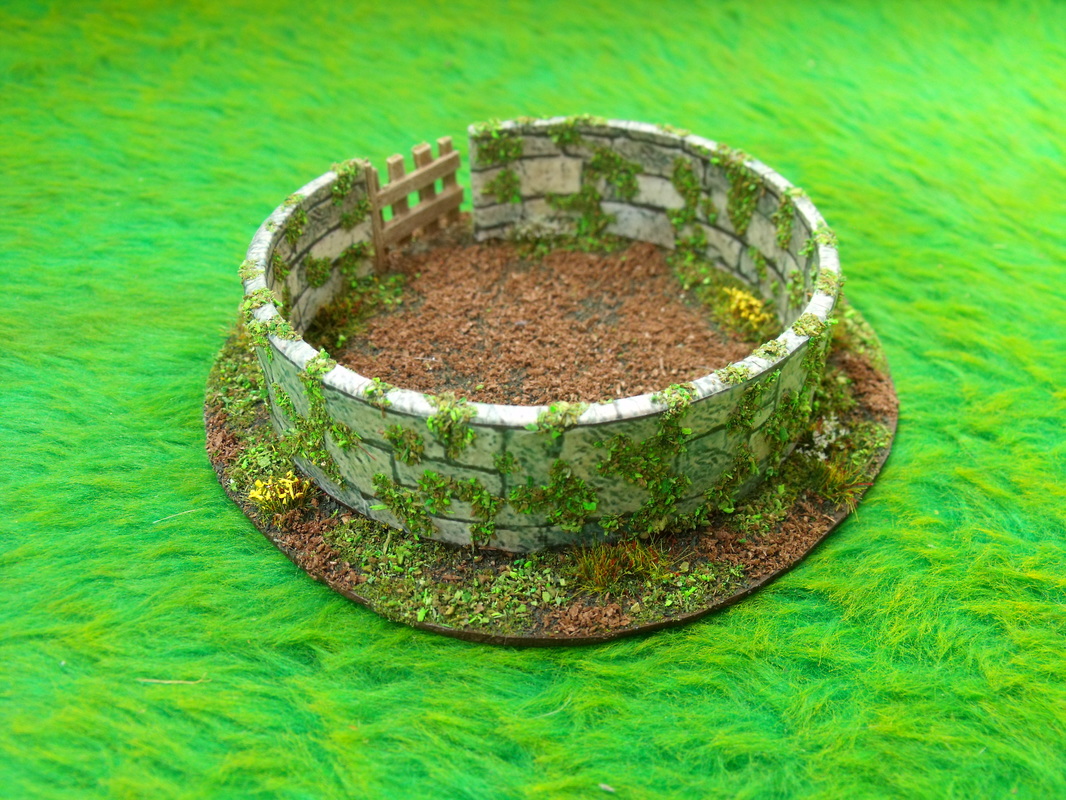
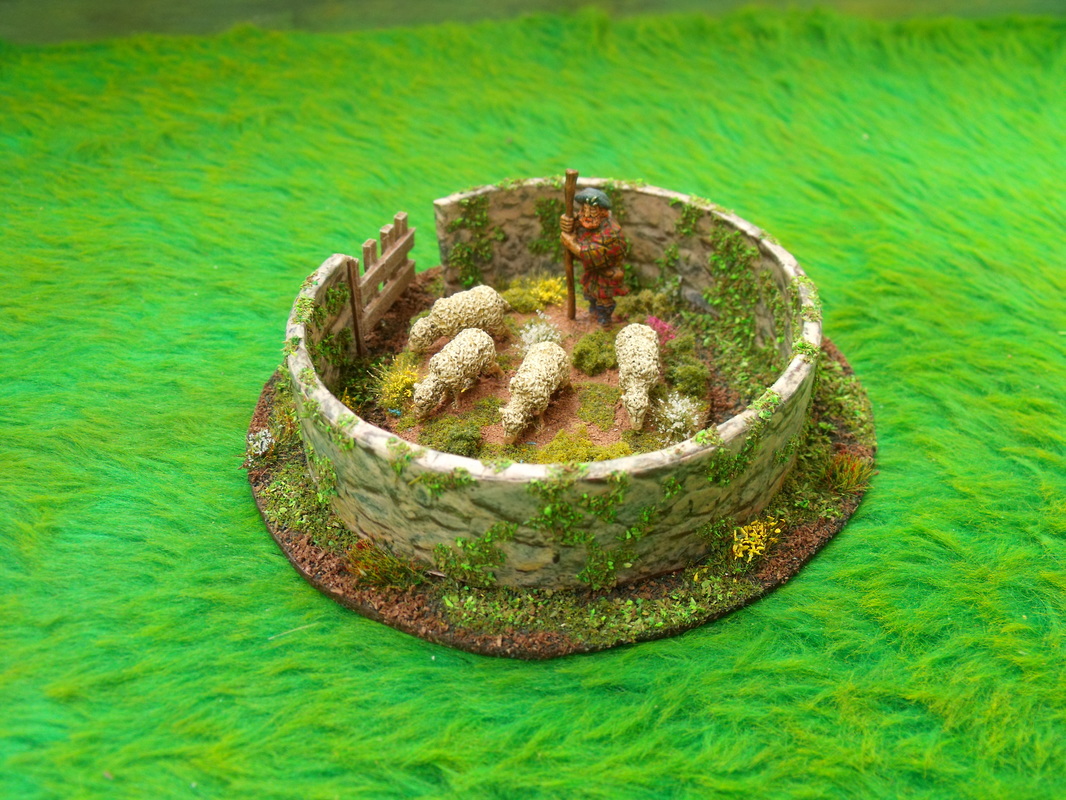
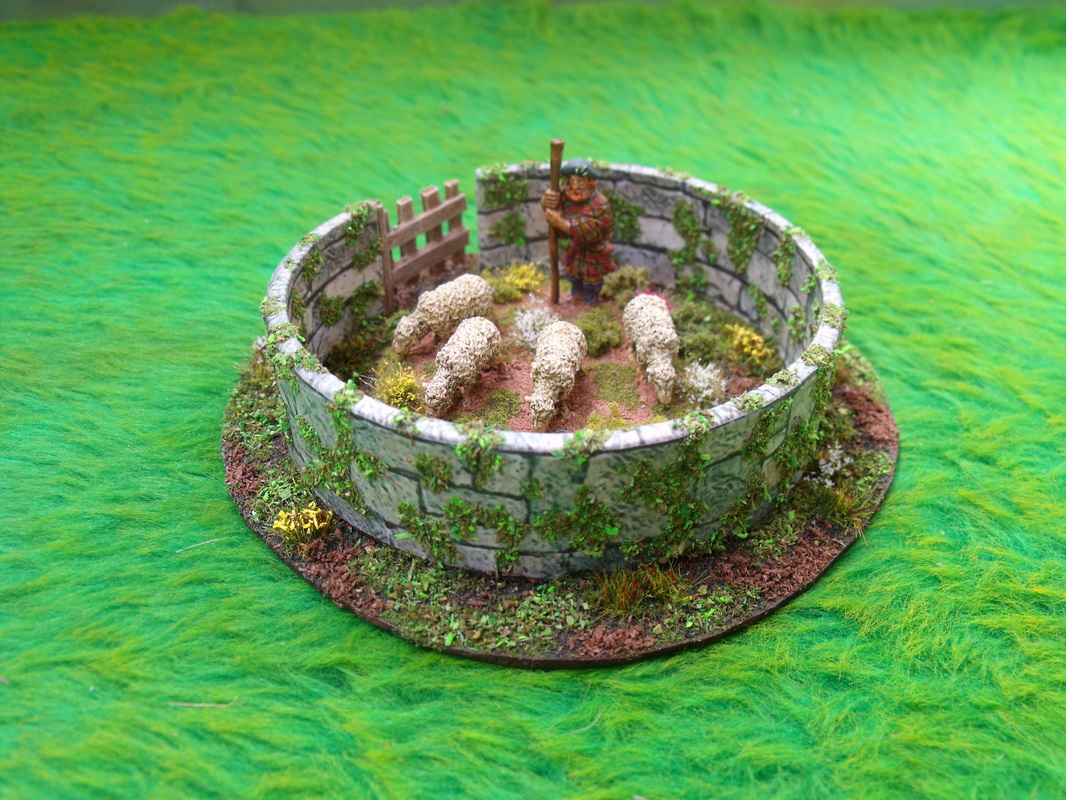
I decided to make some animal enclosures a few days ago for my ECW collection as part of a steadily growing number of rural building and scenic items that I am in the process of building. I was partly inspired by looking at the Warlord Games livestock pen and it seemed a nice and logical addition to the pig sty, barn and other rural buildings I had been working on. To make my livestock pens I simply took two 1" tall cardboard rolls saved from sellotape used at Xmas (although any similar size tube will do) and proceeded to snip them with clippers to make an opening. Then I teased them to make the opening bigger for a gateway and once done and roughly circular I then decided that I would cover them with stone effect paper. This was simple enough to do by cutting the paper in a strip that was about half inch deeper than the wall of the roll I simply painted the inside wall of the roll with PVA glue and then positioned and smoothed down the paper to cover the inside but allowing the overhang to be at the top of the roll. Once done I snipped the overhang at roughly 1/4" intervals and then applied more glue to the overhangs and smoothed them down so that they covered the top of the roll. The next thing to do was to trim off any slight overhang at the bottom with a sharp knife and then cut another strip of stone effect paper for the outside of the tube, this time allowing less overhang. Next I painted the outside of the roll with PVA glue and positioned the paper to that and smoothed it down, again trimming off any overhang at the bottom. At this stage (about 5 minutes after starting) you have a fully functional Livestock pen that can be put straight onto the table and used for a game if you wish to. I decided that I wanted a base for my pen so I positioned onto a Marley tile and marked around it making note of where the gate was positioned, from this I then drew a rough circle around this that was about 1/2" wider all the way around so I could add some scenery to the base. I used a sharp knife to score the tile and simply snapped off the excess and then trimmed up any rough bits so that it looked nice all the way round. At this stage I glued the pen down to the base with superglue and then painted the livestock pen with clear matt acrylic varnish to protect it (use solvent based varnish if your printing ink is not water resistant) from wear and tear. I then painted the complete base with dark brown paint and left it a few minutes to dry whilst I decided to make the second animal pen. by time the second pen was complete and the base painted the first coat of paint on the first pen was totally dry and ready for the second coat of brown paint and scatter material. I make my own scatter material, but for reference it is simply very dark brown in colour and simulates damp earth very nicely. I applied the brown paint again and this time threw on a load of scatter material and left it to dry while again I turned to the second pen and did the same scatter material effect on that. While I made a cup of tea the scatter had dried out and was ready for the long grass clumps and flowery bushes to be added, again these are home made and simply clumps of long scatter grass with coloured scatter material added for the flowers. These clumps are self adhesive so took no time at all to position and I did the first pen and then went straight on to doing the second pen. After that I diluted some PVA glue and applied it around the edges of the wall both inside and out of the pens and scattered with dark green grass scatter. Again at this stage you have a really serviceable livestock pen that looks nice, but I decided to go the extra mile to make it look even better. After leaving the scatter material to dry out I decided to lightly brush over the green scatter material with slightly diluted PVA glue and lightly scatter on a light green grass scatter material to add a contrast and highlight to the dark green tones of the first layer. Again I lightly brushed over the dark earth areas and again using a lighter colour I sprinkled lightly with a mid brown scatter material to highlight the earth areas. At this stage I decided to go for something a little different and applied neat PVA glue in little patches all over the walls of the pens both inside and out and applied green scatter material to simulate weeds, moss etc growing over the walls. I really liked the effect so I decided that the second pen would also have the same treatment. The last part of the projedt was to make gates for the pens and I did this with balsa wood, although matchsticks or even twigs could have bee used to make these. A quick coat of paint and a final lighter drybrush and I glued the gates in place with superglue and they were all finished and ready to use. Below are the fruits of my labour which was less than a hour in total to build and base both of the livestock pens.
Click on the Images to Enlarge
|
AuthorStephen Wylde BA (hons) Archives
July 2022
Categories
All
ECW Blogs
ECW Sites
|


 RSS Feed