
WARGAMES DESIGNS ECW BLOG
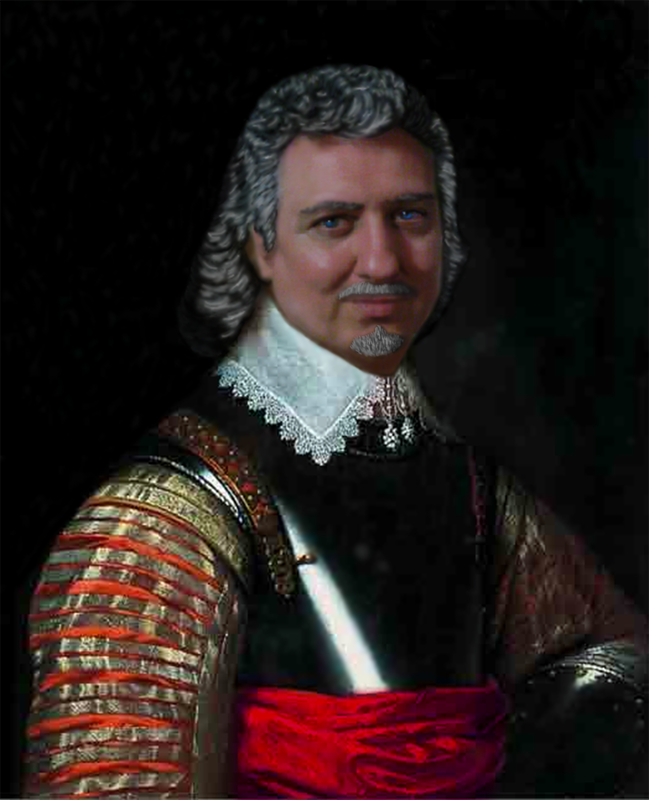
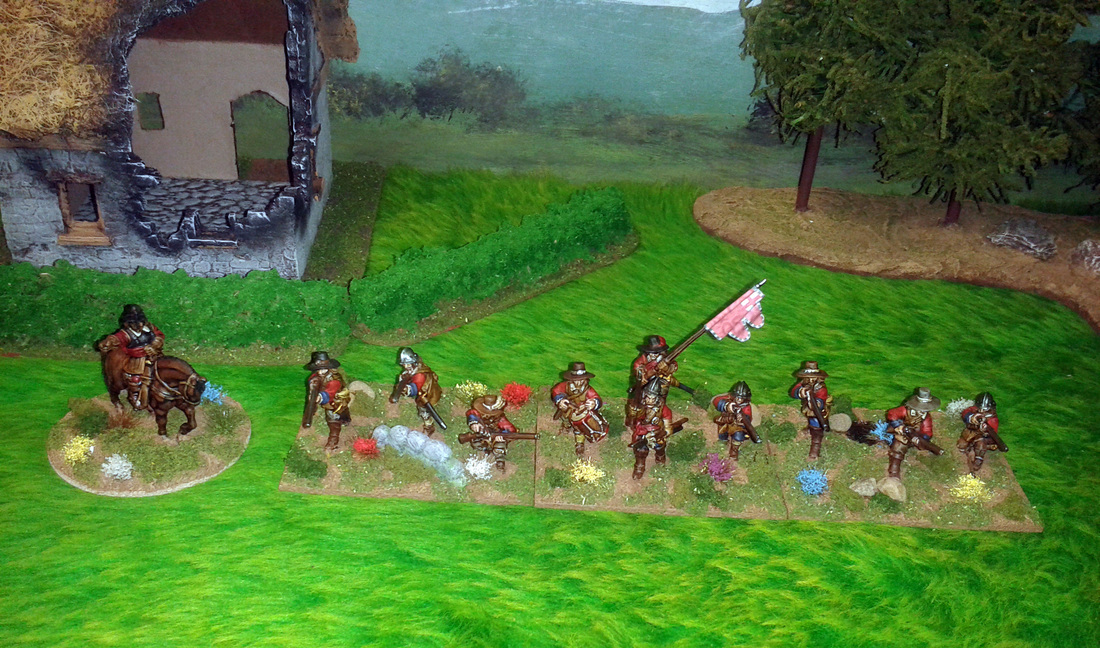
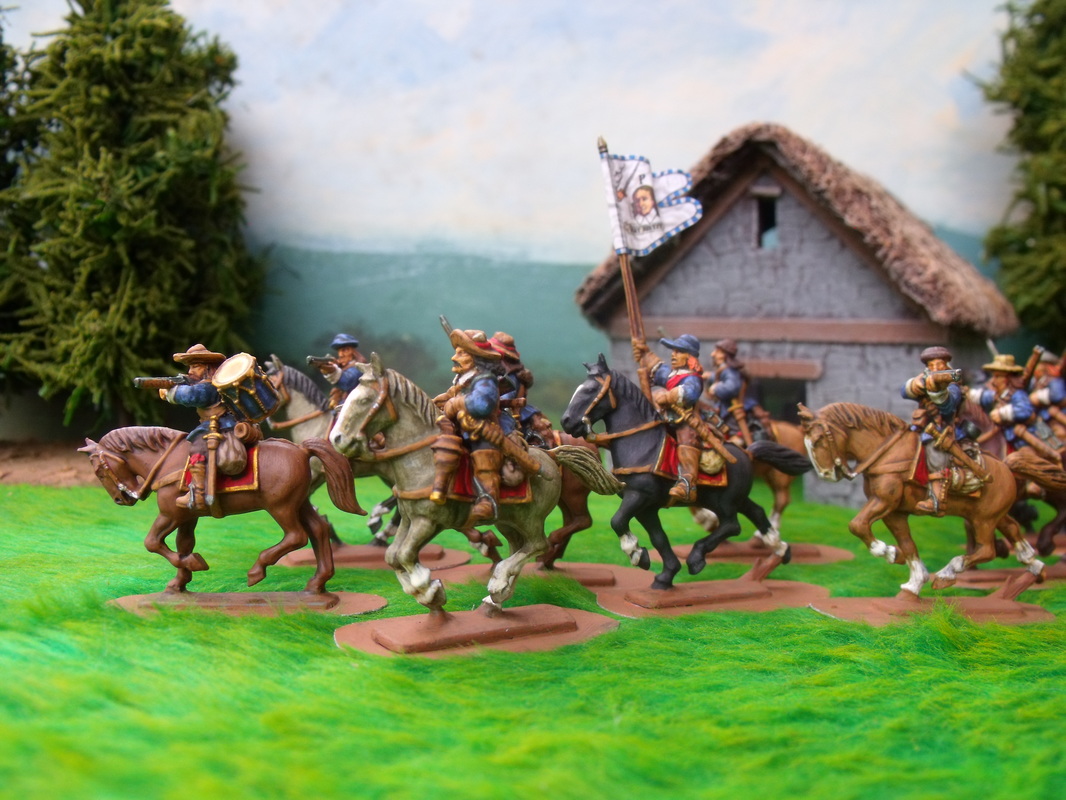
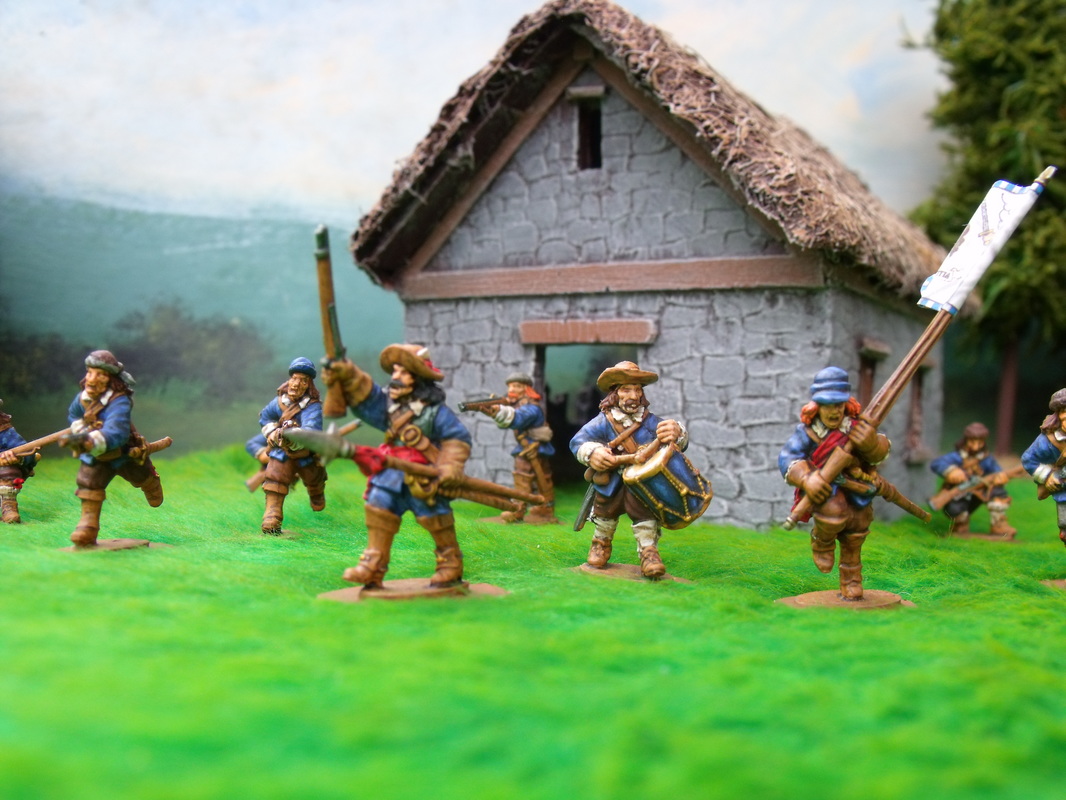
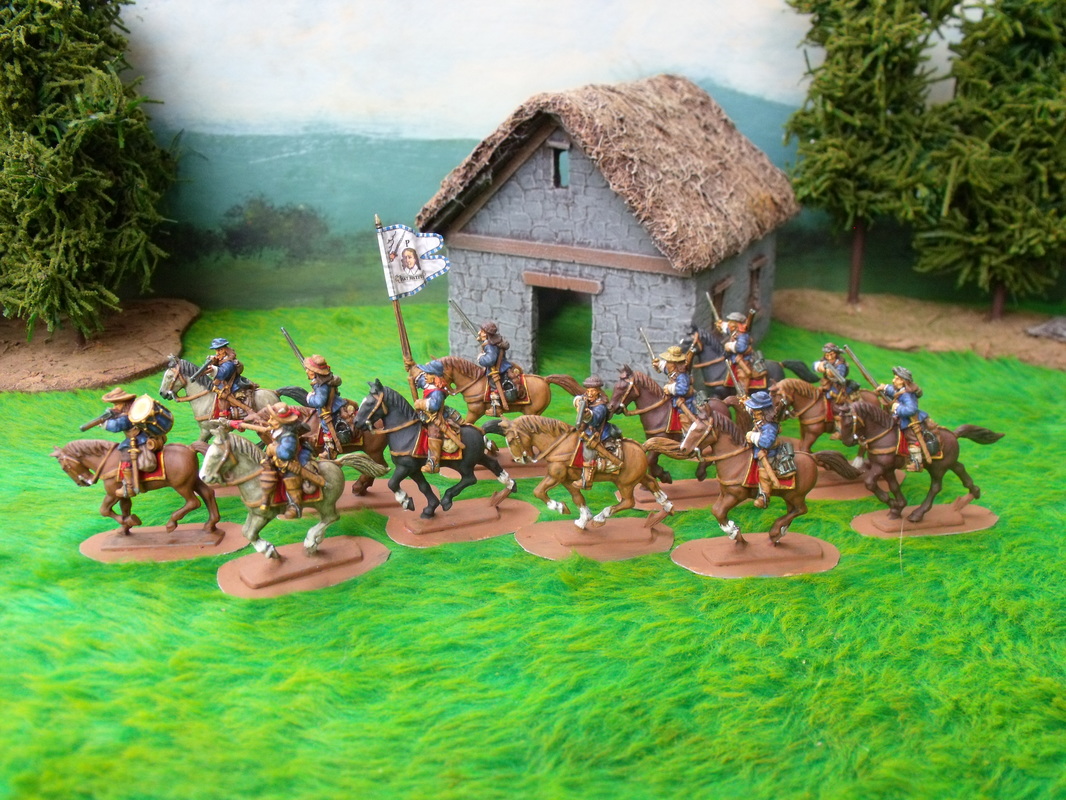
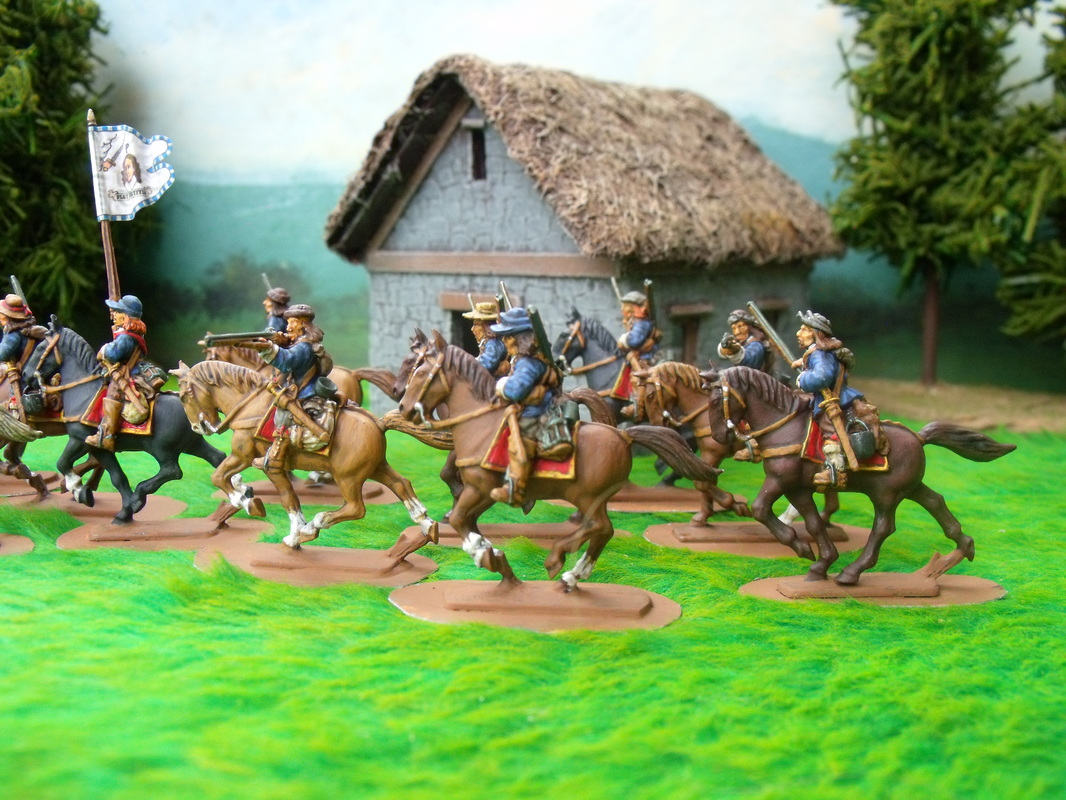
The Very Famous Royalist General Sir Stephen Wylde
|
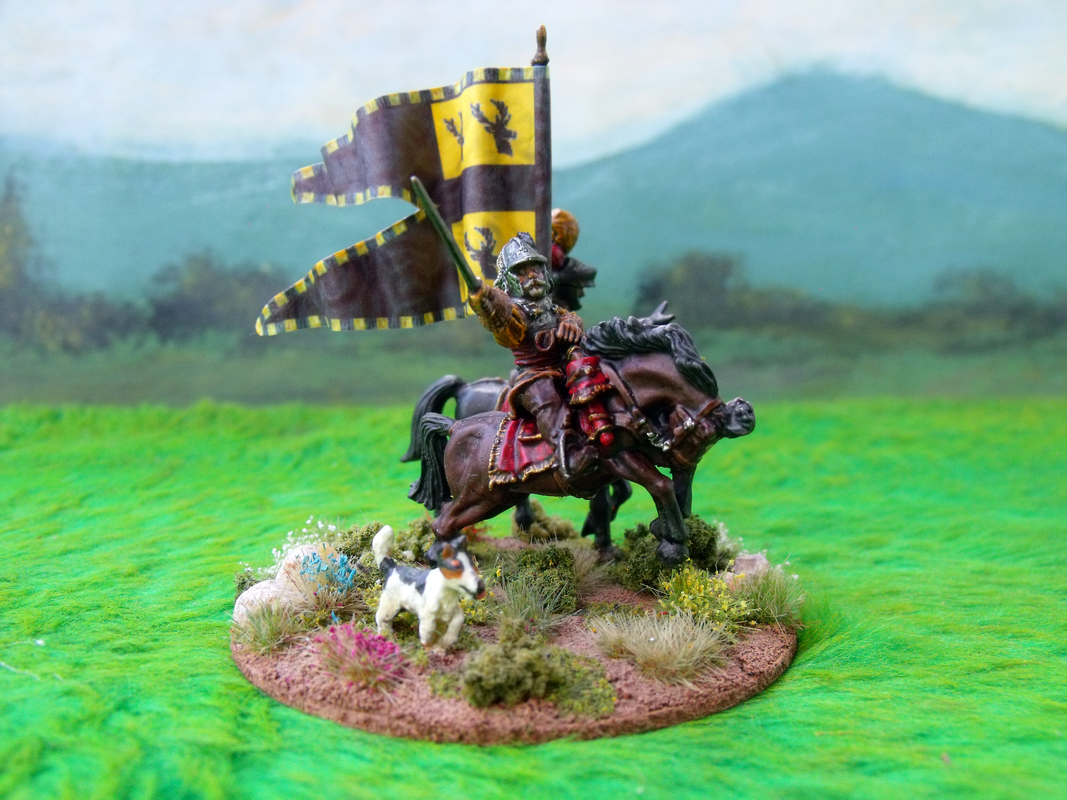
Sir Stephen with his Personal Standard Bearer and his Faithful Hound Daisy
|
|
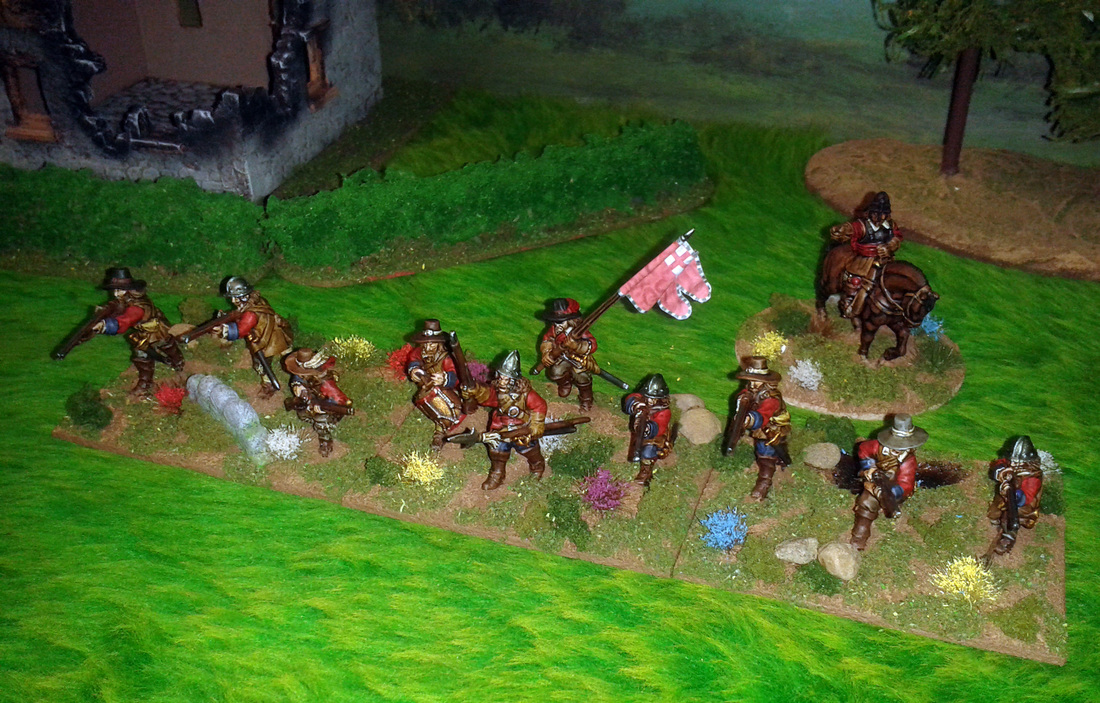
The Very Famous Royalist General Sir Stephen Wylde
|
Sir Stephen with his Personal Standard Bearer and his Faithful Hound Daisy
|
|
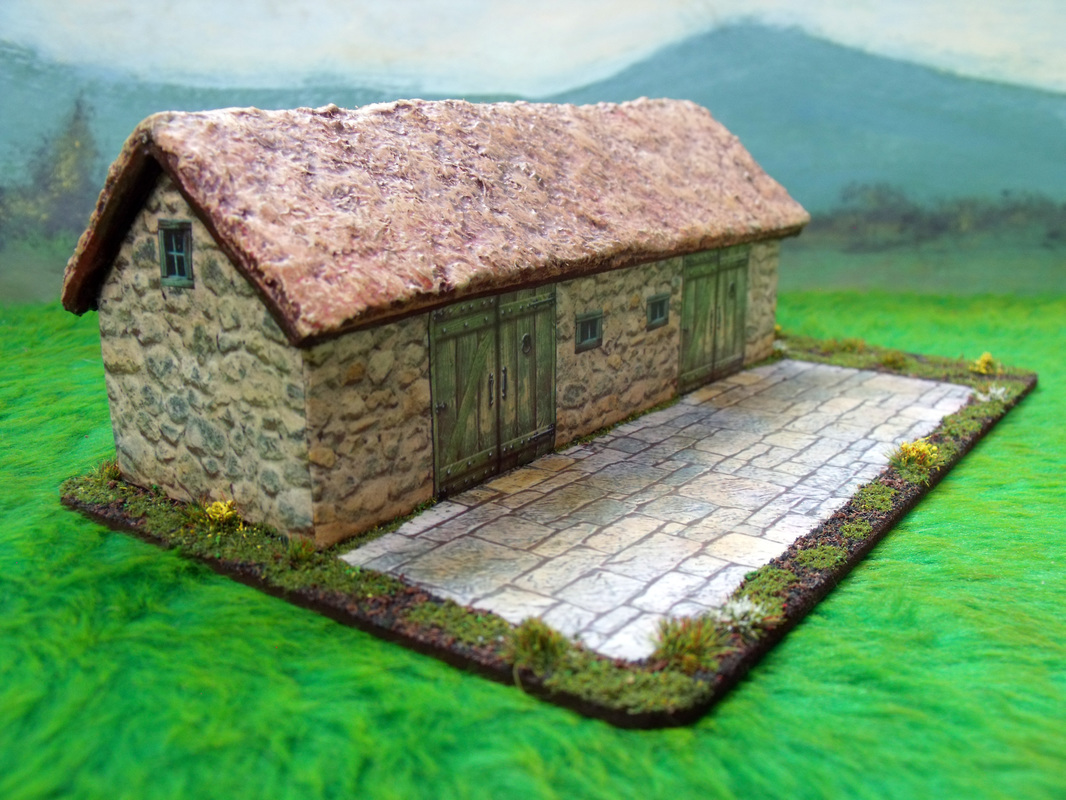
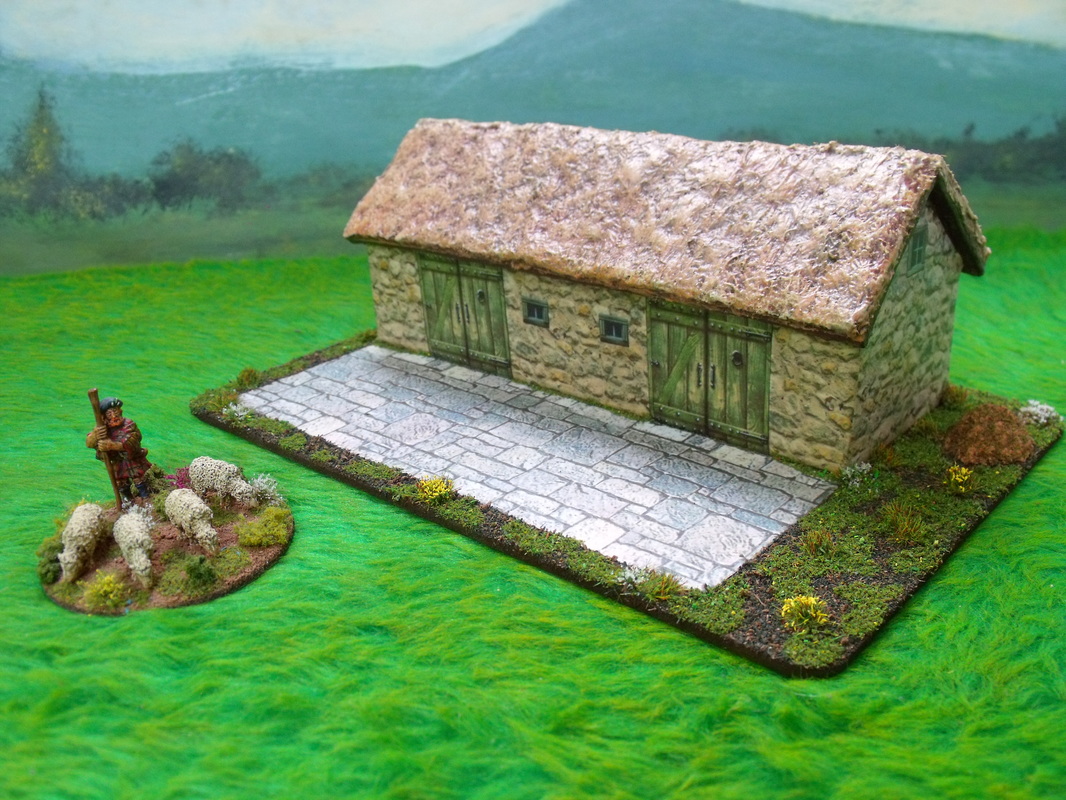
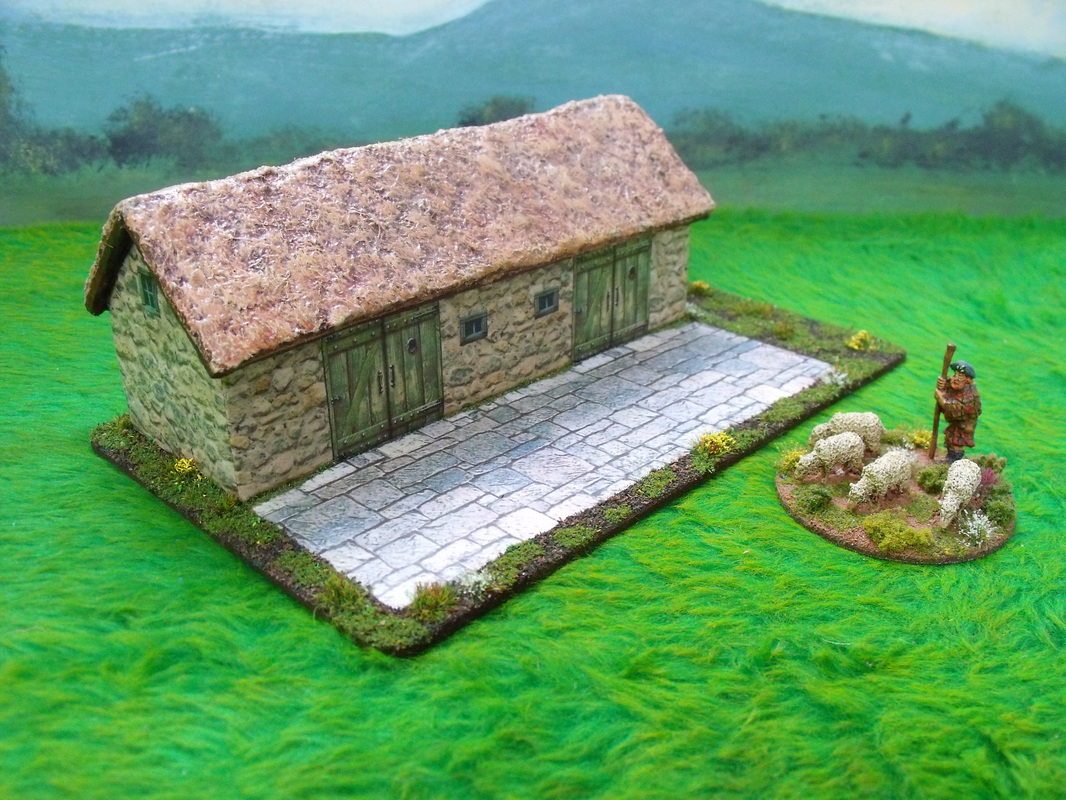
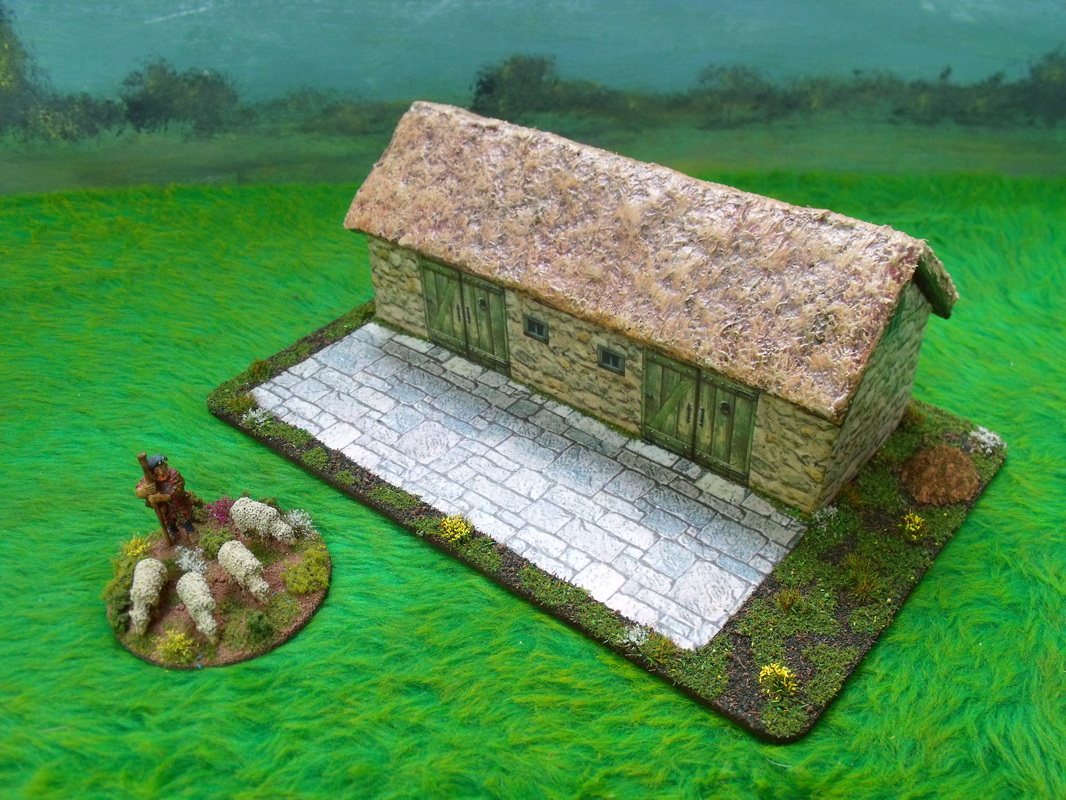
After some excellent feedback I decided to add some muck stains to the courtyard and a bit of weathering to the bottom of the walls to suggest damp. Also as noted in the last post I have re-varnished the thatch with solvent based matt varnish to take away the slightly glossy sheen. I think that the result was well worth the extra ten minutes of work.
0 Comments
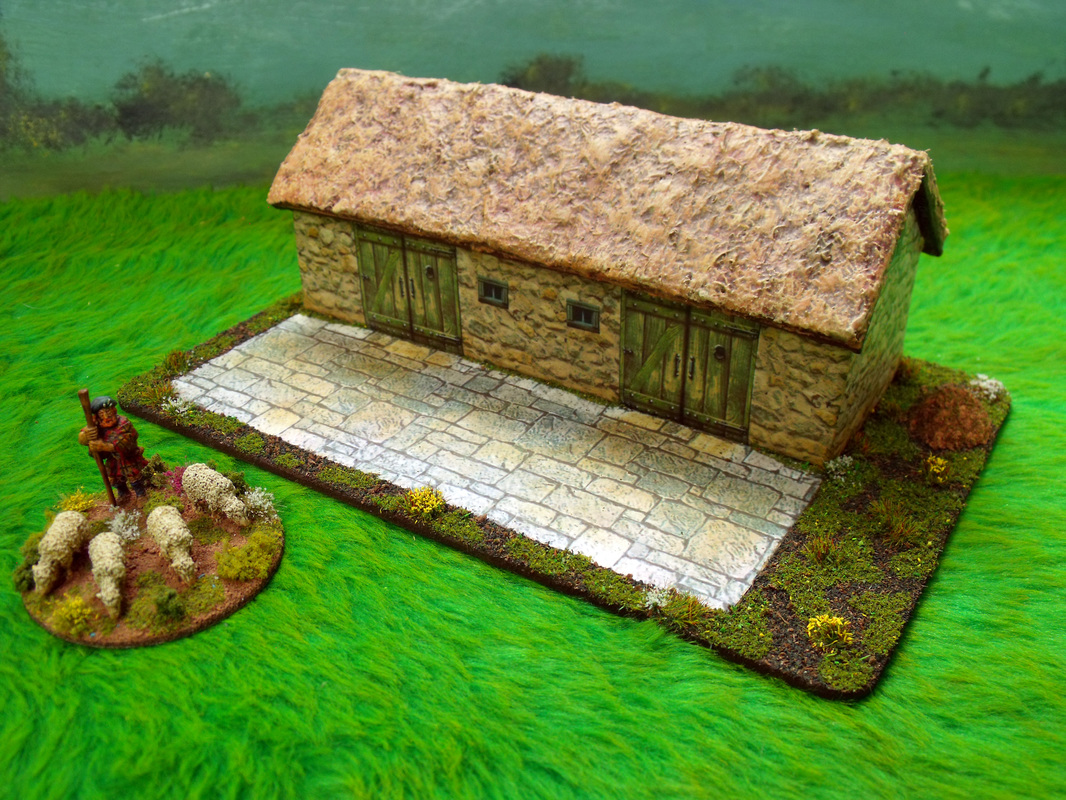
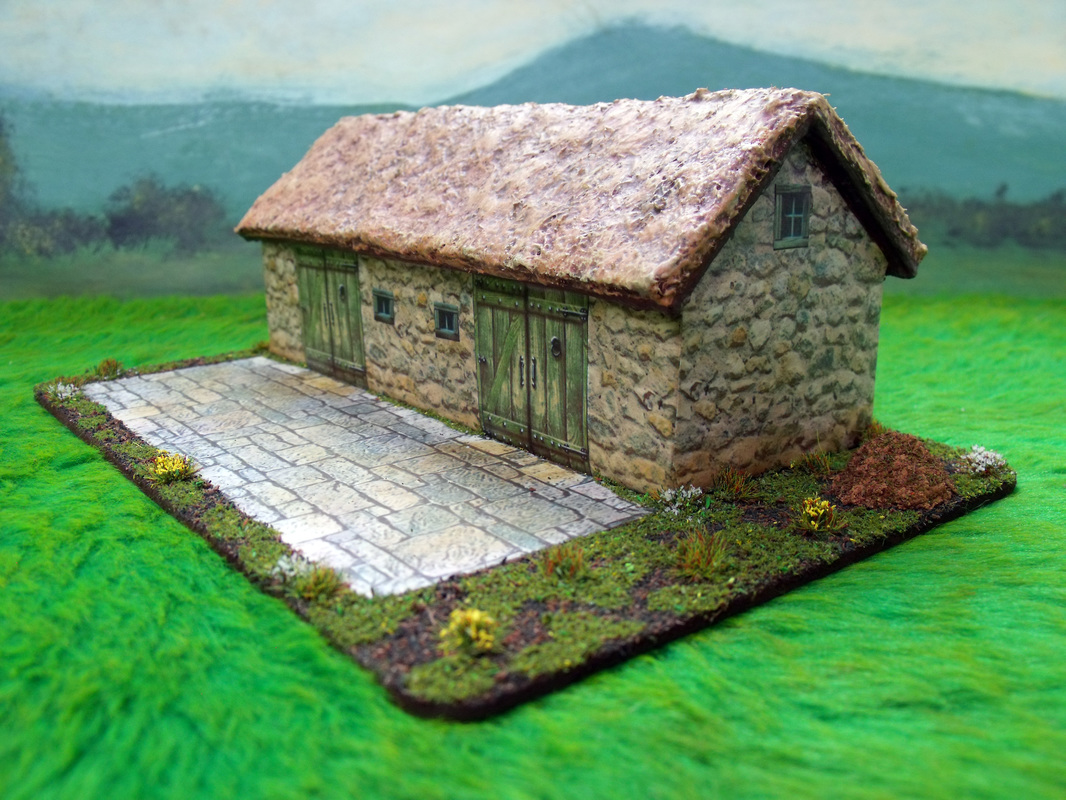
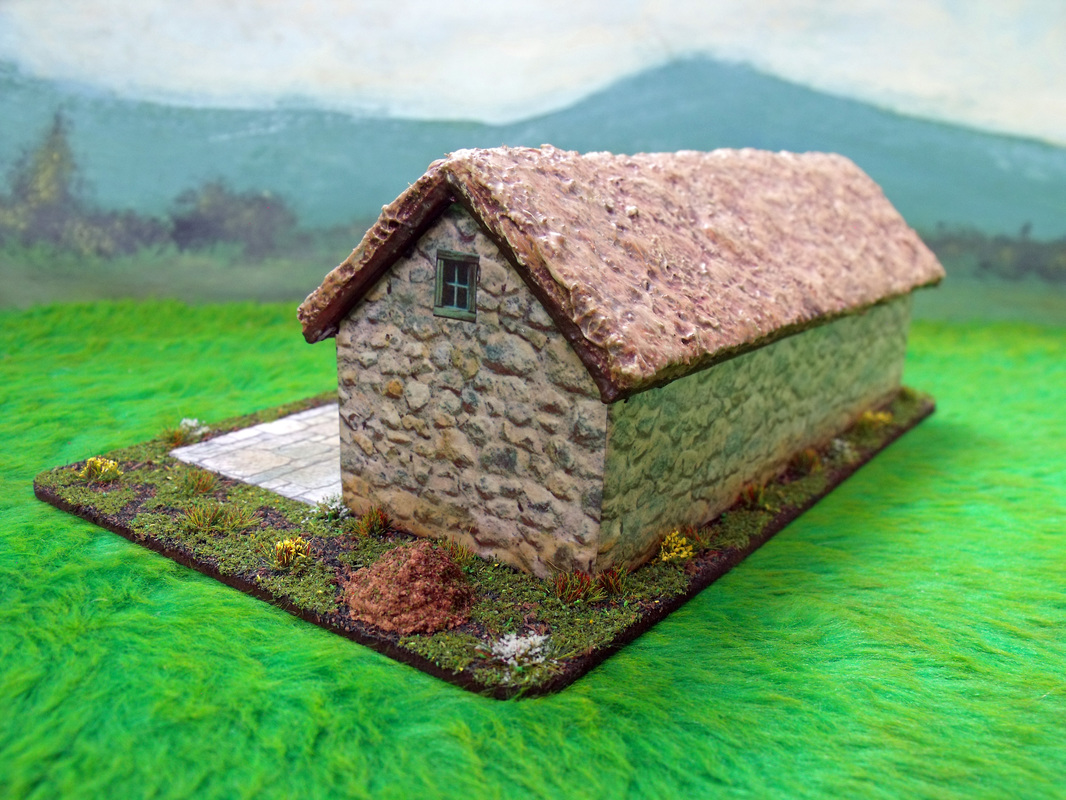
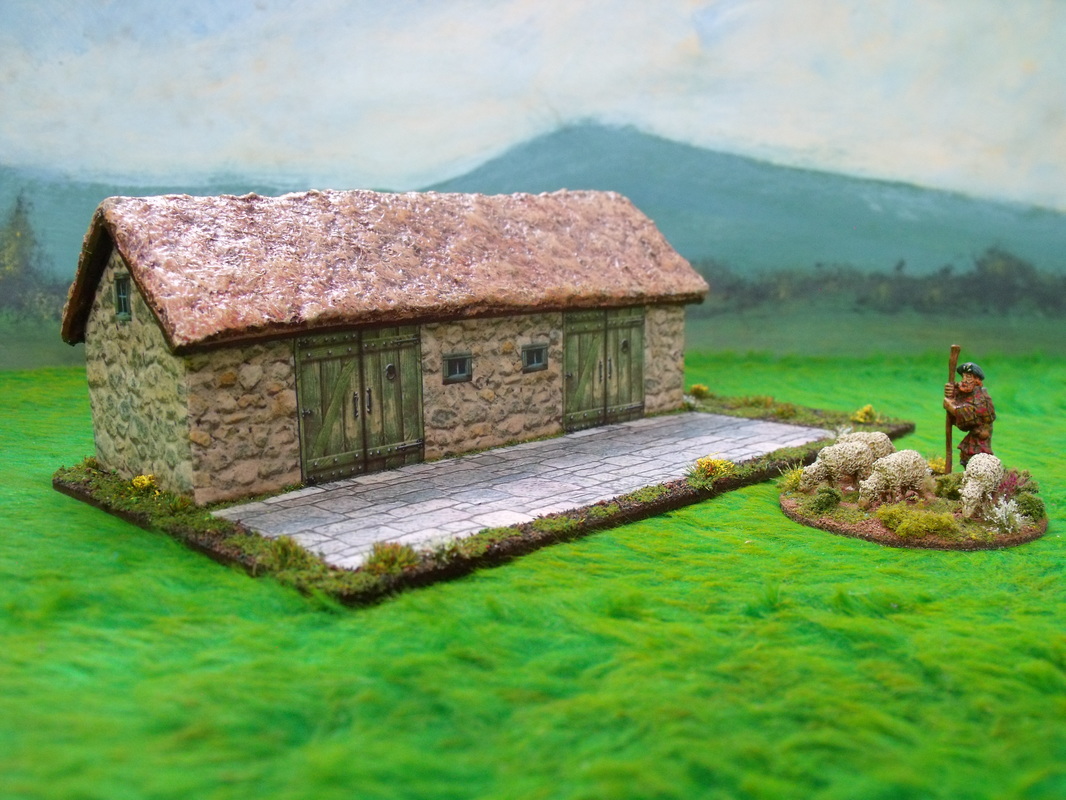
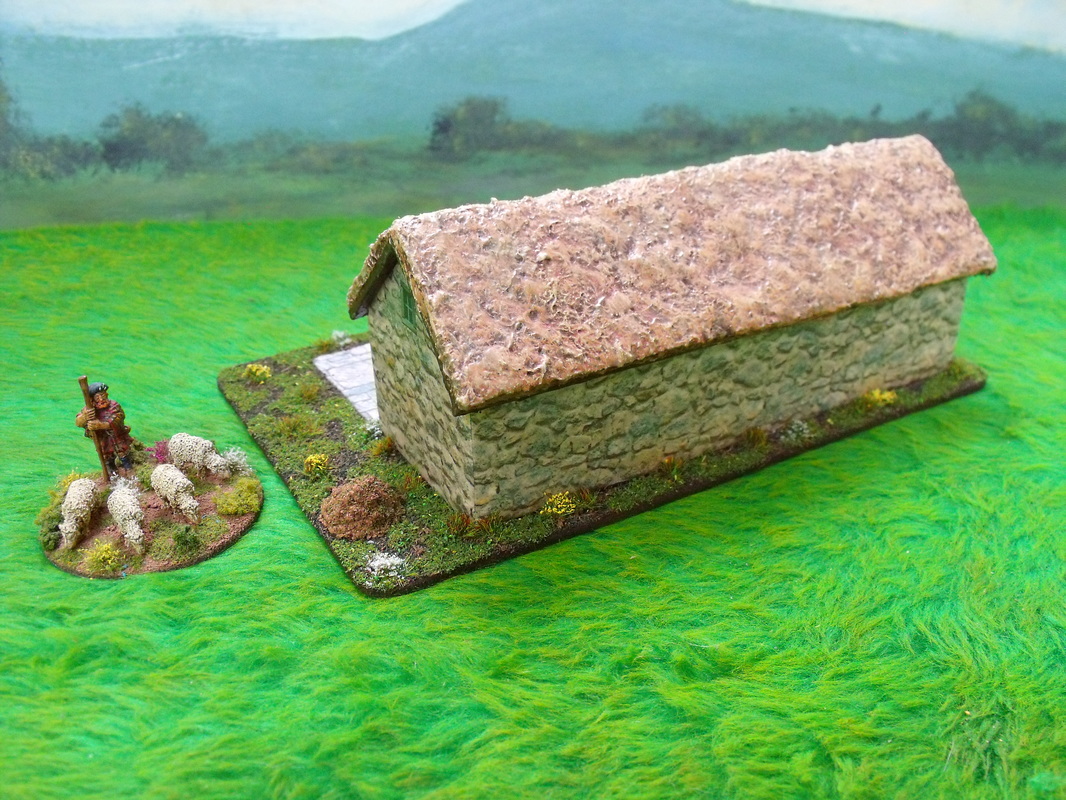
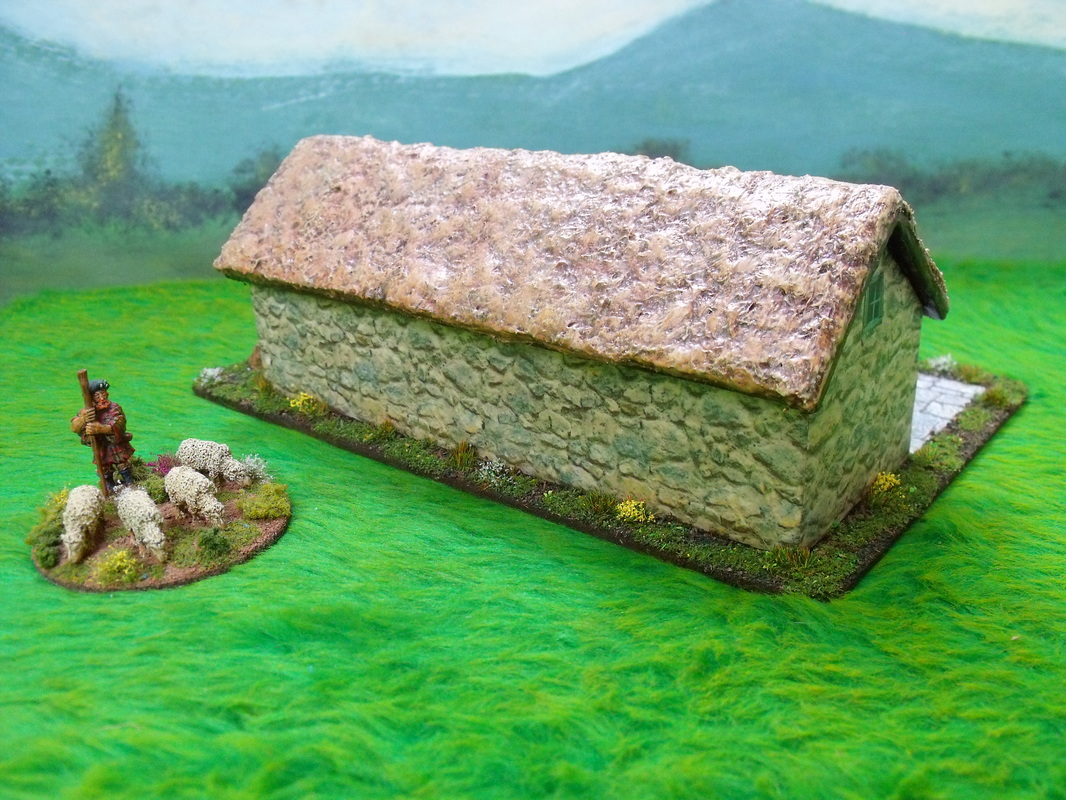
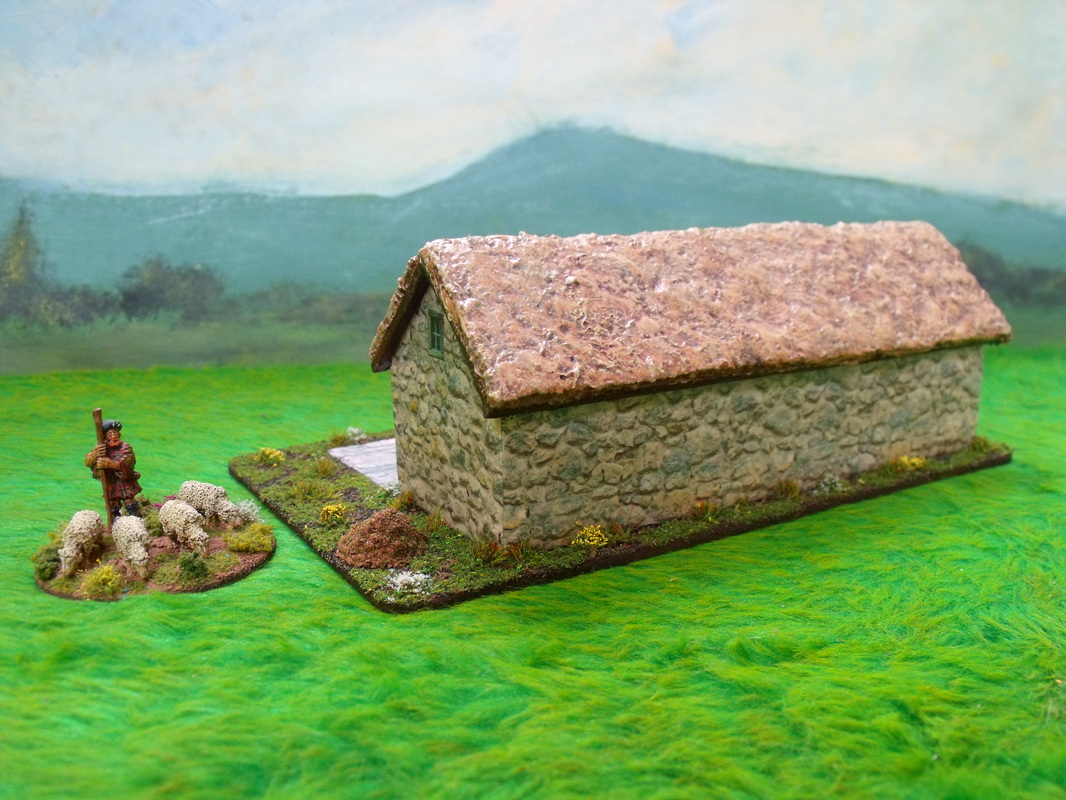
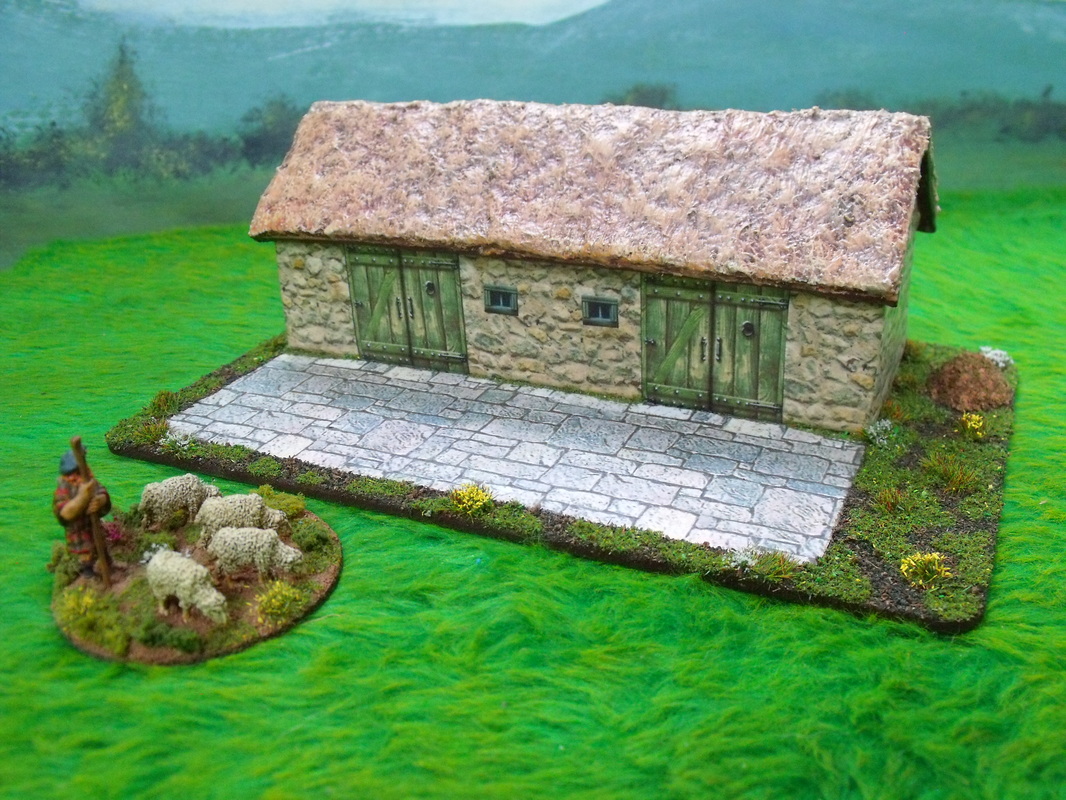
I made this Pigsty for my ECW collection a good while ago and decided to finish it off the other day by putting the groundwork around the structure and courtyard. The building itself is made of a polystyrene block cut to the right shape and wrapped in stone effect wallpaper with the doors and windows added later. The roof is felt lagging over thick card with a polyfilla wash over it and several coats of paint to give a nice thatch effect. The base is an off-cut of hardboard and the courtyard is again a stone effect paper and the groundwork is several layers of various shades of scatter material with some long grass and flower tufts added to make it look extra pretty. The pile of pig muck is strategically placed for an assassin to hide in just in case an enemy general decides to go looking for some free bacon. With all of my buildings I give them a coat of matt acrylic varnish or protection but sometimes a coat of matt solvent based varnish is required over that to really matt down such things as the shiny a thatch that was caused by the acrylic varnish. All in I am really pleased with the result and especially now that the thatch has had an extra coat of matt varnish.
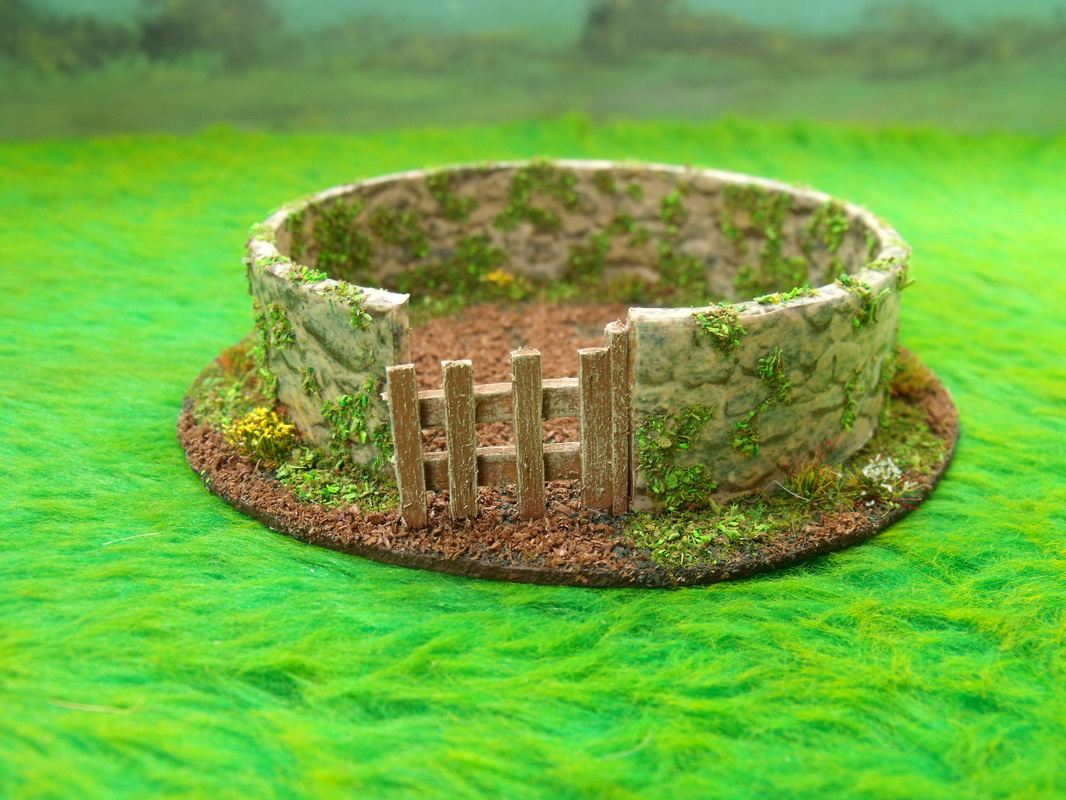
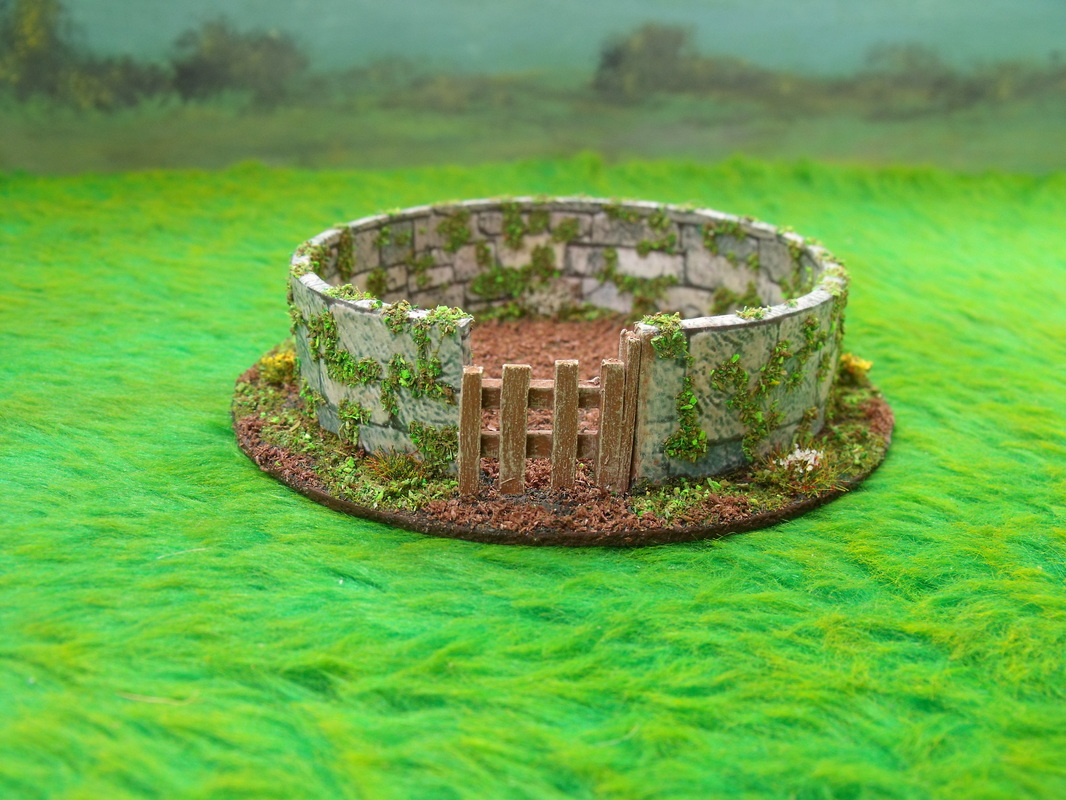
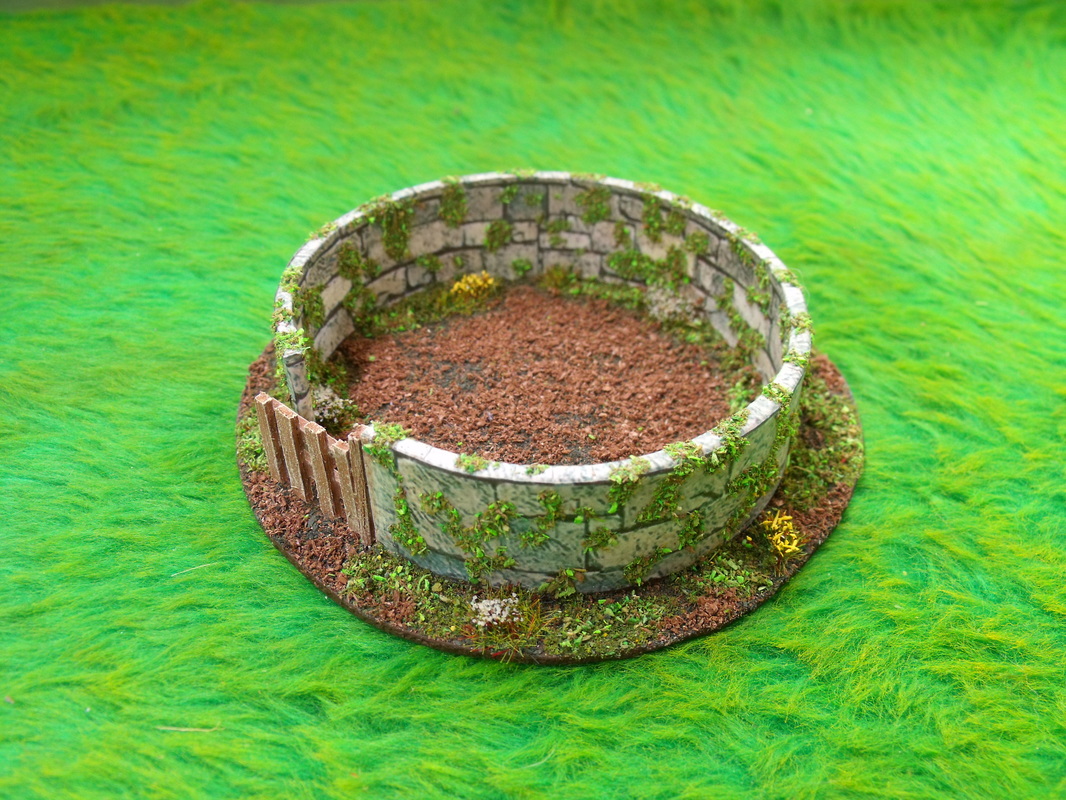
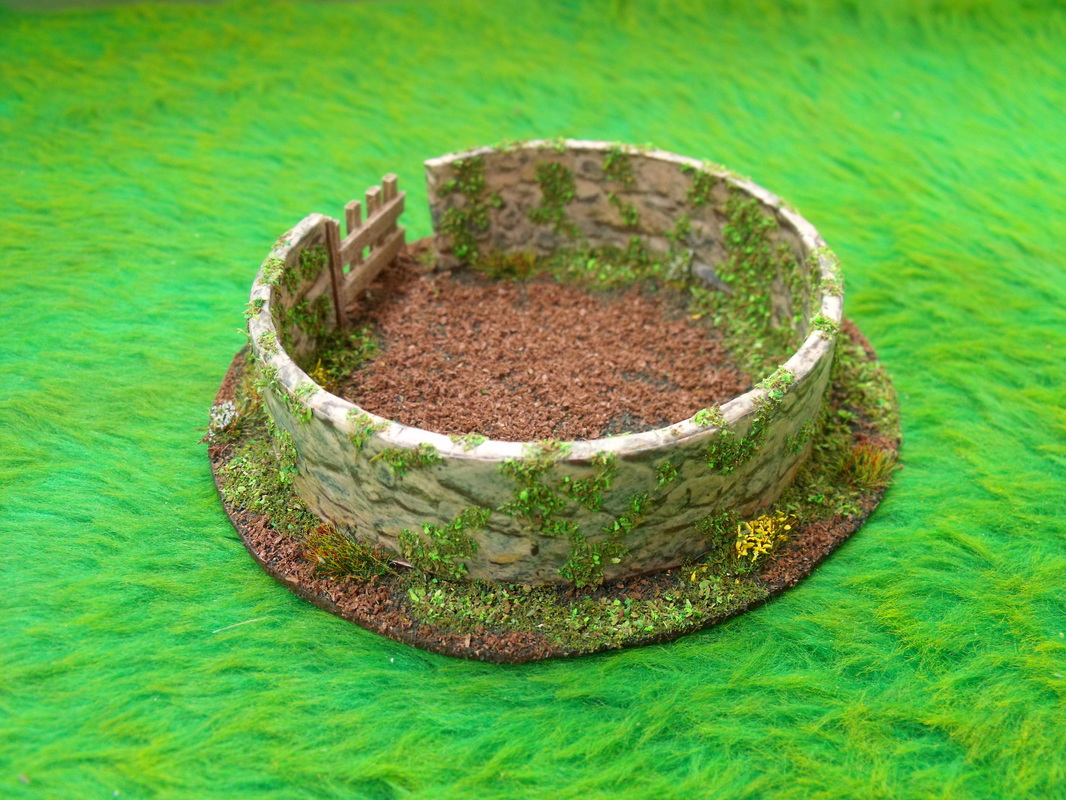
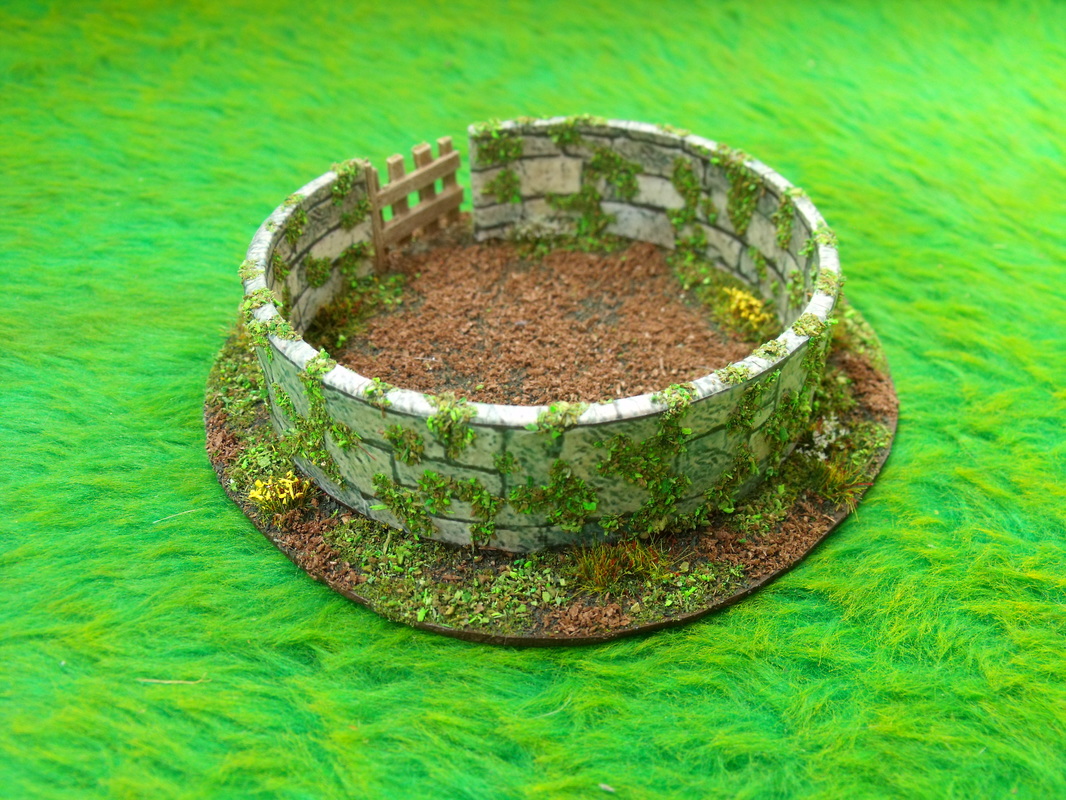
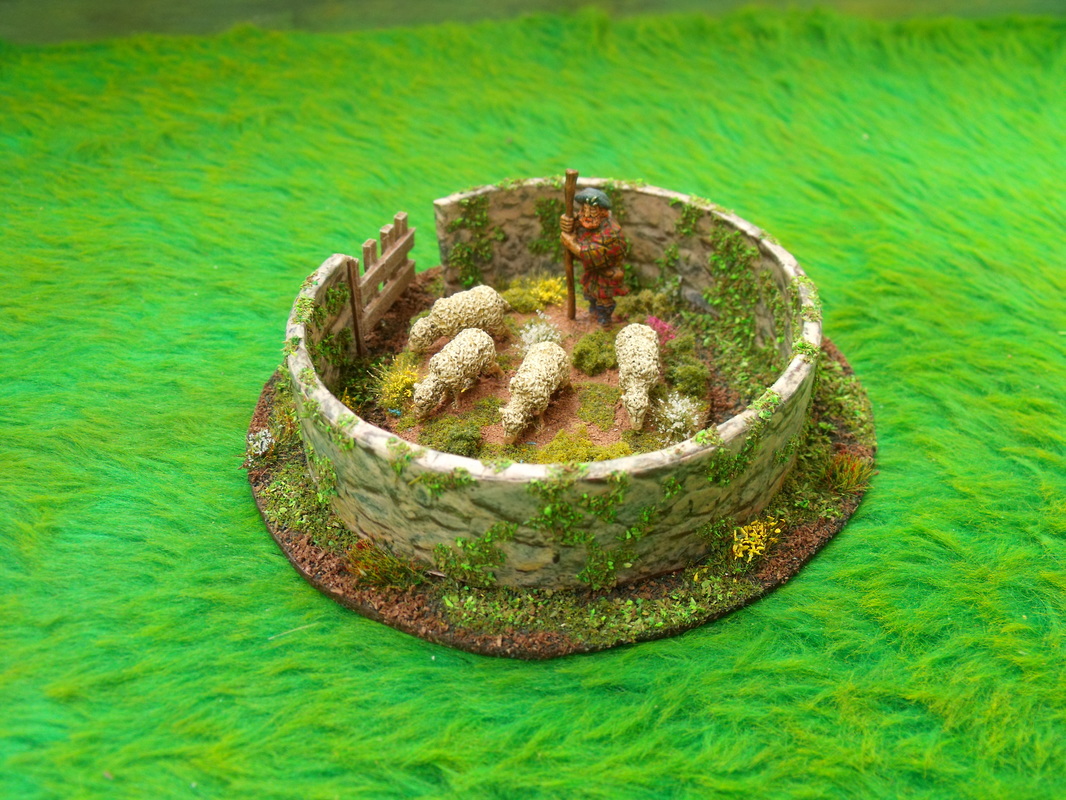
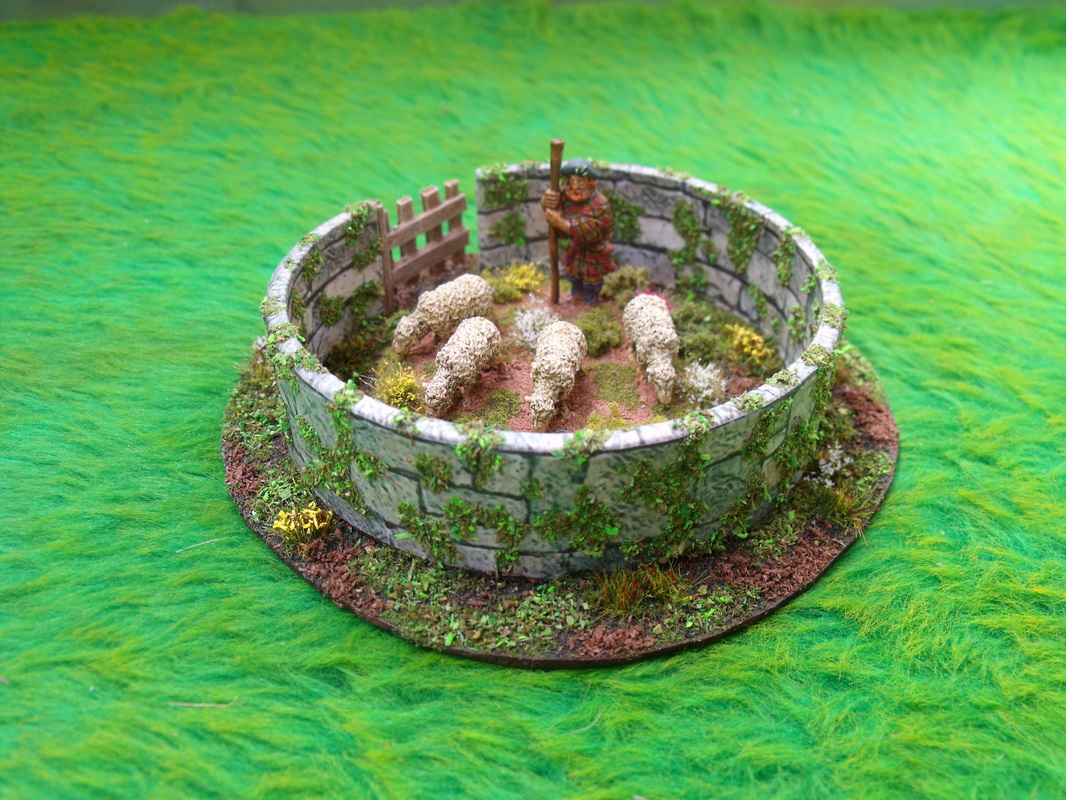
I decided to make some animal enclosures a few days ago for my ECW collection as part of a steadily growing number of rural building and scenic items that I am in the process of building. I was partly inspired by looking at the Warlord Games livestock pen and it seemed a nice and logical addition to the pig sty, barn and other rural buildings I had been working on. To make my livestock pens I simply took two 1" tall cardboard rolls saved from sellotape used at Xmas (although any similar size tube will do) and proceeded to snip them with clippers to make an opening. Then I teased them to make the opening bigger for a gateway and once done and roughly circular I then decided that I would cover them with stone effect paper. This was simple enough to do by cutting the paper in a strip that was about half inch deeper than the wall of the roll I simply painted the inside wall of the roll with PVA glue and then positioned and smoothed down the paper to cover the inside but allowing the overhang to be at the top of the roll. Once done I snipped the overhang at roughly 1/4" intervals and then applied more glue to the overhangs and smoothed them down so that they covered the top of the roll. The next thing to do was to trim off any slight overhang at the bottom with a sharp knife and then cut another strip of stone effect paper for the outside of the tube, this time allowing less overhang. Next I painted the outside of the roll with PVA glue and positioned the paper to that and smoothed it down, again trimming off any overhang at the bottom. At this stage (about 5 minutes after starting) you have a fully functional Livestock pen that can be put straight onto the table and used for a game if you wish to. I decided that I wanted a base for my pen so I positioned onto a Marley tile and marked around it making note of where the gate was positioned, from this I then drew a rough circle around this that was about 1/2" wider all the way around so I could add some scenery to the base. I used a sharp knife to score the tile and simply snapped off the excess and then trimmed up any rough bits so that it looked nice all the way round. At this stage I glued the pen down to the base with superglue and then painted the livestock pen with clear matt acrylic varnish to protect it (use solvent based varnish if your printing ink is not water resistant) from wear and tear. I then painted the complete base with dark brown paint and left it a few minutes to dry whilst I decided to make the second animal pen. by time the second pen was complete and the base painted the first coat of paint on the first pen was totally dry and ready for the second coat of brown paint and scatter material. I make my own scatter material, but for reference it is simply very dark brown in colour and simulates damp earth very nicely. I applied the brown paint again and this time threw on a load of scatter material and left it to dry while again I turned to the second pen and did the same scatter material effect on that. While I made a cup of tea the scatter had dried out and was ready for the long grass clumps and flowery bushes to be added, again these are home made and simply clumps of long scatter grass with coloured scatter material added for the flowers. These clumps are self adhesive so took no time at all to position and I did the first pen and then went straight on to doing the second pen. After that I diluted some PVA glue and applied it around the edges of the wall both inside and out of the pens and scattered with dark green grass scatter. Again at this stage you have a really serviceable livestock pen that looks nice, but I decided to go the extra mile to make it look even better. After leaving the scatter material to dry out I decided to lightly brush over the green scatter material with slightly diluted PVA glue and lightly scatter on a light green grass scatter material to add a contrast and highlight to the dark green tones of the first layer. Again I lightly brushed over the dark earth areas and again using a lighter colour I sprinkled lightly with a mid brown scatter material to highlight the earth areas. At this stage I decided to go for something a little different and applied neat PVA glue in little patches all over the walls of the pens both inside and out and applied green scatter material to simulate weeds, moss etc growing over the walls. I really liked the effect so I decided that the second pen would also have the same treatment. The last part of the projedt was to make gates for the pens and I did this with balsa wood, although matchsticks or even twigs could have bee used to make these. A quick coat of paint and a final lighter drybrush and I glued the gates in place with superglue and they were all finished and ready to use. Below are the fruits of my labour which was less than a hour in total to build and base both of the livestock pens.
Click on the Images to Enlarge
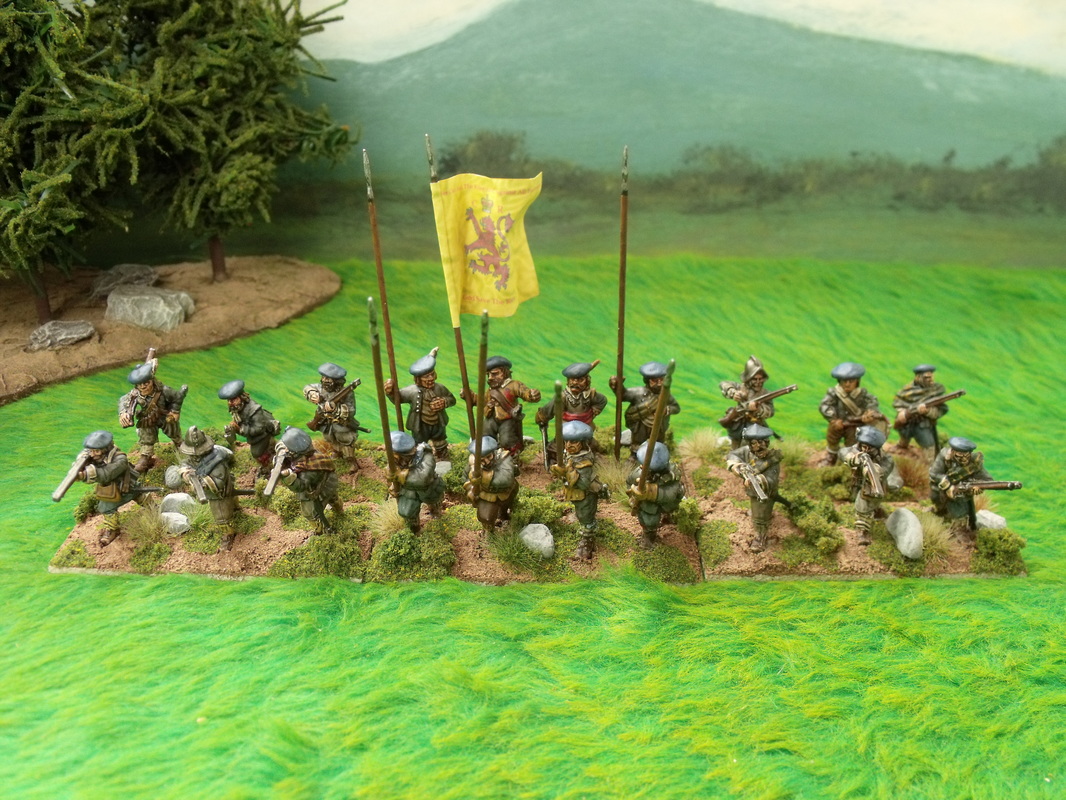
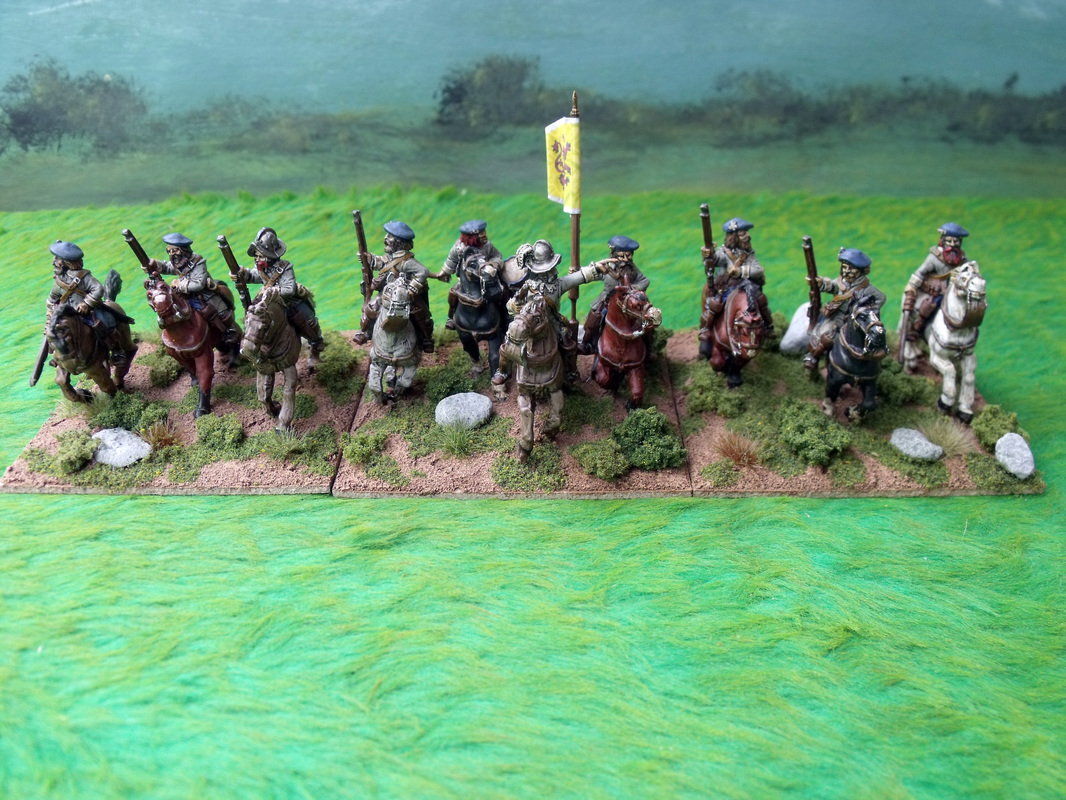
This is part 1 of the Pike & Shot combined unit rule amendments in a fancy dandy PDF format, I have also included the Characters PDF for anyone who hasn't downloaded it before. Many years ago long before Pike & Shotte rules were published I played ECW games with their forerunner rules Blackpowder, and initially I simply made each sub unit of pike and shot separate units as per the rules. This gave a decent game but I was never truly happy with the way that close combat worked out as a lot of 'silly' situations can occur when the units are divided up such as opposite pikes attacking just the musket armed sections of a battalia, or the musketeer wings deciding to move to another part of the battlefield without the pikes and other such nonsense. After many games I eventually settled on the more intuitive combined units which gave a much better game for the ECW period. When Pike & Shotte came along I thought that the combined unit approach would be taken up in this rule set but to my dismay it wasn't and so I decided to make my own rule amendments to cover this and to build upon what I had already started earlier. Personally I don't like the idea of separate units of pike or shot for the ECW period, although I can fully understand why the author opted for this approach especially for the earlier periods covered by the rule set. One of the lovely things about the Pike & Shotte rules is that you can easily adapt them to suit your personal preferences, and as such it is extremely easy to convert the infantry into units of mixed pike and shot. At that time Charles Singleton was one of our group of gamers and I believe that he is now actually working on an ECW supplement for Pike & Shotte rules which I very much look forward to reading and as such hope that he even adds rules for combined pike & shot units as we all definitely preferred them at the time. I have to say that I think that playing ECW as combined pike and shot units is much better than playing them as split units, especially for actions larger than a skirmish. My own 28mm ECW armies are arranged in smaller mixed units averaging about 20 figures in 2 ranks for foot or 10 figures in 1 rank for the horse both occupying the same frontage which is approximately 9 inches. Obviously I don't expect anyone else to follow my unit sizes but needless to say so long as the units are more or less the same frontage as each other it doesn't really matter what frontage you actually use. Large units are one third wider or 12 inches instead of 9 inches wide and smaller units ore one third narrower or 6 inches instead of 9 inches wide. Tiny units where used are reserved for small platoons of musketeers or small troops of lifeguard cavalry and are one third of the width of a normal unit or 3 inches wide. The rationale I use for the unit frontages is that pike and shot units were 6 ranks deep and an average 500-600 man regiment would have an approximate frontage of 150 yards and an average squadron of approximately 250-300 cavalry would be in 3 ranks and again have a frontage of around 150 yards. Obviously this is based on the normal unit size and large units would represent 700-800 infantry or 350-400 cavalry, small units would represent 300-400 infantry or 150-200 cavalry, and tiny units would represent 100-200 infantry or 50-100 cavalry. I use the following system for the fighting qualities which I feel give a really good game and don't adversely affect the effectiveness of either arm as the frontages and combat qualities have been adjusted to take into account the original relationships within the rules. Infantry Rules & Stats Pike & Shot (Small) HTH = 4, Shooting = 2, Morale = 4+, Stamina = 2, Points 28 Pike & Shot (Normal) HTH = 6, Shooting = 3, Morale = 4+, Stamina = 3, Points 36 Pike & Shot (Large) HTH = 8, Shooting = 4, Morale = 4+, Stamina = 4, Points 44 Shot only (Tiny) HTH = 1, Shooting = 2, Morale = 5+, Stamina =1, Points 17 Shot only (Small) HTH = 2, Shooting = 4, Morale = 5+, Stamina = 2, Points 26 Pike only (Tiny) HTH = 3, Shooting = 0, Morale= 4+, Stamina = 1, Points 19 Pike only (Small) HTH = 6, Shooting = 0, Morale = 4+, Stamina =2, Points 26 Storming Parties (Small) HTH = 4, Shooting = 2, Morale = 4+, Stamina =2, Points 28 Siege Engineers (Tiny) HTH = 1, Shooting = 0, Morale = 5+, Stamina =1, Points 13 Clubmen (Small) HTH = 2, Shooting = 0, Morale = 6+, Stamina = 2, Points 14 Clubmen (Normal) HTH = 3, Shooting = 1, Morale = 6+, Stamina = 3, Points 21 Clubmen (Largel) HTH = 4, Shooting = 2, Morale = 6+, Stamina = 4, Points 28 Highlanders (Small) HTH = 4, Shooting = 1, Morale = 5+, Stamina = 2, Points 17 Highlanders (Normal) HTH = 6, Shooting = 2, Morale = 5+, Stamina = 3, Points 24 Highlanders (Large) HTH = 8, Shooting = 3, Morale = 5+, Stamina = 4, Points 31 Kilponts Archers (Small) HTH = 2, Shooting = 2, Morale = 5+, Stamina = 2, Points 18 Kilponts Archers (Normal) HTH = 3, Shooting = 3, Morale = 5+, Stamina = 3, Points 25 For extra colour and variety I also add different ratios of pike to shot, without exchanging the actual figures I may add. Pike Heavy units add 1 to their HTH number and subtract 1 from the Shooting number. Shot Heavy units subtract 1 from their HTH number and add 1 to their Shooting number. Morale can also be varied to reflect better or worse armour or status such as: 5+ for units with really poor armour (basically just normal clothing) - 4pts, or 3+ for unusually well armoured or elite status units (although this I would use very rarely) +4pts. Stamina can be adjusted to reflect the fighting experience of units by giving veteran units an extra Stamina point +4 pts, or raw or particularly fragile units subtracting a Stamina point - 4pts. Shot only units represent platoons of musketeers or forlorn hopes of musketeers. Storming parties of mixed troop types are best represented using the same stats as small pike and shot units but without any benefits of having pikes. Highlanders are assumed to be mostly pistol armed so have a shorter shooting range of 6 inches. Any special rules that you wish to add are used as per the rule book and the points are applied as usual. Units shoot as a whole and only in exceptional circumstances do I allow a unit to split its fire, such as when straddled at close range by 2 units or when in 'Hedgehog' formation. With regard to 'Hedgehog' this is a matter of debate as to whether or not this actually ever existed as there is no hard proof that this was ever used in the ECW so it's omission from your games will not detract from the game at all. Cavalry should be disallowed from charging pike and shot frontally and if you want to implement a 'Hedgehog' rule for pike and shot being charged in the flank or rear by cavalry then it is easy to do so. Simply make a successful command roll as a result of a charge by cavalry and place a suitable marker next to the unit to say that it is in 'Hedgehog' formation, arranging your figures in a suitable way and counting it as a frontal pike and shot unit from all directions for the purposes of cavalry attacking them. The cavalry charging them can either choose to flow round and charge past the infantry, halt their charge and rally on the spot or even rally back their remaining charge move, but they may never contact the pike and shot unit. If the command roll is unsuccessful the cavalry are assumed to have made contact with the flank or rear of the pike and shot unit and the usual rules apply for such circumstances. Once in 'Hedgehog' the pike and shot unit has its shooting dice halved but may shoot from two different directions in the same turn although not at the same enemy unit, and if shot at by artillery the rules as written in the Pike & Shotte rule book apply. Personally I have never seen the need for the rule though as our cavalry is never in a position to attack infantry flanks or rear. Well that's it for now, but in part 2 I will detail the full rule amendments for cavalry and dragoons and also put up a full PDF version of these rule amendments for anyone that wants a fancier version to use alongside their rule book.
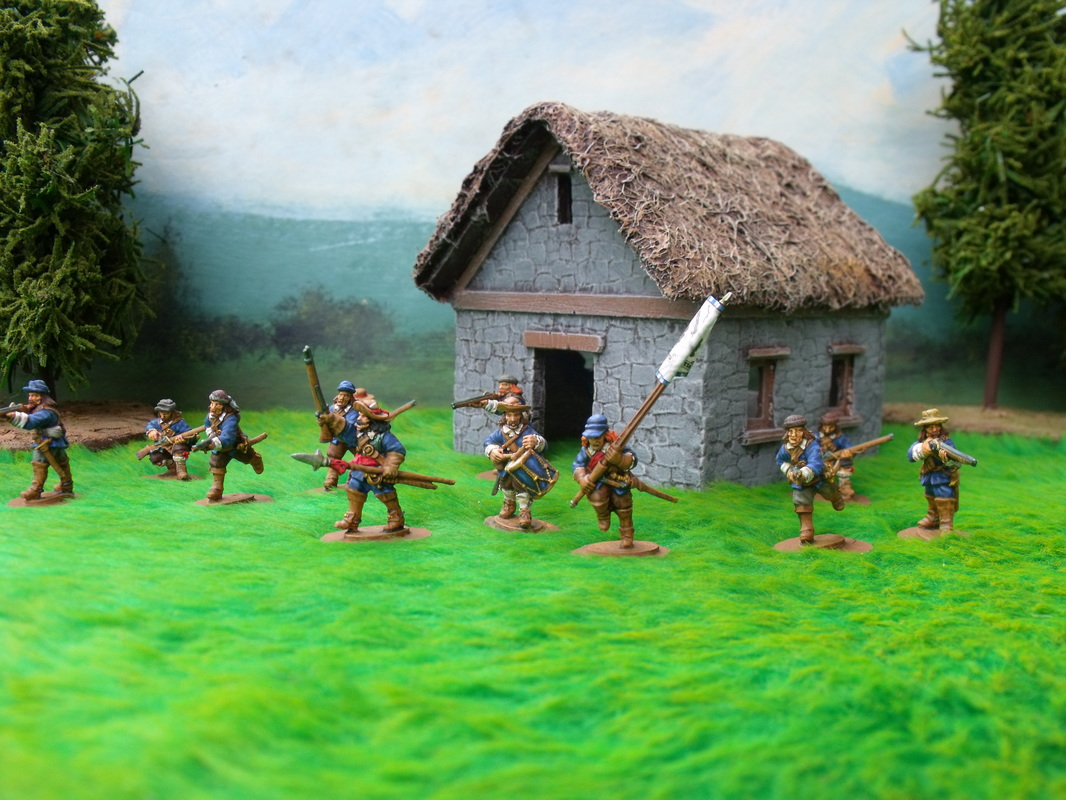
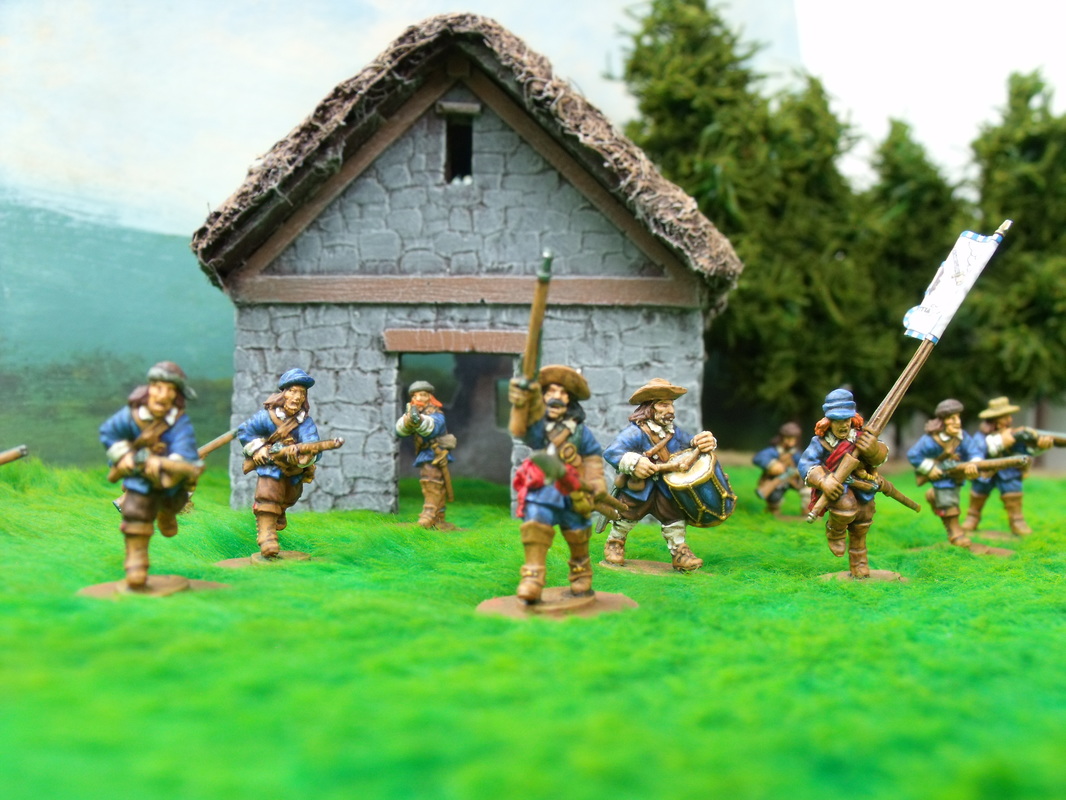
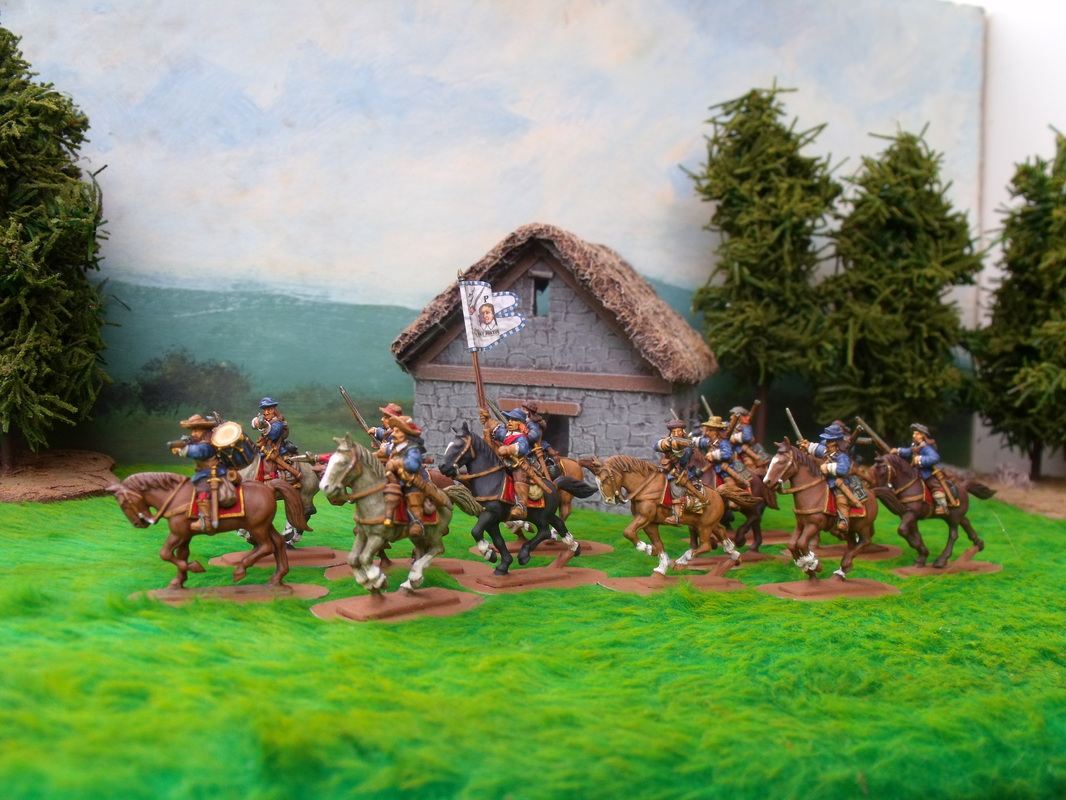
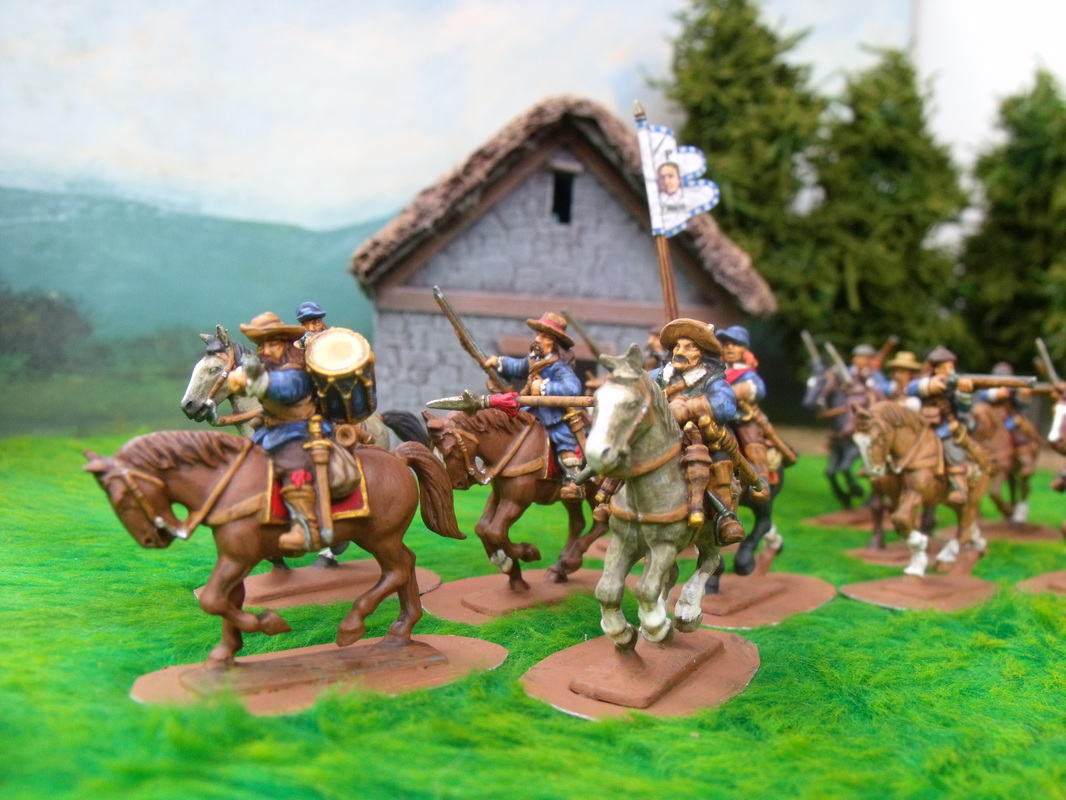
This is a Royalist regiment I painted a while ago for a customer to represent Henry Washington's Dragoons. The figures are Warlord Games and although the horses are far to big for the type of nag that dragoons usually had access to they are really nice figures to say the least and I do love the horses anyway. I didn't base them because the customer wanted to do this himself, so I just put them on temporary based for the pics to be taken. From what I have been able to find out from various sources they could have been red or blue uniformed and the flag was possibly white with the device as shown in the pics, so I made and printed the flag myself. At some point in the near future I will release this flag along with another variant or two with a future new Royalist cavalry sheet as part of my ECW collection of flags.
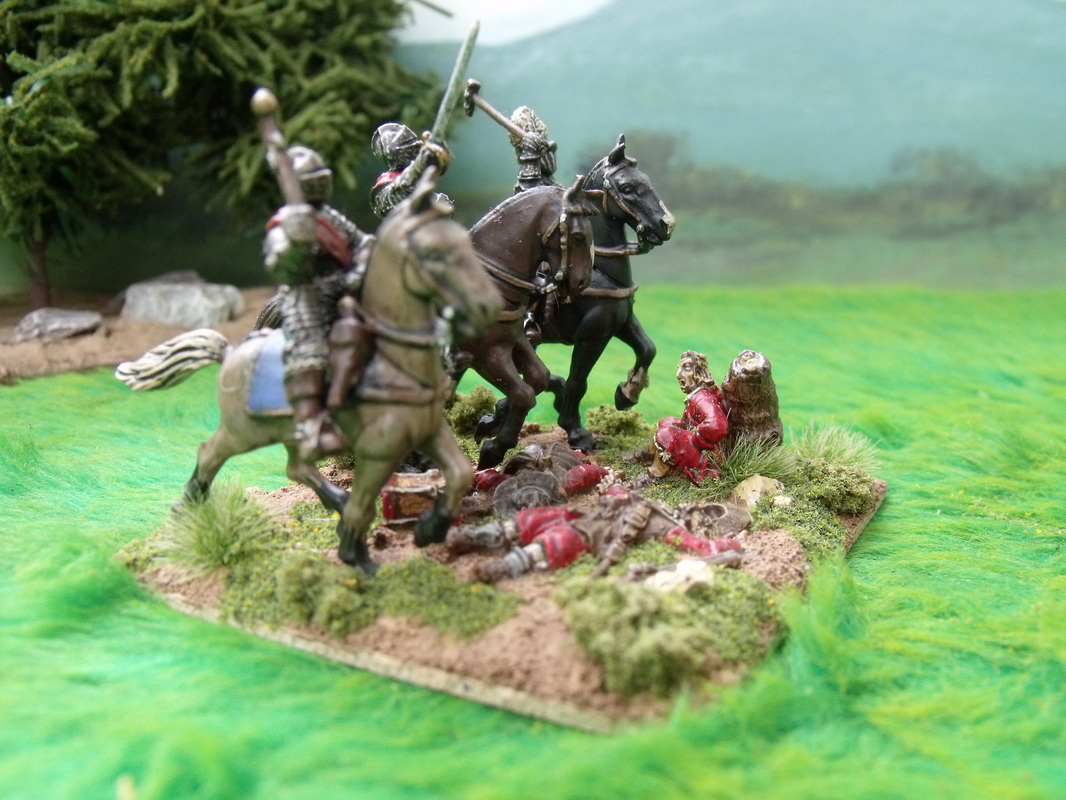
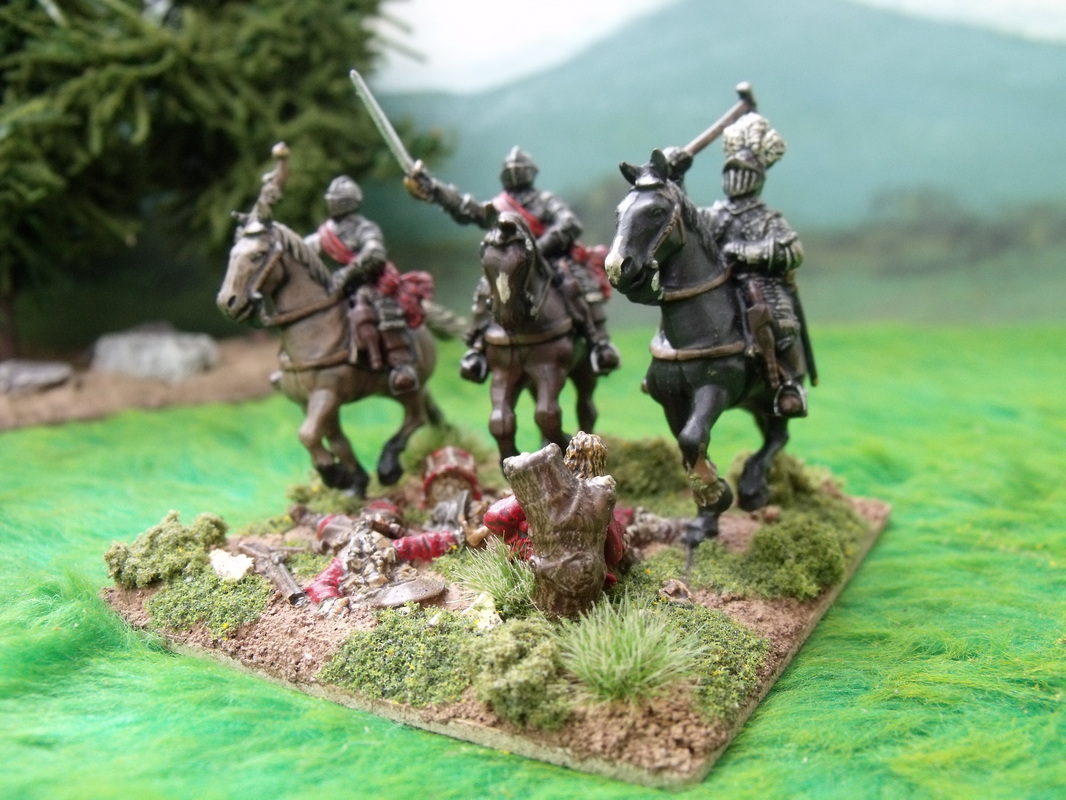
As it says in the title here are some more characters for use with Pike & Shotte or any ECW rules you wish to use them with. The Shepherd This Character is based as a single vignette with a flock of sheep. The Shepherd with his flock are placed mid way between the wings of cavalry on either flank as per the discretion of the owning player. Further to this roll one d6 to determine how many inches in from the flank the Shepherd is: d6 Effect 1 6 inches from flank edge 2-3 12 inches from flank edge 4-5 18 inches from flank edge 6 24 inches from flank edge Both wings of the armies must call a halt to hostilities until the Shepherd has safely moved off the table. The shepherd moves after both sides have completed their movement and travels at a speed of 6 inches per turn off towards the flank edge of the table until he is removed from play. No actions of any sort are allowed to the battalias or brigades on this flank that have any unit with 36 inches until such time that the Shepherd is off the table. The Shepherd vignette may be swapped out for a Gentleman walking his dogs, a travelling wagon, a group of civilians or any other similar group that takes your fancy. 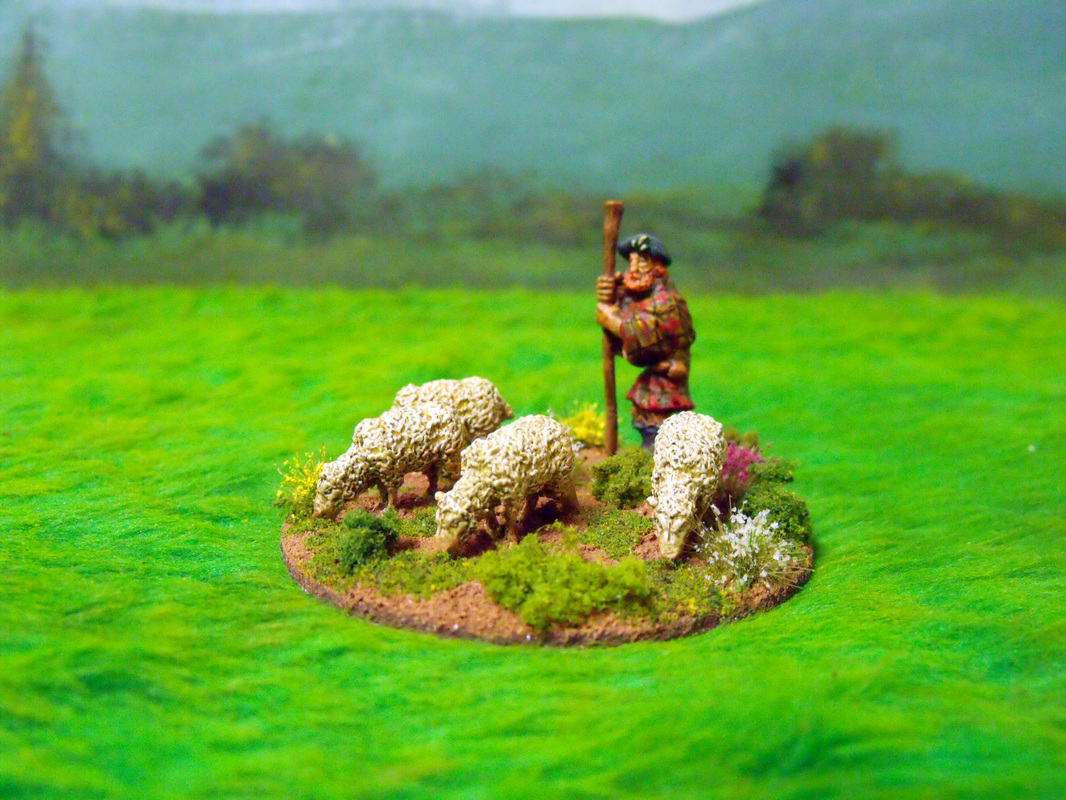 The Shepherd with his flock The Buffoon This Character is simply based as single vignette depicting any normal commander or general figure. The character is played upon your opponent at the start of the game after all deployment. Upon receiving this card off your opponent you must nominate one of your commanders and declare that he is the Buffoon for the rest of the game. Now that the commander is the Buffoon his command rating declines by one point such as from an 8 to a 7 and further to this each time this commander rolls dice to make an order he will Blunder on a roll of 11 or 12 following all the normal rules for Blunders. Once declared as the Buffoon, the commander cannot be swapped out for another commander or retired from the game unless injured in some way. He is blissfully unaware of his shortcomings and will carry on in his role as befits his rank. The rationale for Buffoons is that your general may not be quite as good as he led you to believe, or that he may on the day of battle be under the weather or still suffering the effects of last nights drinking bout. No matter how you want to explain it to yourself for the coming battle at least the general is not quite up to the task ahead. 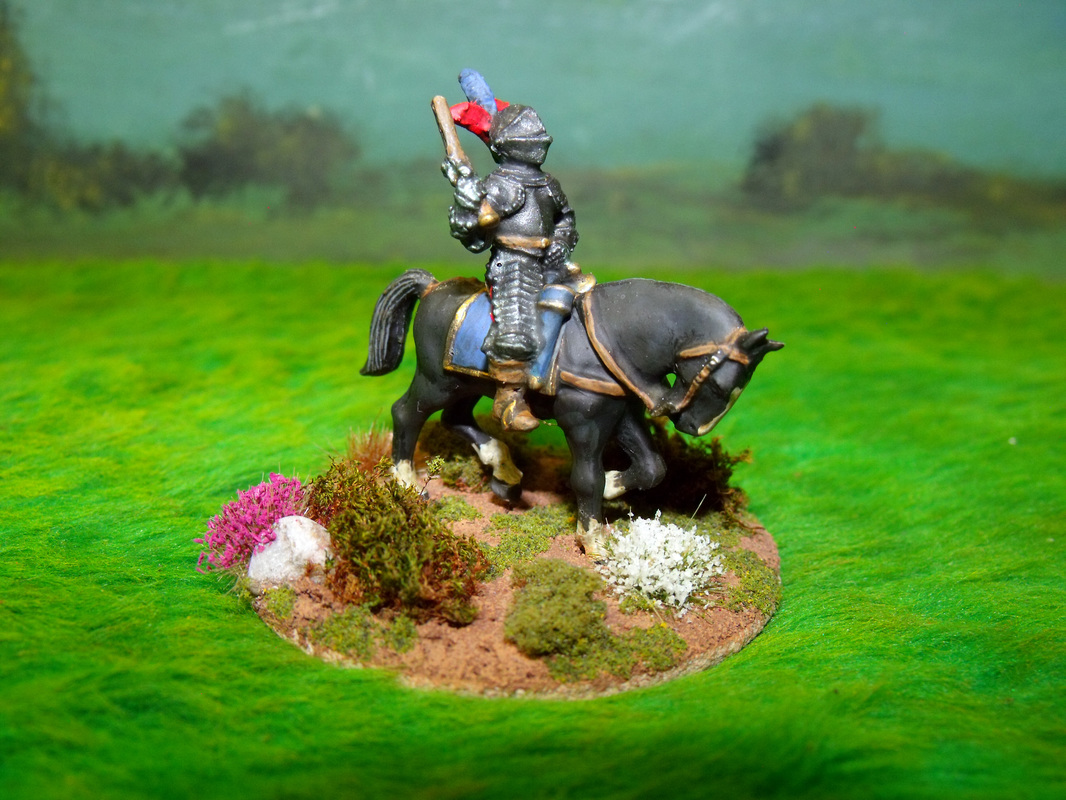 Unfortunately this general in his fine armour is a Buffoon The Assassin This Character is based as a single vignette which may or may not include a dung heap, bush or tree from which he leaps to make his deadly attack. The Assassin will hide in a predetermined spot until the enemy commander comes within 6 inches of his position, even if this is just passing by whilst moving from one place to the next. At this point the owning player declares that the Assassin has been activated and rolls one d6 with the following results: d6 Effect 1 The Assassin is killed outright and removed from play 2 The Assassin is wounded, captured and removed from play 3 The Commander is unhorsed and suffers a -1 to his command rating next turn 4 The Commander is unhorsed and suffers a -1 to his command rating for one d3 turns 5 The Commander is wounded and must receive treatment or else he will die 6 The Commander is killed outright and removed from play Placement of the Assassin is made after deployment and before the first turn begins, the owning player draws an accurate map of exactly where the Assassin is to be placed and this must be on a terrain feature that could give natural cover. Suitable terrain would be hedges, walls, ditches, river or stream banks, under a bridge or in a building, fields, copse or orchard, marsh or broken ground, or any other similar terrain type. The Assassin may not be placed in the enemy deployment zone for obvious reasons and may not be placed within 6 inches of any enemy unit. If an enemy unit moves over the position where the Assassin is hiding then there is a chance that he is discovered. The enemy player is cordially asked to roll one d6 after by the owning player without being told the location or which unit has moved onto the Assassin, and on a score of 6 the Assassin is discovered and captured. This is done each time a unit moves over on stays on the Assassin's position. Remember that the Assassin is very well hidden and is sneakily trying to avoid capture at any cost. Once he has been discovered or used the Assassin is removed from play. 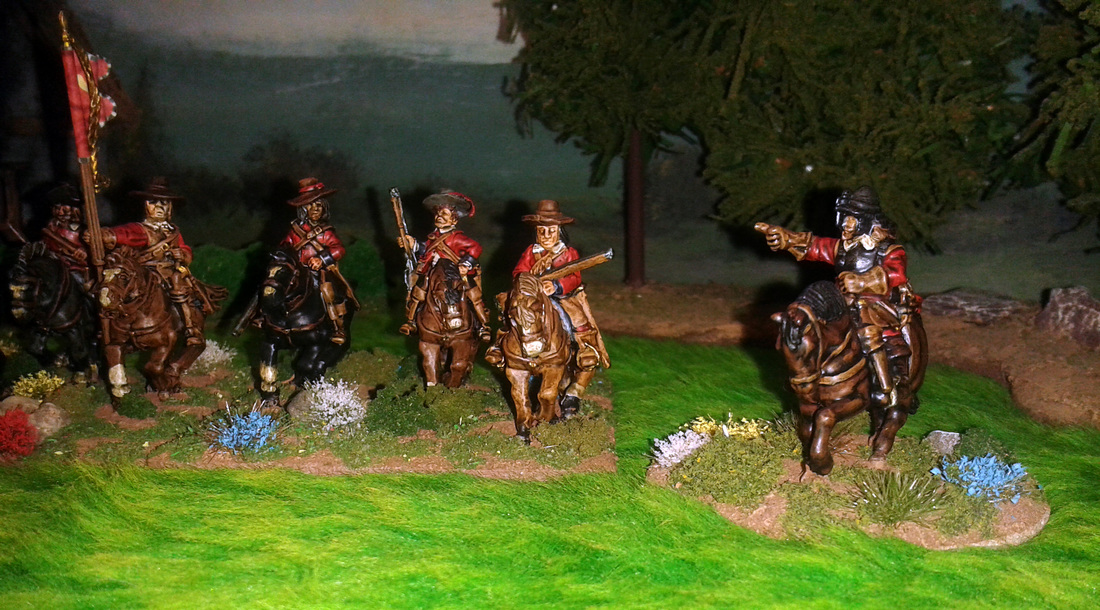 'Don't worry lads, I am safe here by these trees, you lot go and check out that building over there.' If you wish to download a fancy dandy PDF version of these Characters, including the original three Characters, then click on the link below.
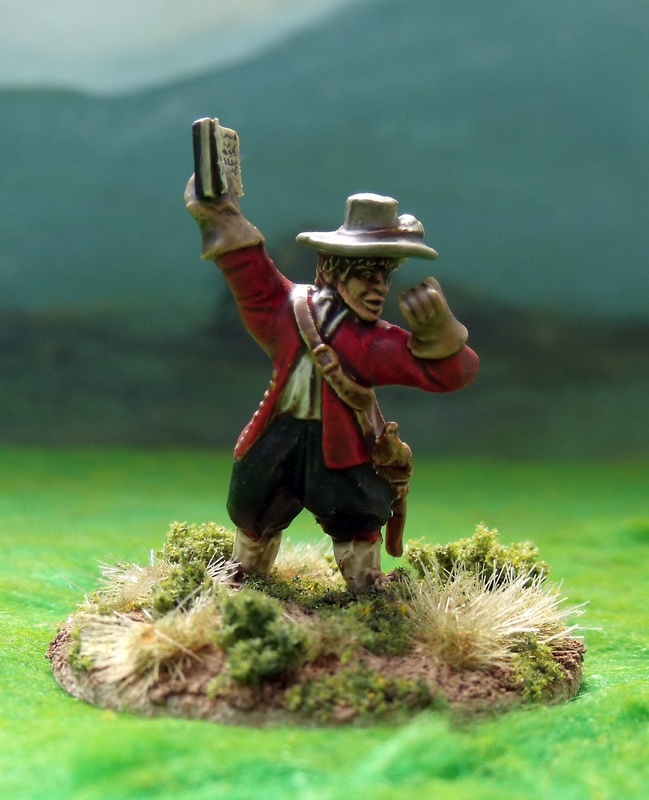
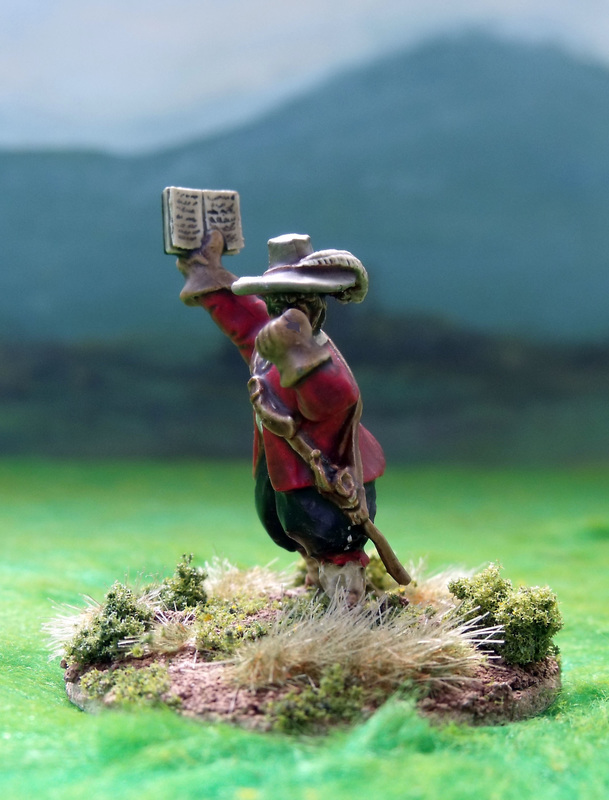
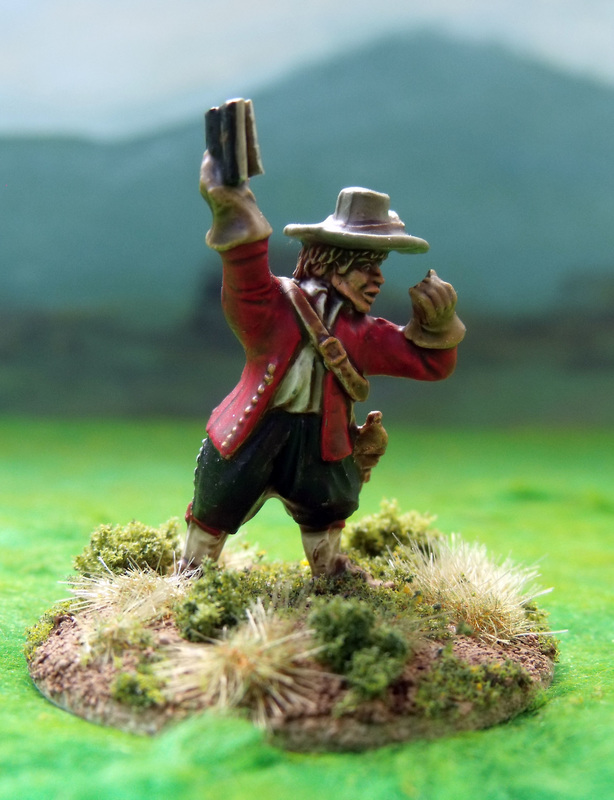
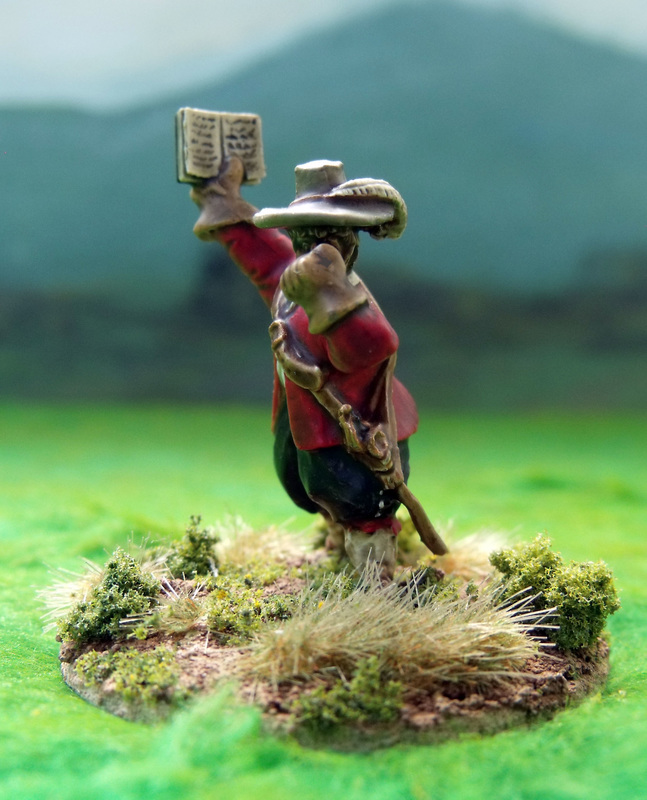
This is my attempt to bring useful characters of all types for use with the excellent Pike & Shotte rules from Warlord Games. My rationale being that not only does this add to the flavour of the game and period but it also serves to find a use for some of the splendid vignettes and character figures available from all sorts of manufacturers other than being purely aesthetic. I will over the course of the next few weeks or months be adding many characters as I write rules for them and also paint up my own versions of each for use within my own ECW games. Most characters would be of beneficial use for the army but I also have some ideas for characters that the opponent plays on you in order to cause mischief and mayhem in your army. If anyone has similar ideas for new characters please let me know and I will put them on here and obviously credit you for them. Okay with further ado here is my first offering. The Preacher/Agitator This Character figure is based as a single foot or mounted figure and obviously if he is on foot he will be with a unit of foot or if mounted he will be with a mounted unit. He must be placed next to a unit at the start of a game which he remains with until the end of the game, unless he is killed. He can only affect one unit this being the unit he is attached to and he will affect them in the following manner: At the start of each turn during the unit's command phase roll 1 d6 and if the score is a 6 the Preacher/Agitator has made a stirring speech that rouses the troops in the unit he is with, roll another d6 for the effect in the table below. d6 Effect 1 The unit gains the Eager trait for the rest of the battle 2 The unit gains the Steady trait for the rest of the battle 3 The unit gains the Brave trait for the rest of the battle 4 The unit gains the Valiant trait for the rest of the battle 5 The unit gains the Stubborn trait for the rest of the battle 6 The unit gains the Fanatic trait for the rest of the battle If the unit already has the trait that it has just received on the above table, then the roll is wasted as you cannot have the same trait twice.
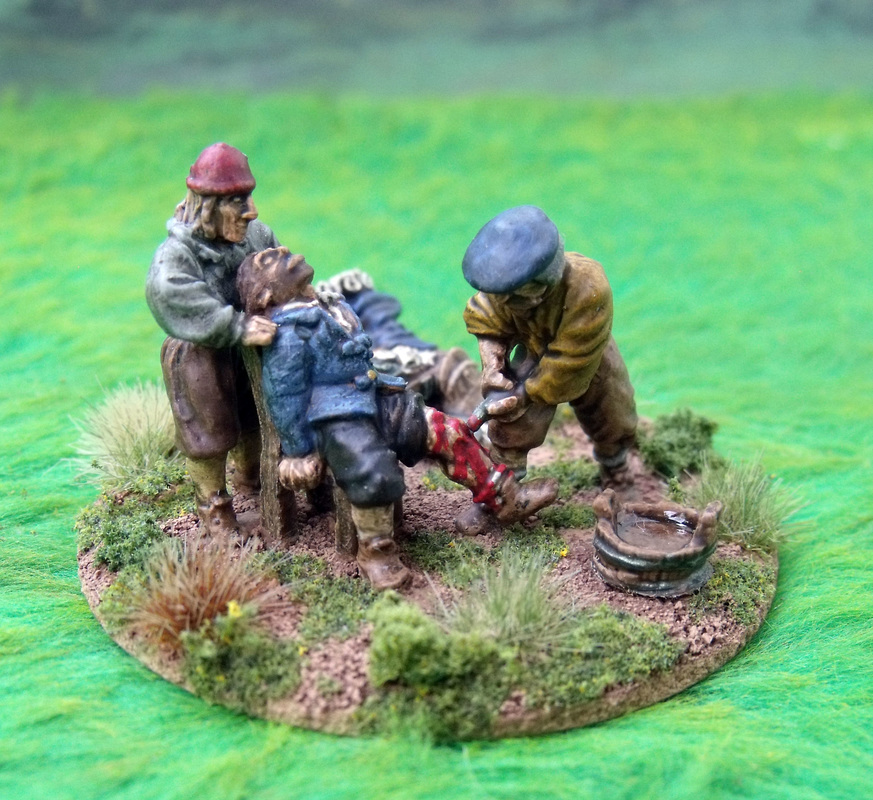
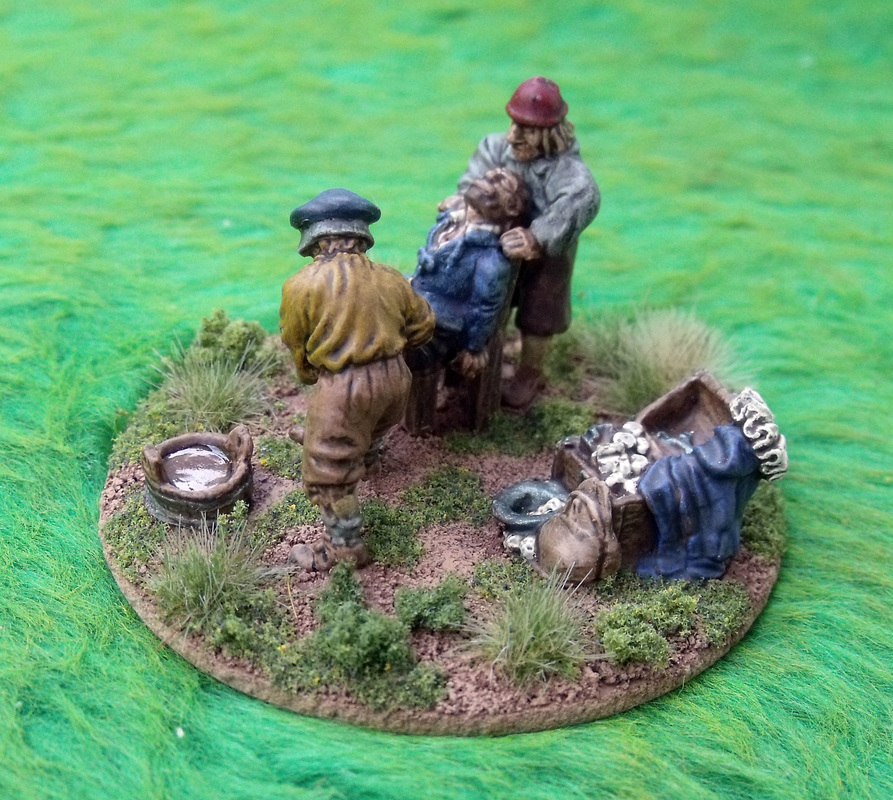
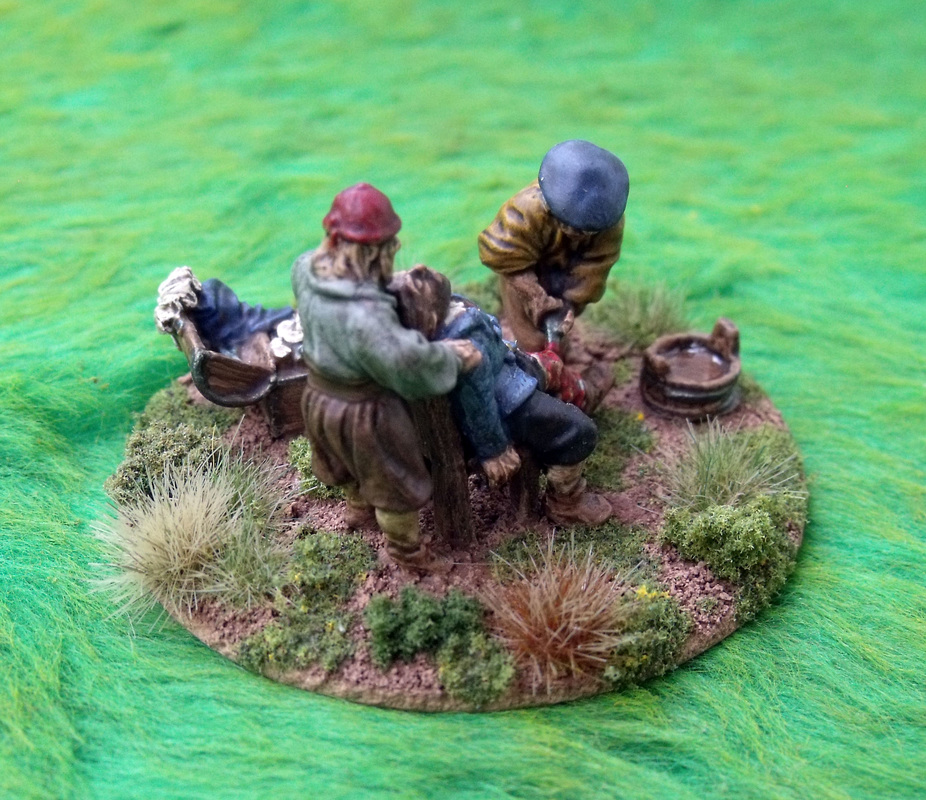
The Barber Surgeon This Character figure is based as a single vignette with the tools of his trade, an assistant and probably also an unwilling patient. He must be placed next to the baggage, camp or similar defensive position at the rear of the army that would be suitable for him to ply his trade. Once in this position he may never move unless the baggage train is fleeing the table in which case he may move off the table too. If a commander figure has fallen casualty place the commanders base next to the base of the Barber Surgeon and in the next orders phase for the commanders battalia roll 1 d6 for the effect in the table below: d6 Effect 1 The commander dies from his wounds, remove him completely 2 The commander his too badly wounded to recover for this battle, remove him completely 3-4 The commander is being treated, roll again in the next command phase 5-6 The commander has had his wounds treated, he may make his way back to his battalia Whilst the commander is being treated a substitute commander will obviously be leading his troops, once he is back the substitute will be removed from play. It may take the commander several turns to be treated and several more turns to get back to his battalia afterwards, but this is simply the price of being incapacitated. The Barber Surgeon only ever treats command figures and no other characters or figures, this is because only commanders were of a high enough importance to receive any sort of medical assistance.
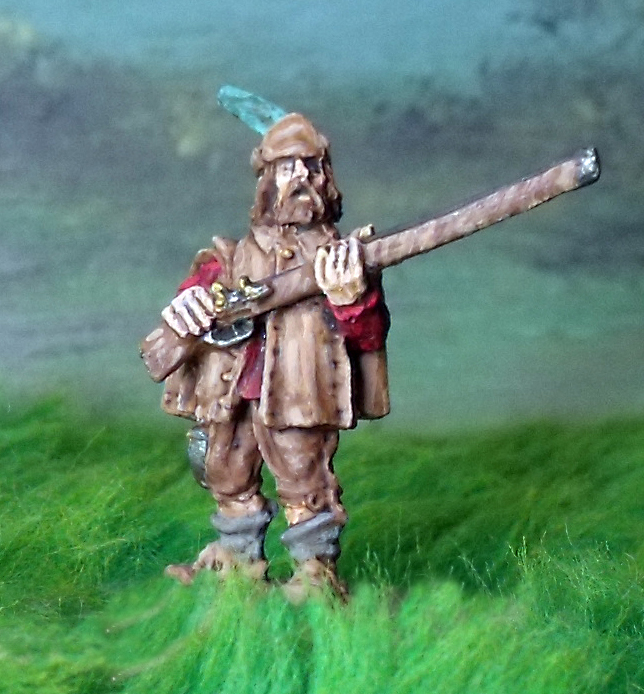
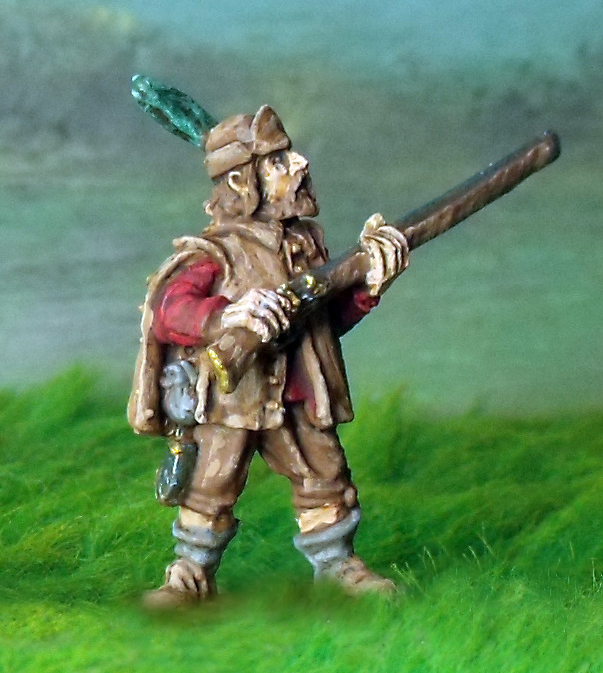
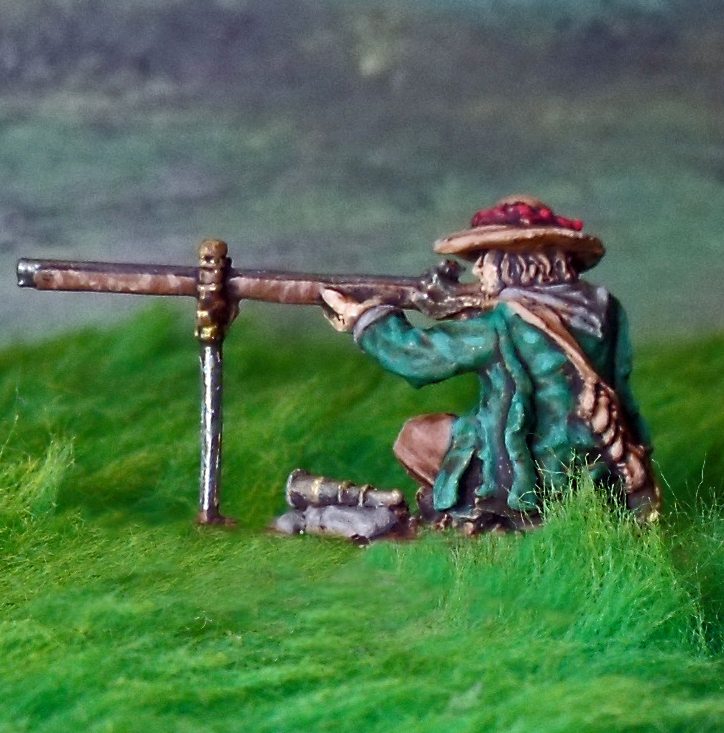
The Sniper This character is based as a single vignette with a suitable long barrelled musket. He must be placed in a suitable vantage point (a church tower is always good) before the game begins and stays there until he is needed. His weapon has a range of 24 inches and he always hits on a score of 4+ with one d6 for shooting purposes each turn. He can target any unit as well as command figures and other character models. If foot, mounted or artillery are hit the Snipers shot they must attempt to save as per normal for being shot at, if they fail their morale save the unit becomes disordered rather than actually taking a casualty. This simulates the confusion caused by him shooting at officers etc. within the unit. If command figures are hit by the Snipers shot they receive a -1 to their command rolls for the next turn, this simulates the confusion and panic caused by the musket balls whizzing past the commanders ears. If the command figure is hit on a score of 6 he has fallen casualty and removed from the battlefield or taken to the Barber Surgeon if you have one. If any other character is hit by the Snipers shot then they take cover and are not allowed to use their special abilities in their next turn, again this simulates the confusion and panic caused by the musket balls whizzing past the characters ears. If the character is hit on a score of 6 he has fallen casualty and removed from the battlefield. A Sniper cannot be targeted by any unit or other Sniper until he has revealed his position to the enemy by firing a shot or his position is contacted by an enemy foot or mounted unit. To hit a Sniper with shooting from any foot, mounted or artillery a 6 is required to hit them and once done they are assumed to run off or be killed, so remove them from the battlefield. If the Sniper is contacted by a unit as per hand to hand combat, he is assumed to run off, be captured or killed, so remove the figure from the battlefield. If the Sniper is shot at by another Sniper then he follows the rules as per any other character being shot at by a Sniper.
Below is a PDF link so that you can download them as fancy dandy character sheets for your Pike & Shotte Games.
|
AuthorStephen Wylde BA (hons) Archives
July 2022
Categories
All
ECW Blogs
ECW Sites
|


 RSS Feed